


Hardware components | ||||||
| × | 1 | ||||
 |
| × | 1 | |||
| × | 1 | ||||
 |
| × | 4 | |||
Software apps and online services | ||||||
 |
| |||||
 |
| |||||
Hand tools and fabrication machines | ||||||
 |
| |||||
I made a rhythmic nightlight device using a single-chip microcontroller with a 6-axis IMU, which responds to the IMU’s movements. The idea first came to me while watching light animations, or more precisely, one night by the sea when I saw the blue tears along the shore -- Blue tears are a marine bioluminescent phenomenon mostly caused by noctiluca scintillans. These plankton flash bright blue when disturbed by waves. I thought: if I could bring this scene home, set it on my desk, and even hold it in my hand, it would be such a wonderful experience!
I planned these lighting effects::
- Neon, deep-sea blue, sky cyan, flowing purple, and other light patterns.
- An undulating wave effect reminiscent of the ocean.
- Light shifts following the direction of gravity.
- Low-power wake-up via IMU motion and button trigger.
However, I ran into a few issues along the way. Since I only wanted a compact gadget I could pick up and play with, I decided not to add peripherals such as Bluetooth or Wi-Fi — honestly, I didn’t want to add them anyway, haha. That meant I needed to find an MCU with an on-board IMU for this project. After some research, I settled on the XIAO STM32C5. This XIAO comes with a built-in IMU and PWM temperature compensation. The temperature compensation feature, in particular, helps counteract drift during extended runtime, though I didn’t end up using it in this project. As a bonus, it also integrates lithium battery management and charging circuits, which is really handy!
The final implementation idea is as follows: read the on-board IMU data from the XIAO STM32C5, fuse and process the data, then map the result to the WS2812 LED matrix to create a flowing ocean effect.
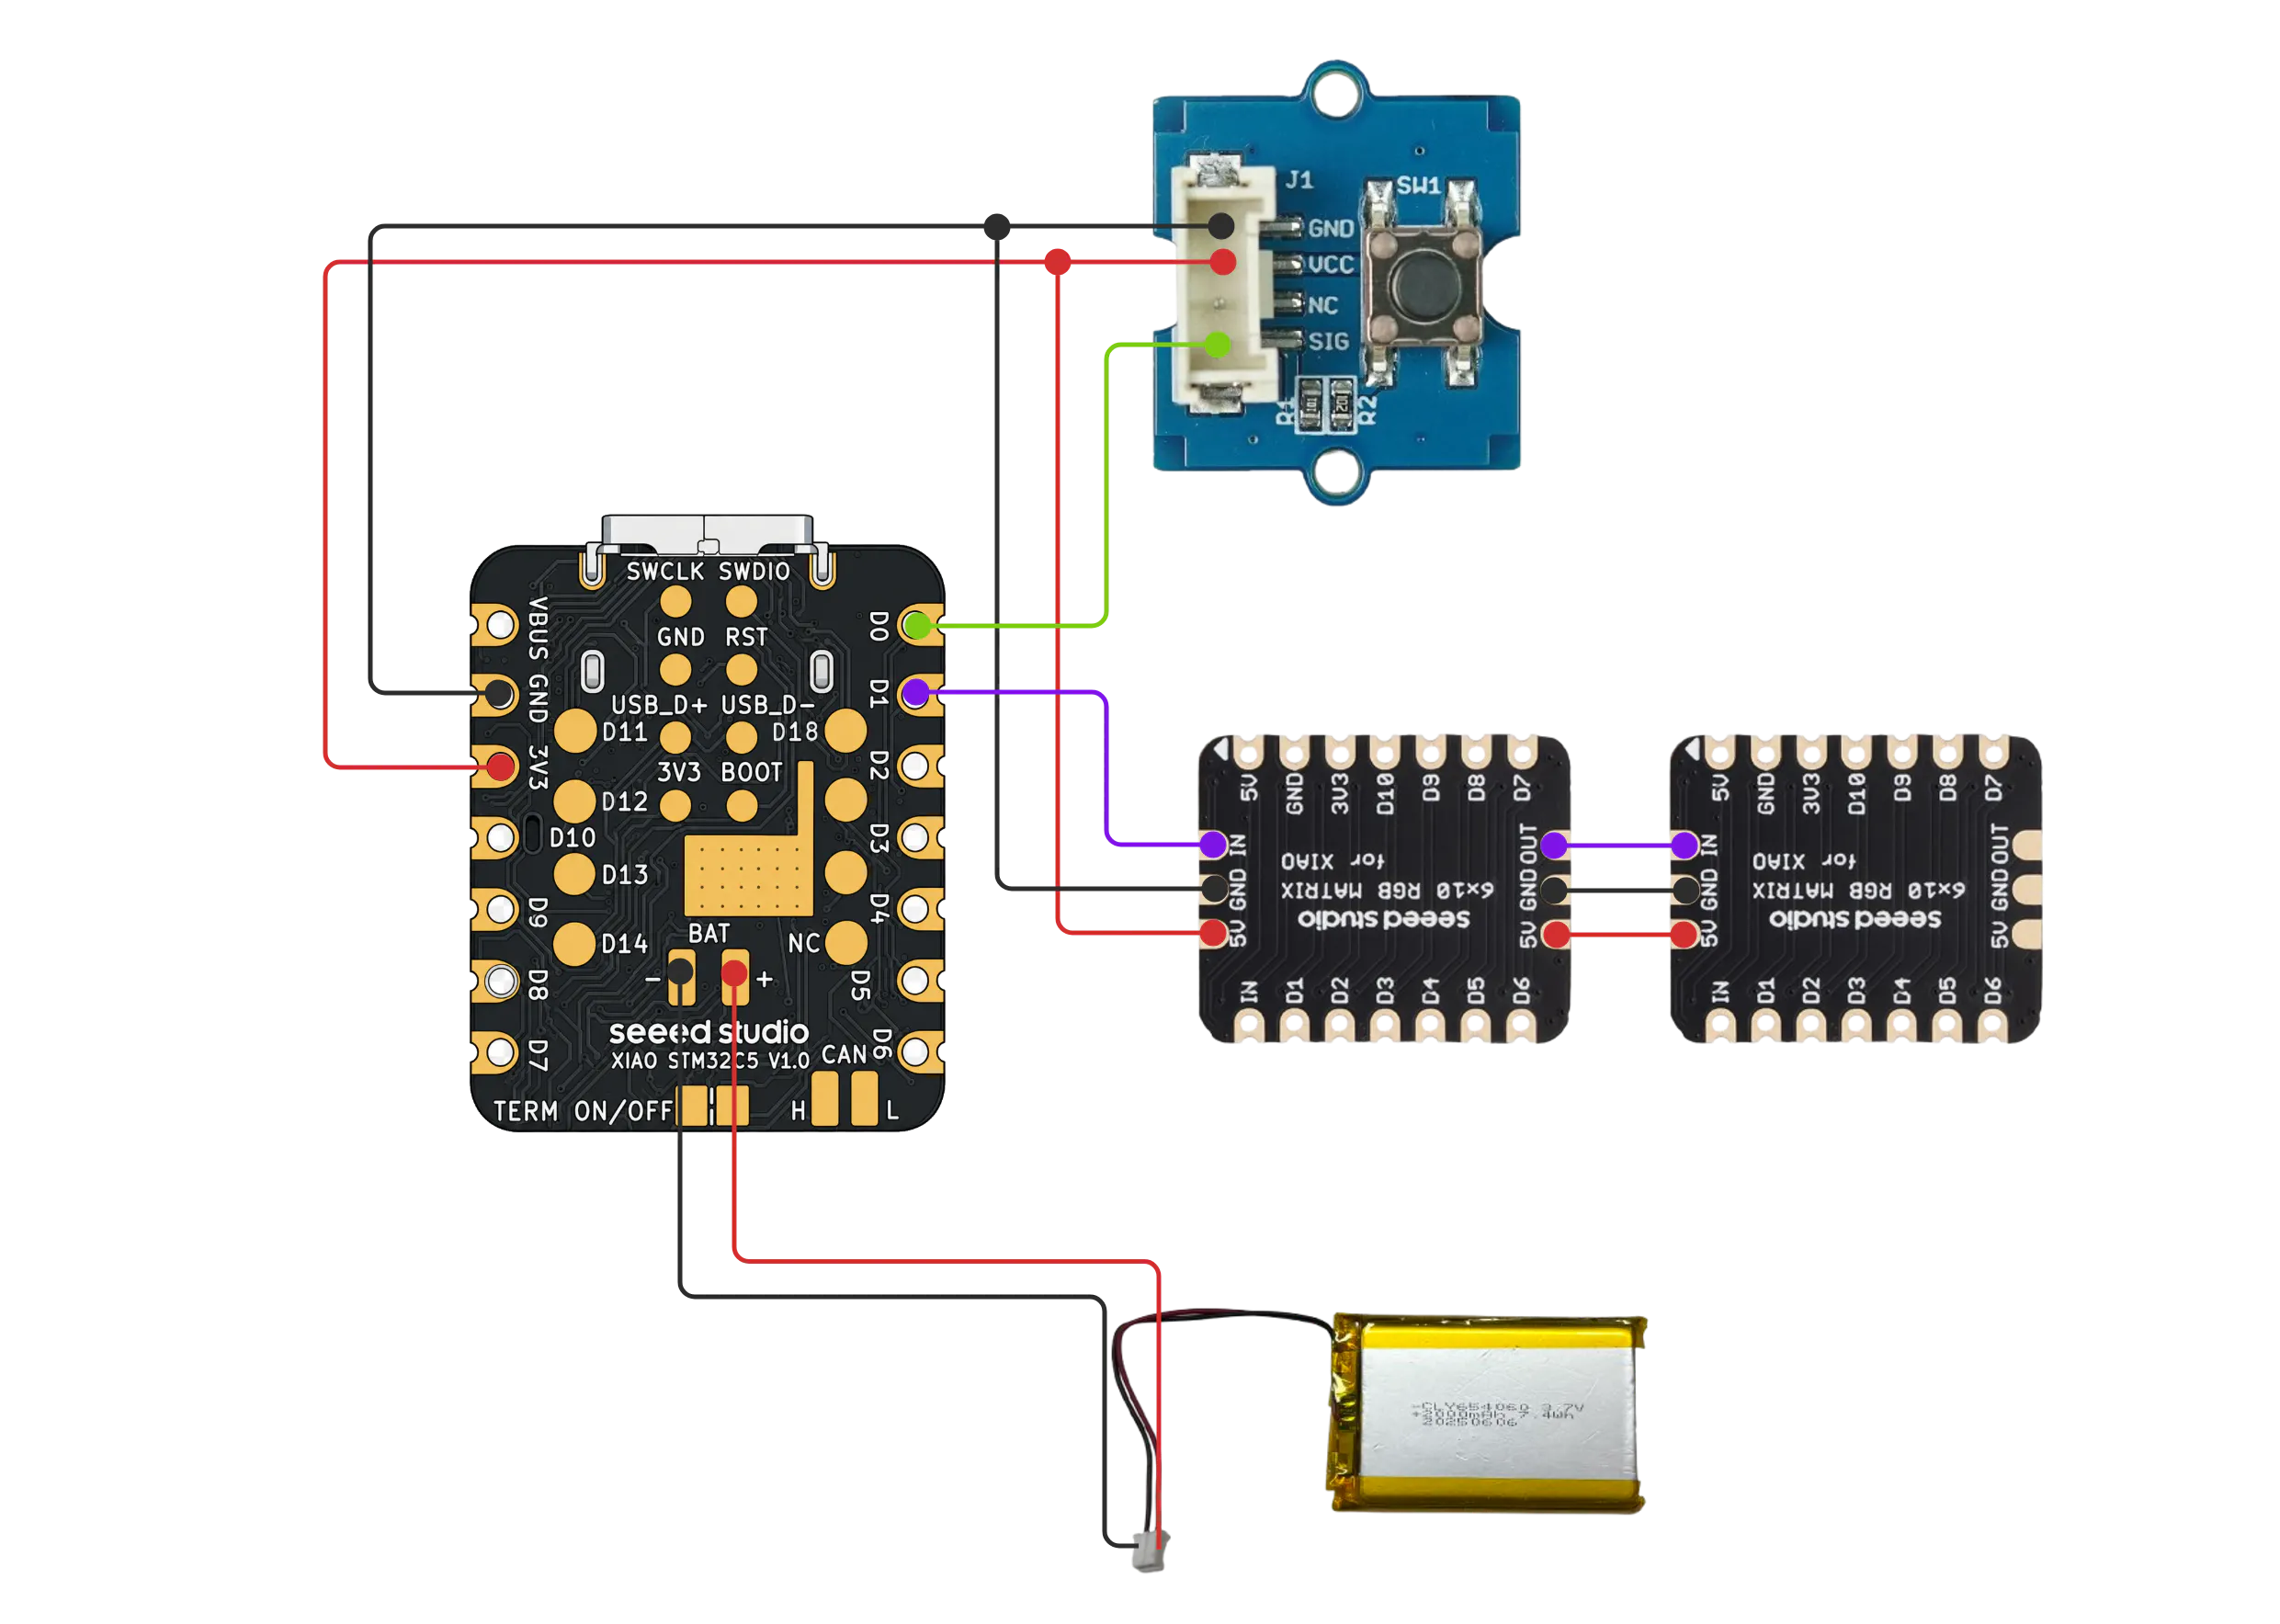
HardwareHardware: 1 × XIAO STM32C5, 2 × 6×10 RGB WS2812 Matrix for Seeed Studio XIAO, 1 × Grove Button, assorted jumper wires, 1 × 3.7V lithium battery. Note that I soldered everything instead of using plug-and-play connections. Soldering with a soldering iron was a bit challenging.
Material Preparation Diagram
wiring diagram
For development, I used VS Code with the PlatformIO IDE extension. The software framework is Zephyr RTOS, an RTOS hosted by the Linux Foundation for microcontroller development. Its programming style draws heavily from Linux development practices, though it is not overwhelmingly difficult. Three key files require attention:
main.cprj.confapp.overlay
Reference:
Getting Started with XIAO STM32C5
In terms of the code logic, I treat the two cascaded RGB panels as one unified container. A water surface that shifts with gravity divides the area into water and air. The program continuously reads IMU data: when the device tilts, the water surface rotates according to the gravity vector; when the device shakes, ripples are generated based on motion intensity, and the waves fade out gradually. Every frame update adjusts the water level so that the seawater region always occupies roughly half of the container. As a result, whether the gadget stands upright, lies flat, or is flipped upside down, the lighting behaves like flowing water inside a single vessel. Besides, I use IMU motion interrupts for wake-up. A button is implemented to switch lighting modes, trigger manual sleep, and the device will automatically turn off after being idle. This design supports both static flowing animations and handheld interactive control.
More code can be found in the GitHub repository linked at the end.......static inline int pixel_index(int column, int row)
{
return (MATRIX_ROWS - 1 - row) * PANEL_COLS + column;
}
static struct rgb hsv_to_rgb(uint8_t hue, uint8_t saturation, uint8_t value)
{
uint8_t region = hue / 43U;
uint8_t remainder = (uint8_t)((hue - region * 43U) * 6U);
uint8_t p = (uint8_t)(((uint16_t)value * (255U - saturation)) >> 8);
uint8_t q = (uint8_t)(((uint16_t)value *
(255U - (((uint16_t)saturation * remainder) >> 8))) >>
8);
uint8_t t = (uint8_t)(((uint16_t)value *
(255U - (((uint16_t)saturation *
(255U - remainder)) >>
8))) >>
8);
switch (region)
{
case 0:
return (struct rgb){value, t, p};
case 1:
return (struct rgb){q, value, p};
case 2:
return (struct rgb){p, value, t};
case 3:
return (struct rgb){p, q, value};
case 4:
return (struct rgb){t, p, value};
default:
return (struct rgb){value, p, q};
}
}

.....Initially, I wanted to build this project with a bottle-shaped enclosure. It would not only look like a glowing artifact, but I could also seal it with resin and toss it into the ocean as a real electronic message in a bottle. Someone might even find it, plug in USB‑C, and read the message I left behind! Haha!! However, I abandoned this idea in the end. Partly because my skills in 3D enclosure design are still limited, but more importantly, discarding electronics into the sea is harmful to the environment, and I could not bring myself to do that. By the way, self-tapping screws are recommended for assembly; they make fitting the parts much easier.


Comments