_h2vjxKZNFg.gif?auto=format%2Ccompress&gifq=35&w=400&h=300&fit=min)

Hardware components | ||||||
 |
| × | 1 | |||
 |
| × | 1 | |||
 |
| × | 1 | |||
 |
| × | 2 | |||
 |
| × | 1 | |||
 |
| × | 4 | |||
Software apps and online services | ||||||
 |
| |||||
| ||||||
 |
| |||||
Hand tools and fabrication machines | ||||||
| ||||||
In life, there are many unpredictable things. Sometimes you want something but inevitably lose it. Sometimes the parting comes even sooner than you expected. However, life goes on. One needs to regain confidence and keep moving forward.Recently, I used the products from SeeedStduio to create a gesture-recognition trash can robot, in order to address the embarrassing situation where I couldn't find the trash can after having breakfast.
Next, I will introduce to you how I made this project and the materials needed for it. If you have any questions, you can message me privately.
These materials need to be purchased based on your specific actual requirements.
- XIAO ESP32S3 × 1
- Grove Shield for XIAO × 1
- Grove Vision AI Module V2 × 1
- Acrylic frame × 1
- Some DuPont lines
- Motor drive board ( If you have it, it doesn't matter even if you don't. ) ×2
- DC 12V motor × 4
- Round trash can × 1
- Servo × 1
The entire vehicle body is composed of three parts: the Visual recognition section, the Control part and the 3D shell section.
Visual recognition sectionThe model trained using Vision V2 and SenseCraft is used to recognize gestures, and then the data is packaged and transmitted to XIAO ESP32S3 via IIC.
Log in to the SenseCraft AI website, and then select or train your model. Here, I choose the pre-trained model on this website that is compatible with Vision V2.
You need to connect it via USB-C and install it on your device. You can use it to preview the images and check the recognition results. This is very intuitive and clear, and you don't need to have a deep understanding of the underlying principles. This is something that makes me very happy because it significantly saves my time.
Communicate with Grove Vision AI Module V2 using the IIC protocol, parse the received data, and then perform corresponding logical control based on the parsed information. The main controller makes the selection based on the specific actual situation. Currently, the expansion board module used supports all XIAO of Seeed Studio. However, it should be noted that the XIAO you are using supports development using the Arduino framework.
- Create Project
Use VS Code + Platform IO to create an engineering project. Select Seeed XIAO ESP32S3 as the board and Arduino as the framework.
According to the wiki of Seeed Studio's website: Use XIAO get recongnition results, using XIAO ESP32S3 to process the visual data of Vision V2, I will encapsulate the corresponding modules based on the required control logic. For example, I have modularized the motor module, servo, and visual processing to facilitate management. Below is a brief introduction to my project directory. For more details, you can refer to my Github repository: Gesture_AI
- AI_getsure
This part parses the JSON data format sent back by Vision V2 and executes the corresponding logic based on the target information parsed. Below is a simple control function code. For detailed content, you can check it in the repository.
// Target 0: move forward -> Rock
void handle_target_0(const boxes_t *box)
// Target 1: move backward -> Paper
void handle_target_1(const boxes_t *box)
// Target 2: Servo rotation -> Scissor
void handle_target_2(const boxes_t *box)- Motor
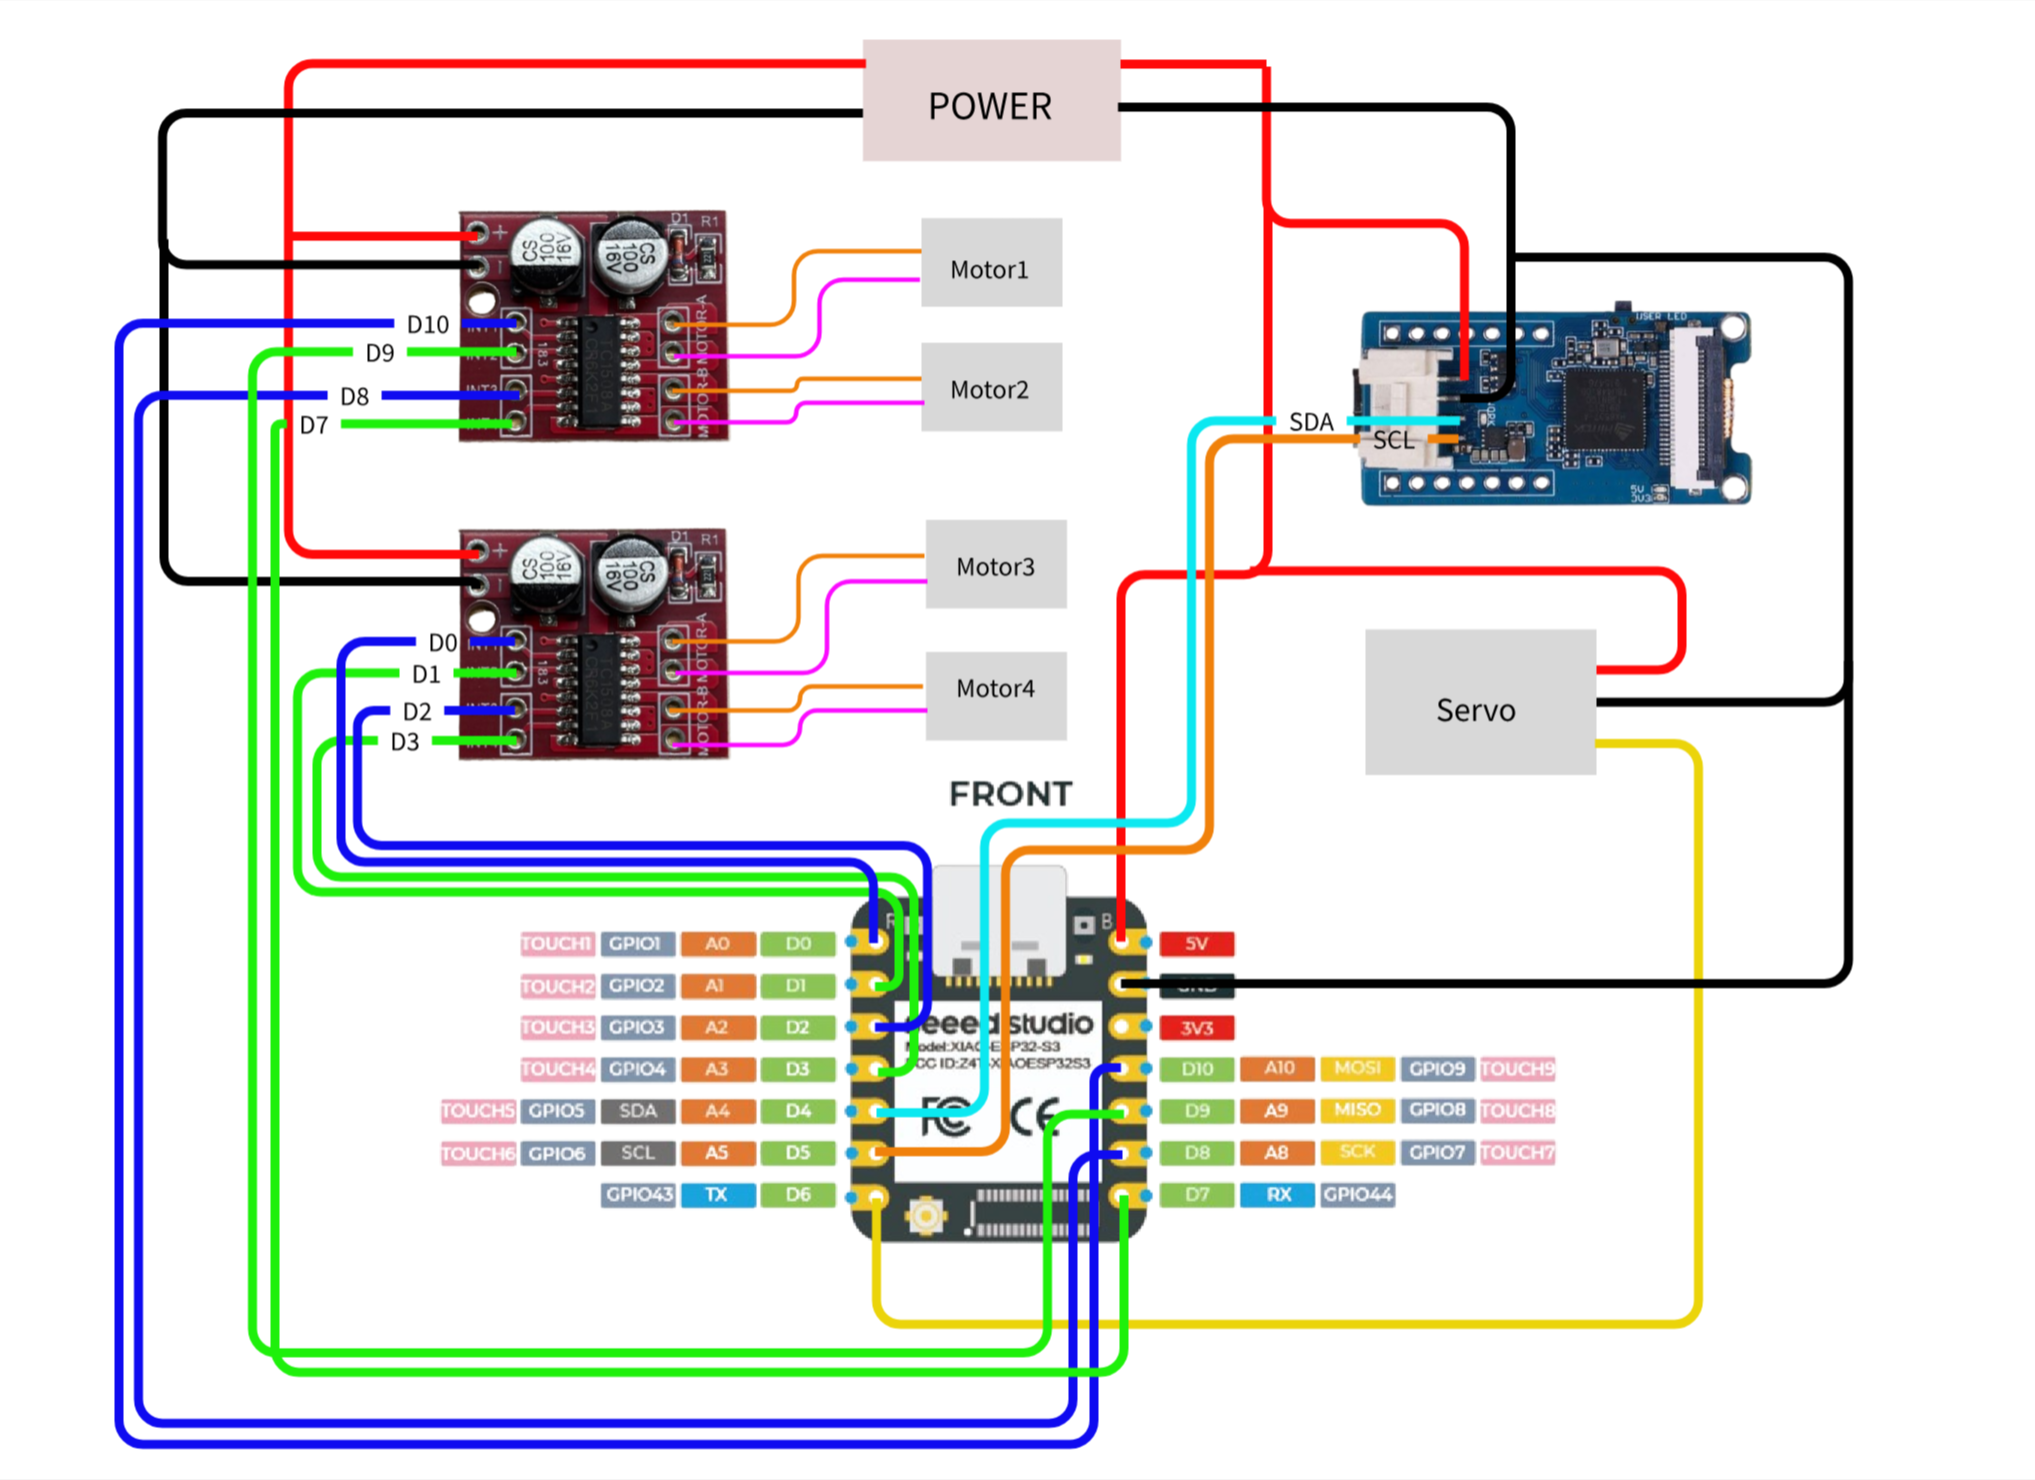
Initialize the motor, mainly by setting the output format of the IO ports. When there are two different levels of voltage (high and low), the motor will be enabled to rotate. Here, I used four motors and gave them individual names.
#define motor_1_A D10
#define motor_2_A D8
#define motor_1_B D9
#define motor_2_B D7
#define motor_3_A D0
#define motor_3_B D1
#define motor_4_A D2
#define motor_4_B D3
void motor_init(){}
void motor_stop(){}
void motor_go_straight(){}
void motor_go_back(){}- Servo
Set the IO port as PWM output and control the rotation angle of the servo by adjusting the duty cycle.
void servo_set_angle(int angle)
{
// Limit the angle within the range of 0 to 180.
angle = constrain(angle, 0, 180);
// Map the angle to the PWM duty cycle range
// For a 50Hz steering motor, a pulse width
//of 1ms to 2ms corresponds to an angle range of 0 to 180°
// 10bit@50Hz → 1024 = 20ms
// 1ms = 51, 2ms = 102
int duty = map(angle, 0, 180, 51, 102);
ledcWrite(SERVO_CHANNEL, duty);
}- SSCMA
The official processing library of Seeed Studio, responsible for interacting with the Vision V2 module
3D shell sectionI used Onshape, a very good tool, to draw my 3D model. The advantage of this tool is that you don't need to download the software onto your computer. You can simply run it in the browser. Of course, you can choose to draw the 3D model part because it doesn't affect the operation you want to perform.
Print out the cover and place it on top of the trash can.
The wiring part is rather complicated. Please carefully check it before connecting to avoid damaging the motor drive and XIAO.
The actual wiring looks very messy. Covering it with a casing would make it look neater. If you are skilled at PCB design, you can choose to integrate them onto a single circuit board.
After the connection is completed, download the program for testing.
Every attempt is just part of exploring—you always get some unique takeaways from it. This work isn’t fully polished yet, so if you have any better ideas, just share them. We can discuss them together.


_3u05Tpwasz.png?auto=compress%2Cformat&w=40&h=40&fit=fillmax&bg=fff&dpr=2)
Comments