


Hardware components | ||||||
 |
| × | 1 | |||
 |
| × | 1 | |||
| × | 1 | ||||
| × | 1 | ||||
| × | 1 | ||||
| × | 1 | ||||
| × | 2 | ||||
| × | 1 | ||||
| × | 2 | ||||
| × | 6 | ||||
 |
| × | 1 | |||
| × | 1 | ||||
| × | 1 | ||||
Software apps and online services | ||||||
 |
| |||||
| ||||||
| ||||||
| ||||||
| ||||||
| ||||||
| ||||||
| ||||||
 |
| |||||
| ||||||
Hand tools and fabrication machines | ||||||
 |
| |||||
 |
| |||||
| ||||||
In the last 250 years, we have made great strides forward in automation. This has provided us with more luxury and convenience than we could have ever dreamed of. Soon we will even have generated music, food, entertainment, warfare, and love. Currently there is just one stone left untouched: philosophy.
Cue the Philosotron, to take care of this truly dreadful activity. It's a robot that stares out of a window, and provides cryptic messages to be misunderstood and fought over for centuries.
This article consists of the following steps:
- Introduction
- Dataflow
- Raspberry Pi Setup
- Camera Setup
- Pan & Tilt (optional)
- The Box
- Observing
- Deep Analysis
- Website
- Full Code & Installation
- Results
- Notes & Considerations
- 1. The Raspberry Pi directs the servos via a chip to move to a random position (optional).
- 2. The camera takes a picture and sends it back to the Raspberry Pi.
- 3. This picture is passed to Moondream via their API.
- 4. Which shortly describes what it sees and replies back with a caption.
- 5. This caption is combined with the latest stored thought, to be passed onto the Gemini API.
- 6. A new piece of wisdom is generated and sent back.
- 7. This thought and the accompanying picture are stored locally.
- 8. For viewing, a local website is displayed.
We are opting for a headless setup. This means it won't have a desktop environment or run any visual components. Here's a good tutorial on Getting started with your Raspberry Pi and a good tutorial on remote access.
Setting up remote access is optional, the desktop version is great as well. I usually go for a headless setup, because I prefer to work via my laptop, and avoid the need for a separate screen, mouse, and keyboard.
Once the MicroSD card is written and ready, we can slide the card into the designated slot, plug in the power supply and the Pi should come to life.
Update, Upgrade, Autoremove, and Clean
Once the hardware is ready and we have access directly or via SSH, we run the command below making sure everything is up to date and clean:
sudo apt update && sudo apt full-upgrade -y && sudo apt autoremove -y && sudo apt cleanVision for our sage will be provided by a USB webcam. All we need to do is plug it into the USB port of our Raspberry Pi. Once done, we can check if it is connected by running the following command:
lsusb

(env) user@Philosotron :~/Philosotron $ lsusb
Bus 001 Device 001: ID 1d6b:0002 Linux Foundation 2.0 root hub
Bus 001 Device 002: ID 2109:3431 VIA Labs, Inc. Hub
Bus 001 Device 003: ID 1a40:0801 Terminus Technology Inc. USB 2.0 Hub
Bus 001 Device 004: ID 26e0:3c13 Sonix Technology Co., Ltd. HDF Webcam USB
Bus 001 Device 005: ID 1b3f:2008 Generalplus Technology Inc. Usb Audio Device
Bus 002 Device 001: ID 1d6b:0003 Linux Foundation 3.0 root hub
As you can see our webcam is registered as USB device 004.
Pan & Tilt (Optional)This step is completely optional, if you prefer simpler setup, you can keep the camera static, and power the Raspberry Pi with a standard power supply.
Pan-Tilt Parts
What you see, defines your reality. To allow our guru to have a changing perception, we use this 3d printed pan-tilt setup by Tommy Zhang to move the camera into different positions before each snap.
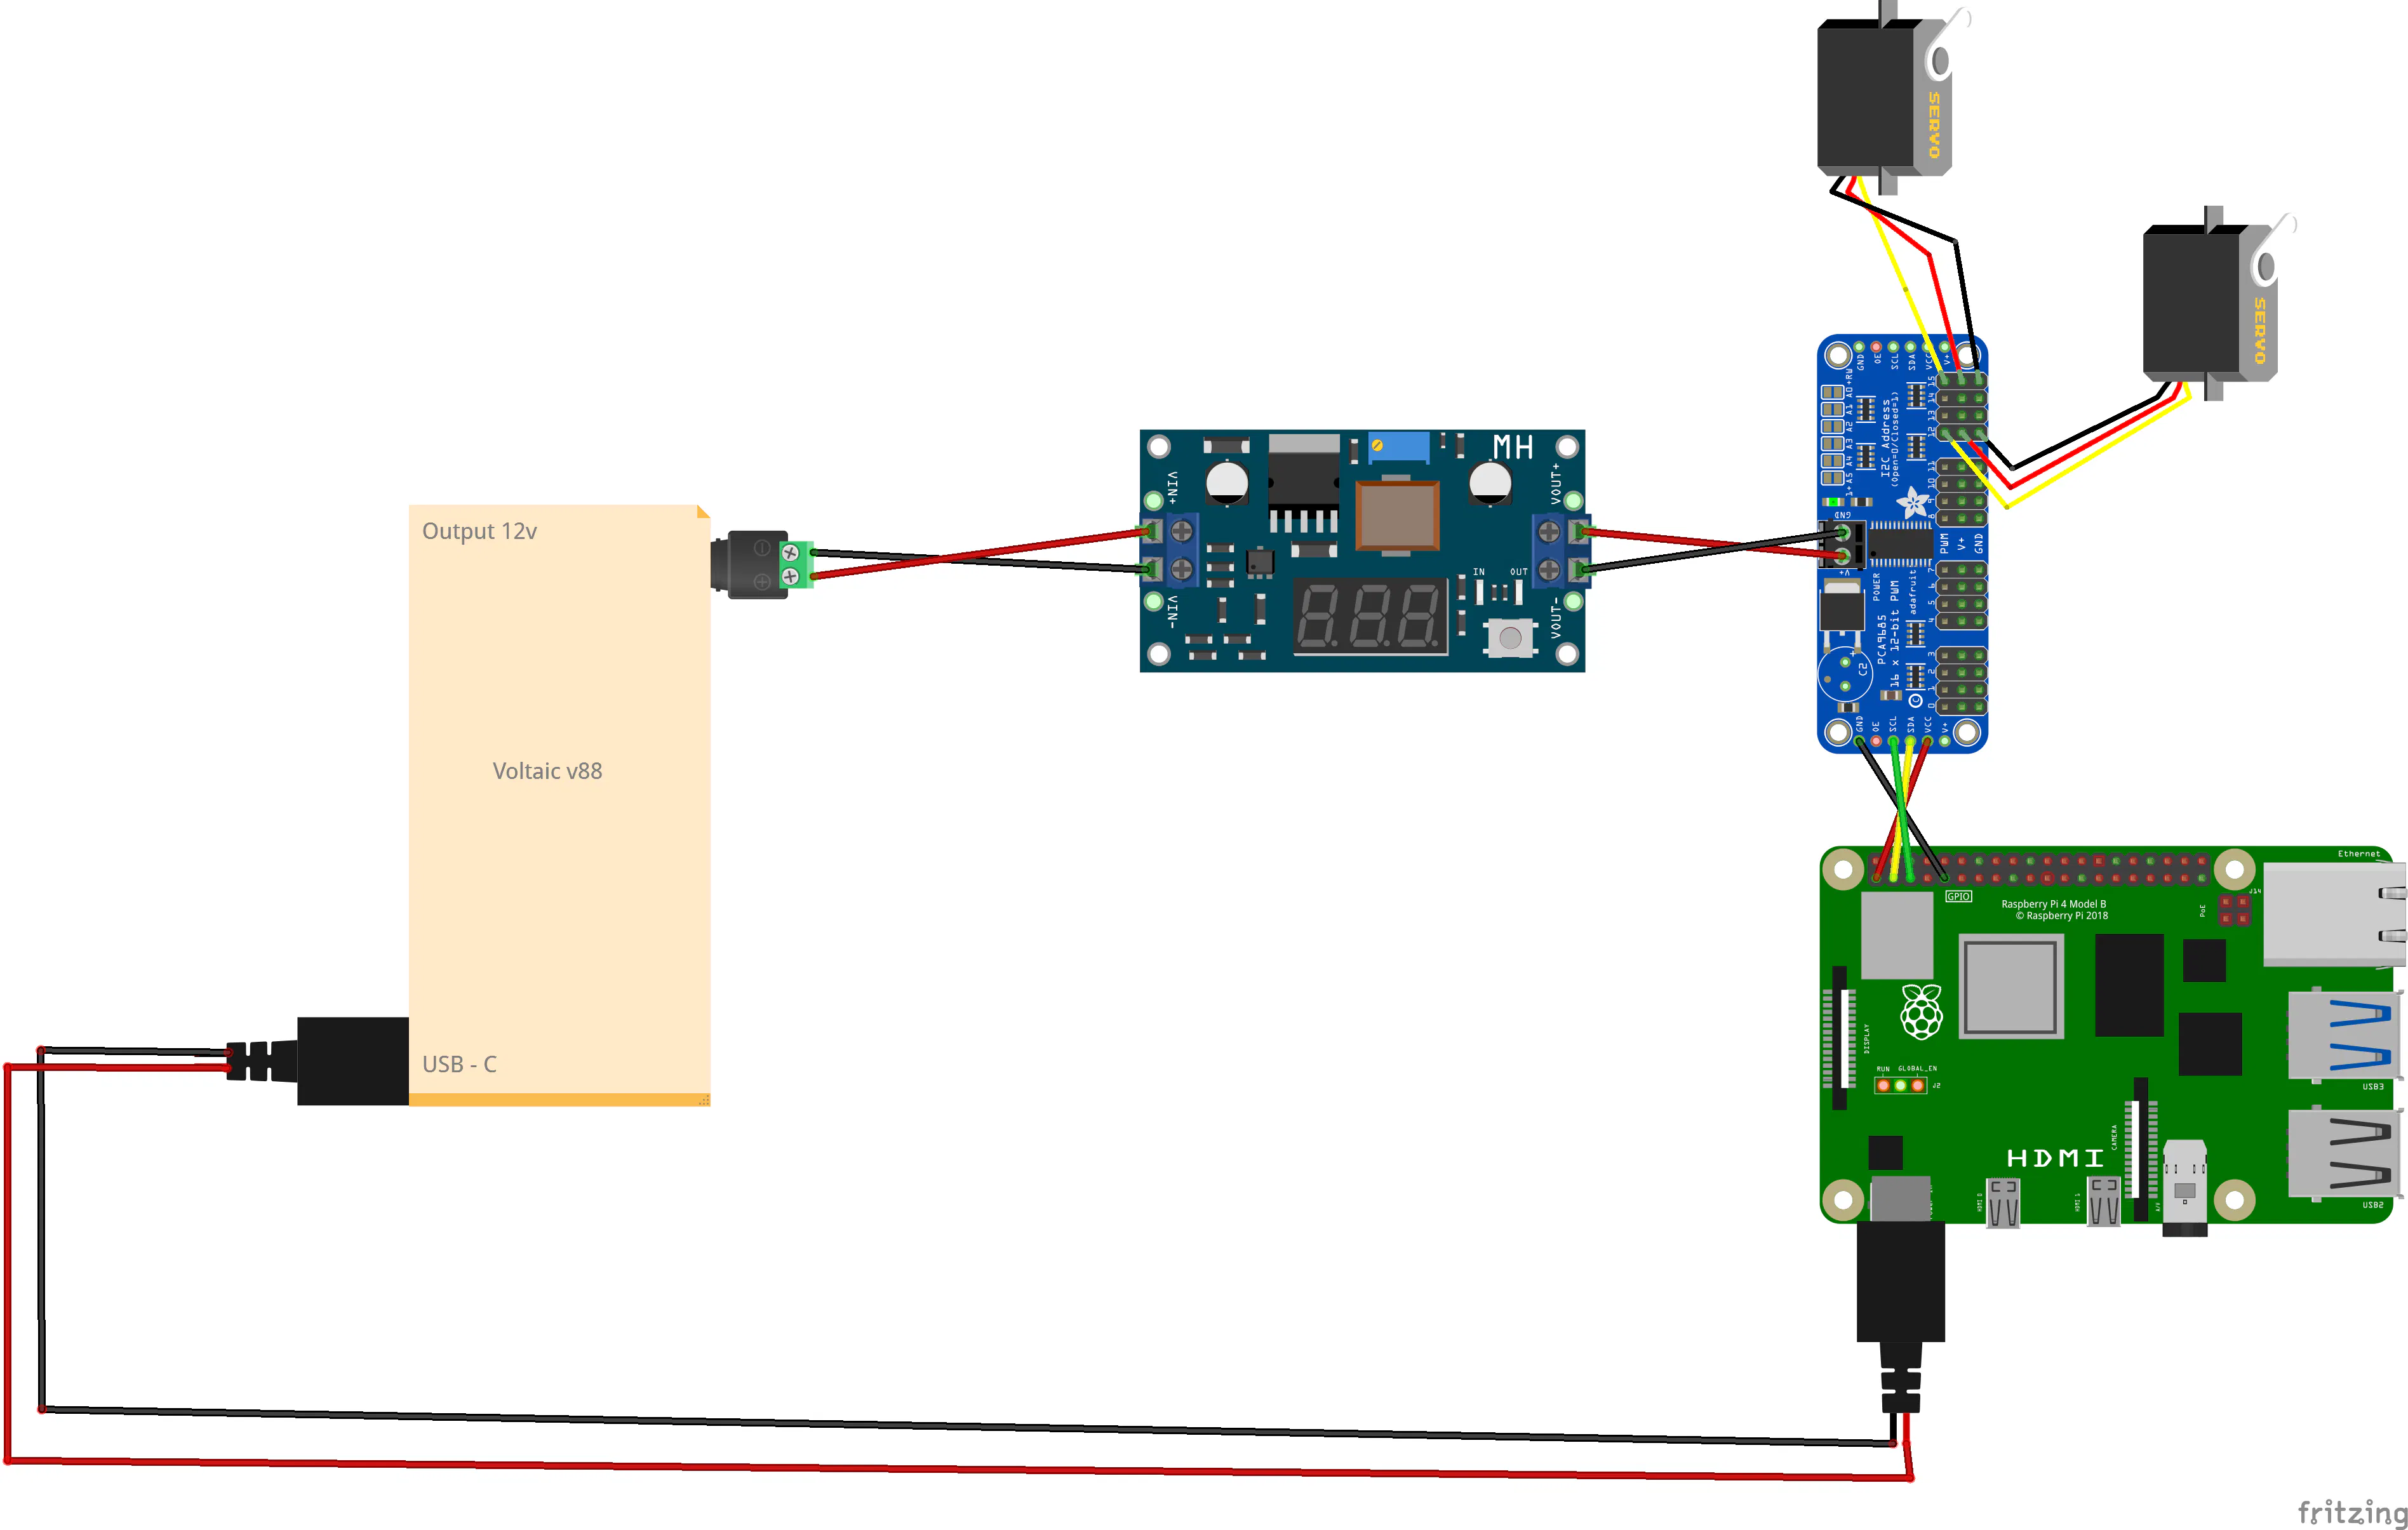
This setup uses two MG996R 180-degrees servos for movement, a PCA9685 chip for power supply and control of these servos, and a LM2596S step down converter. This converter will take the 12V coming from the V88 battery, tune it down to 6.4V, and feed it into the supply side of the servo control chip (PCA9685). To connect the chip to our Pi, you can follow this tutorial by Adafruit.
To attach the webcam to the pan-tilt setup we glue some Velcro on both the baseplate and underside of the webcam (see picture). This allows us to both remove and position the webcam easily. It's sturdy enough to hold everything in place, yet flexible enough to allow calibration, as an added bonus it also dampens some of the vibrations coming from the servos.
As we already have the Voltaic V88 battery to power the pan-tilt setup, we might as well use it to power the Raspberry Pi itself. All we need to do is run a USB-C cable from the battery to the Pi, and it's all sorted. This has an extra benefit of making the robot completely portable.
See the pictures attached for an overview of the wiring and assembly.
Centering Servos
Once setup, we can run the calibration script to put both servos into their default position (90 degrees), this is the center point in their range of motion. Then we screw in the parts of the pan, and do the same for the tilt. This makes sure that the setup looks straight forward and dead center. If this would not be done, moving the servos might make it crash into itself or look too far to either side.
The calibration script, and necessary configuration are discussed in step Full Code & Installation.
The BoxTo keep everything neat and tidy, we opt to house our electronics in a classy cardboard box. The camera setup is mounted on the lid, the wires are fed through the side openings, and the electronic bits and bobs are placed inside.
To attach the camera to the lid, and to manage the electronics inside we use stick-on Velcro stickers. These are strong, small, and make sure everything stays in place.
ObservingWith the camera in place we can start observing the world. We use a Python script and the opencv library to access the camera and take a picture.
This picture is then sent to the Moondream API, which will provide us with a short caption of the image. Moondream has a free tier where you receive $5 each month to experiment with, which is plenty for this project.
If the pan-tilt setup is part of the robot, we also add some code to initialise the control chip, and move the servos into a random position before each photograph is taken, changing the scenery dynamically.
The complete code, and necessary configuration are discussed in step "Full Code & Installation".
Deep AnalysisWith this short caption available, we now collect the previous thought, combine them, and send it to an external brain for processing. By including the previous thought we create an interlinked chain of thoughts, which is somewhat similar to a stream of consciousness.
The thinking power is provided by the Google AI Studio. They offer a free tier, but the total requests per day are too limited (12), so I opted to upgrade. The cost involved will be less than 2 cents a day, if run 24/7. The free tier suffices, but will run out after ~24 minutes.
The core of our deep thinker lies in the instructions we give it. We prompt Gemini to use the description of the image, and previous platitude, to combine them into a new insight using the following:
prompt = f"""
Internal Monologue History: '{previousThought}'
Current Sensory Report: '{imageSummary}'.

As the Philosotron, you must ignore the mundane.
Translate this visual data into a philosophical platitude that builds upon your previous thought.
Do not repeat yourself. Sound like a guru who has seen too much. Be concise.
"""
The complete code, and necessary configuration are discussed in step "Full Code & Installation".
WebsiteIt would be nice to browse the Philosotrons process and considerations in a user-friendly way. So, to get away from JSON files and folder structures, we are building a small local website to fetch all the relevant data, and display it neatly. To do this we will use Flask as a backend, and Tailwind as a frontend.
This frontend will function as an archive, with a date selector and a chronological list to highlight the chained logic of our great thinker.
The complete code, and necessary configuration are discussed in step Full Code & Installation.
Full Code & InstallationEnvironment Creation & Libraries Installation
Below are the commands needed to create the environment and install all components needed.
#Create a project folder
mkdir Philosotron

# Navigate into the created folder
cd Philosotron

# Create a python environment, required for the installation of libraries
python3 -m venv env

# Activate the created environment
source env/bin/activate

# Install the needed libraries and packages
pip install opencv-python moondream pillow google-genai adafruit-circuitpython-servokit flask flask-cors
API Keys
In the attached code (codeBaseClean.py) we use API keys to access both Moondream and Google AI Studio. You need to replace those with your own, which you can create by following the Google AI studio quick start, and this Moondream Quick Start.
Once configured you can replace the XXX in these lines of code with the corresponding keys:
# Gemini model setup
client = genai.Client(api_key="XXX")

# Moondream model
model = md.vl(api_key="XXX")
File Transfer
With the keys in place and saved, we now transfer the codeBaseClean.py into the newly created folder. Here is tutorial on how to transfer files with FileZilla.
With everything in place we can turn it with the following command:
python3 codeBase.py

(env) user@Philosotron:~/Philosotron $ python3 codeBase.py
Awakening
Moving the Camera.
Captured: image_13-56-37.jpg
-> A white refrigerator is positioned against a light gray wall, with a painting of flowers on its right side and a wooden scroll hanging to its left.
-> The stark white void, a monument to preserved emptiness, reminds me that awareness is merely the first step out of oblivion.
Archive
Inside the Philosotron folder create another folder called templates:
#Create a templates folder
mkdir templates
Download the index.html file, and move it into the templates folder.
We can run the backend and website with the following command:
python3 backend.py
(env) user@EyeBot:~/Philosotron $ python3 backend.py
* Serving Flask app 'backend'
* Debug mode: on
WARNING: This is a development server. Do not use it in a production deployment. Use a production WSGI server instead.
* Running on all addresses (0.0.0.0)
* Running on http://127.0.0.1:5500
* Running on http://192.168.1.5:5500
Press CTRL+C to quit
* Restarting with stat
* Debugger is active!
* Debugger PIN: 178-027-370
Next we use our web browser to navigate to the IP address of our Raspberry Pi, adding the port 5500. In my case this looks like:
192.168.1.5:5500
IMPORTANT: Flask will not see your website unless it is inside a folder named templates. Your folder should look like: Philosotron > templates > index.html.
ResultsBreakable arms
In the process of handling the 3D-printed the servo arms I broke quite a few, so you have been warned.
First Thought
On line 66 of the codeBaseClean.py file there is the following line:
return data[-1].get("thought", "")This makes sure that if there is no previous thought, it will use a default value, in this case "". You can steer the thought process by setting the seed thought to what you like.
Webcam Buffer
On line 140 of the codeBaseClean.py file there is the following line:
for _ in range(60):
video.read()
Webcams often have a buffer that holds old images. We read the camera 60 times quickly to clear out the old frames so the Philosotron is looking at what is happening right now, not what happened 2 seconds ago.
VPN
The Raspberry Pi is set to local network access only by default, you might need to turn off your VPN.
Special Thanks
Thanks to Gemini for moral, code and proofreading support.
Thanks to my garden gnome wife for proofreading.


Comments