


Hardware components | ||||||
_PnKPri8a6q.jpg?auto=compress%2Cformat&w=48&h=48&fit=fill&bg=ffffff) |
| × | 1 | |||
A few weeks ago we helped a friend out and used our X-Carve from Inventables to make a big sign for an event. We got inspired and realized we didn't have a sign of our own so we set out to design it! We used birch plywood and built it two layers, and used an Arduino to control the LED strips that light it up. This was a relatively simple project that was as much fun as it looks, you should definitely try one!
Check out the detailed build video to watch how we built everything!
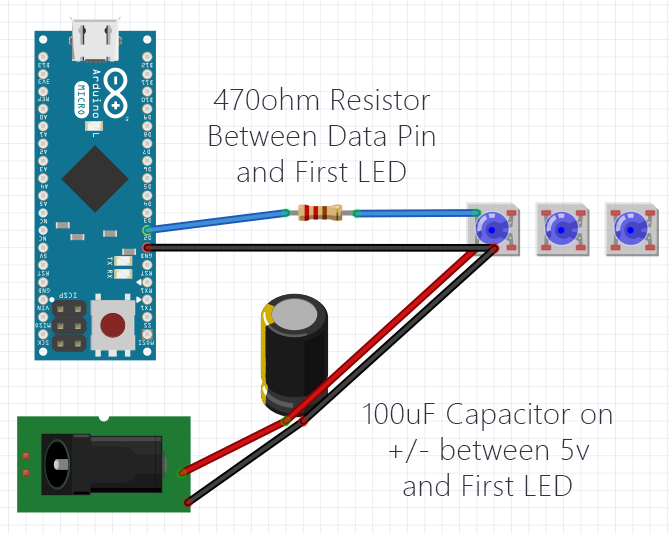
The Electronics SetupWe used an Arduino Micro for this to control the LEDs that light up the sign. There are lots of off the shelf LED controllers available but we enjoy coding it ourselves. It gives us more control and allows us to change things whenever we want, which is right up our alley! Along with the LEDs (300 sequential LEDs, all in a single strip), there’s the Arduino Micro, a small breadboard, a 100uF capacitor, a 470ohm resistor, and a barrel jack for the 5V power source.
Powering the Arduino and LEDsThe Arduino uses a USB micro adapter for its power and the LEDs are powered externally by a separate 5V power adapter. Because there are 300 LEDs and they’ll be using a lot of power, its recommended to power them separately and not through the Arduino.
Since both the Arduino and the LEDs use a 5V power source, we could have spliced the one wall adapter to power them both…but in our case, it was easier to just use two cords. We might upgrade it in the future to simplify once we’re sure we’ll stick with this configuration long-term.
The Mini-BreadboardThe LED manufacturer recommends putting a 100-1000uF capacitor on the positive/negative terminals between the power input the LEDs to prevent any surges from damaging the LEDs, so we did that (100uF). Additionally, they recommend putting a 470ohm resistor between the data pin of the LEDs and the Arduino for the same reason, so we did that too. Since we didn’t have a circuit board to solder these extra components to, we used the breadboard as a junction to get the capacitor and resistor in place. We also used it as a junction for the power and ground jumpers, since it was there.
The CodeWe’re using FastLED, which is an excellent free library available for Arduino that makes it super simple to make LEDs do…basically whatever you want.
You can choose which type of LEDs you’re using and then use some really simple APIs to control them. Highly recommended if you’ve not used it before! Otherwise, the code is dead simple! Choose your LED type, figure out how many there are, then tell them what to do.


Comments