


Hardware components | ||||||
 |
| × | 1 | |||
Software apps and online services | ||||||
 |
| |||||
Please subscribe my youtube channel for more videos......
Hey everyone, what's going on let's start h awesome project.
In this tutorial we gonna build a portable CPU using raspberry pi zero w.
Raspberry pi zero is not made for heavy processing I have tried youtube video but the video is lagging. Then I tried arduino ide it worked pretty well for me...
So now I can program arduino from this tiny little raspberry pi zero w.
Let's start.....
Step 1: Requirements- Raspberry pi zero w
- Small Slide switch
- Mini 30x30 cooling fan
- 134N3P module
- 3.7v 1000mAh battery
Note :- the more mAh means more battery backup
Step 2: Connect SD Card- Take a sd card make sure it is empty
- Put sd card in card reader
- Connect card reader to your pc or laptop
- Download raspberry pi imager too from here. Or you can download it from my github page.
- Run the imager tool.
- Click on choose button where you can choose any os but in raspberry zero w rasbian 32bit is perfect.
- Click on choose sd card and select your sd card.
- Click on write and then click on yes the writing process stars.
- Once image writing is completed it will say to remove your sd card.
- Remove sd card and put it into pi.
- Connect mini hdmi to hdmi adapter as shown in image.
- Connect hdmi cable to the adapter and connect it to tv or monitor.
- Take a OTG hub or you can use single otg like me but you have tp switch mouse and key board when needed.
- Connect power supply which is micro usb cable.
- At start you will see colorful screen as shown in image it will take some time to boot up.
- Once it booted up do initial setup which it ask.
- Select time zone of your country.
- Select us keyboard.
- Click on the wifi icon and connect wifi from your mobile Hotspot or same wifi where tour mobile is connected.
- Now go to the left side of screen and click on raspberry pi logo.
- Here click on preferences and then raspberry pi configuration.
- Go to the interfaces option.
- Enable VNC.
- Take your cursor on wifi logo you will see ip address.
- Note down the address we will use it in vnc viewer.
- Download vnc viewer apk from play store.
- Open Vnc viewer and click on add button
- Enter ip address which you seen on wifi ion.
- Now enter name as you want
- Click on create.
- Now click on connect.
- Enter username "pi".
- Enter password "raspberry"
- Now you can seen your monitor screen on mobile.
- Now you no need hdmi or keyboard or mouse, just power on wait til it connects to wifi and you can connect it on vnc viewer.
- Take the raspberry pi case and remove all number from isopropyl or nail paint removal.
- Put your raspberry pi inside case.
- Put heatsink right top of raspberry pi processor
- Make a square from marker.
- Cut the square from heating up a sharp object.
- Sand it via sand paper.
- Make hole for fan and also sand it.
- Remove USB from module
- Solder 2 wire on B+ and B -
- Solder 2 wire on V and G terminal given in image.
- Fix the module in case, I have made a hole for micro usb port.
- Hot glue not able to fix it on case so I have used both hot glue and super glue.
- Connect battery at b+ and b- terminal of module.
- B+ is positive red wire and B- negative black wire.
- Connect a wire at V terminal of module and it will be connect to any side terminal of switch.
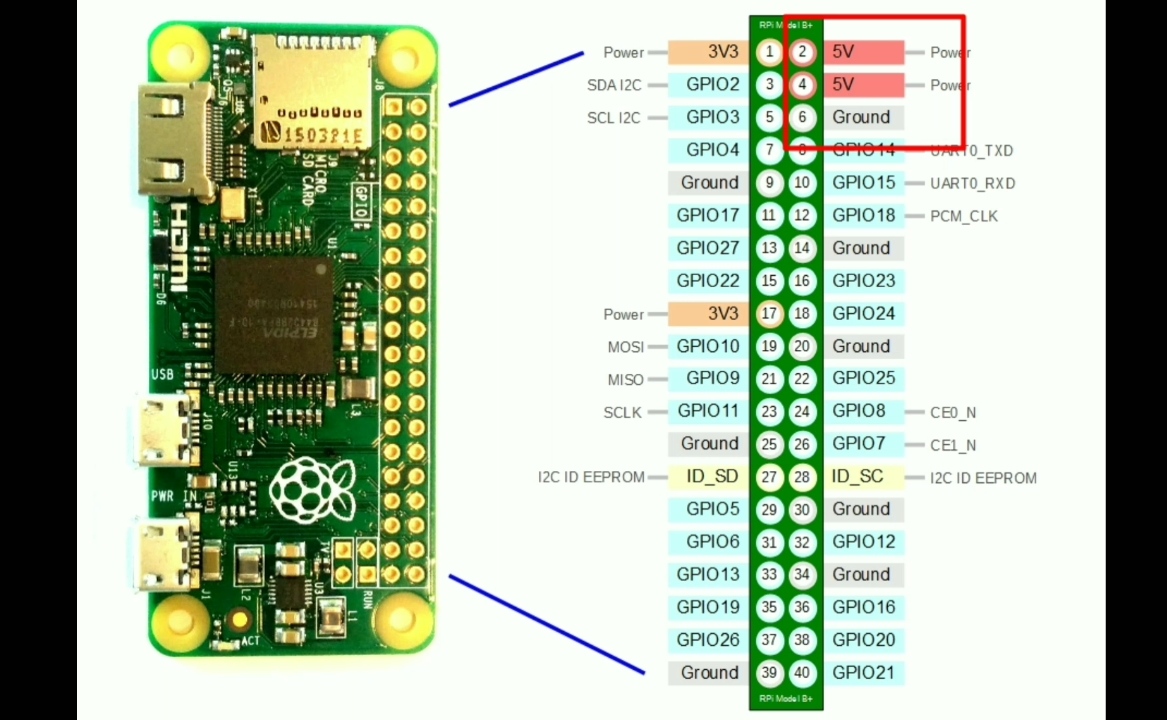
- Connect middle terminal of switch to the +5v of raspberry pi.
- Connect G terminal of module directly to ground of raspberry pi.
- Assemble all things.
- As you can see I have fixed the fan at top of heat sink.
- I have made a hole for on off switch.
- You can also see the charging port hole.
- The battery is looks small because it is 300mAh but I recommend you to use at least 1000mAh.
- This 300mAh giving me 5-7 min of battery backup.
When you startup the raspberry pi without screen the resolution of screen is very small so let's set it.
- Open command terminal.
- Type command "sudo nano /boot/config.txt" and hit enter.
- Here you have to uncomment 3 lines
hdmi_force_hotplug = 1
hdmi_group = 2
hdmi_mode = 82
4. As you can see I have changed group to 2 and mode to 82.
5. You can find your mode here.
6. Now press ctrl + x then y and then hit enter.
7. Type sudo reboot in terminal to reboot.
Step 17: DoneNow all done....
You can also use arduino ide in it.


Comments