


Hardware components | ||||||
| × | 1 | ||||
 |
| × | 1 | |||
| × | 1 | ||||
 |
| × | 1 | |||
| × | 1 | ||||
Software apps and online services | ||||||
 |
| |||||
If you've ever flown an RC airplane and wanted to know exactly what happened during a flight — the altitude, orientation, temperature, and a visual record — most off-the-shelf FPV systems won't help you. They stream live video, but store nothing. The moment you land, the data is gone.
I wanted to fix that. So I built a compact onboard system that records everything: JPEG image frames, environmental sensor data, and full 6-axis orientation — all saved directly to a microSD card during the flight, organized automatically by session.
The result is a lightweight (~50g) ESP32-based board that acts as a true flight recorder for RC aircraft.
Main Features -The system records the following data during every flight session, automatically saved into a new folder on the SD card:
- JPEG image frames captured at 15fps
- Temperature, pressure, altitude, and humidity (BME280)
- Pitch, roll, and yaw orientation (MPU6050)
- Timestamped CSV log synced with the image frames
Everything is triggered by a single button press before takeoff — no laptop, no serial connection needed.Hardware -
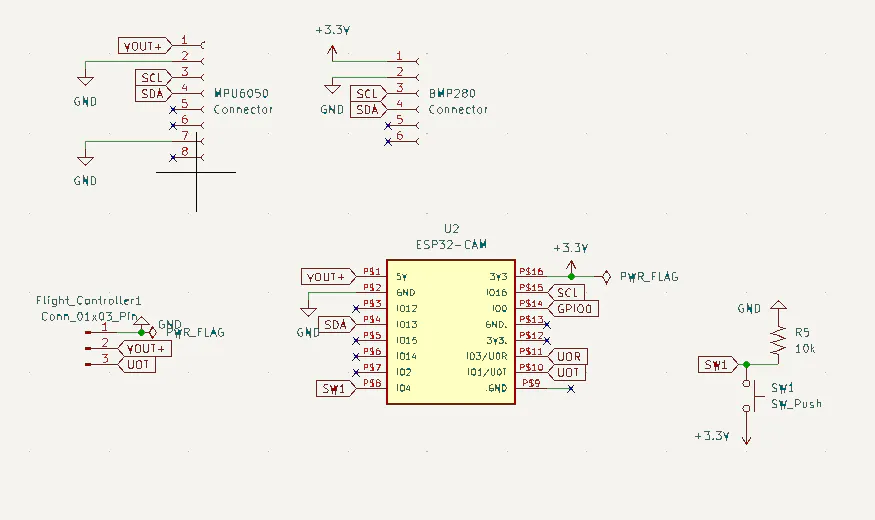
The board is built around the ESP32-CAM module, which handles everything at once: image capture, I2C sensor communication, SD card writes, and orientation processing. It's a surprisingly capable chip for how small and cheap it is.
For orientation, I used the MPU6050 6-axis IMU. It gives raw accelerometer and gyroscope readings which are combined using a complementary filter to produce stable pitch, roll, and yaw values even during the constant vibration of flight. The filter is tuned to trust the gyroscope heavily (alpha = 0.96) while slowly correcting long-term drift using the accelerometer — a balance that works well for the short duration of most RC flights.
For environmental data, the BME280 measures temperature, atmospheric pressure, altitude, and humidity. It communicates over I2C alongside the MPU6050 on the same bus.
One detail worth noting: the gyroscope calibration routine takes 1000 samples at startup (before the button is pressed) to calculate accurate offsets. Running it with the plane sitting still on a flat surface gives much cleaner orientation data in the air compared to a shorter calibration window.Custom PCB -
After getting the circuit working on a breadboard, I designed a dedicated PCB to make the system reliable enough for actual flight use.
RC aircraft experience constant vibration. Jumper wires and breadboard connections don't survive that for long — I actually had a loose connection mid-flight on my first prototype that corrupted an entire session's worth of data. Moving to a proper PCB was the only real fix.
The custom PCB integrates the ESP32-CAM connections, MPU6050 interface, BME280 connections, power routing, and the pushbutton input — all in a compact footprint that mounts cleanly inside a fuselage. Compared to the breadboard prototype, the assembled PCB is smaller, lighter, more vibration-resistant, and just looks like a finished product.
If you're building anything beyond a one-off prototype, I'd strongly recommend getting a proper PCB made. PCBWay is where I'll be going for all my future projects
PCBWay handled the manufacturing, and they sponsored the boards for this project. I was honestly impressed by the turnaround — the boards arrived quickly, well-packaged, and ready to assemble straight out of the box. The silkscreen was clean and precise, the solder mask was consistent across all boards, and every pad was exactly where it needed to be for the ESP32-CAM footprint, which has some fairly tight tolerances.
Beyond the quality, what I appreciated most was how straightforward the ordering process was. Uploading the gerbers, selecting specs, and getting a quote took about five minutes. For student and hobbyist projects where you're not ordering in large quantities, that kind of low-friction process matters.
After the flight, pull the SD card and open the session folder on your computer. Each session contains a folder of numbered JPEG frames and a data.csv file with timestamped telemetry rows that line up with the images.
To make reviewing flights easier, I built a small Python dashboard that lets you load the session folder and scrub through the footage alongside the telemetry graphs. Here's what a sample data row looks like:
timestamp_ms, temperature_C, pressure_hPa, alt_ft, humidity_%, pitch_deg, roll_deg, yaw_deg
4823, 24.31, 1012.44, 187.22, 58.10, 2.14, -1.09, 0.87Note: The code for the visualizer and instructions are available in the GitHub provided below.Final Notes -
This project ended up being a fun mix of embedded systems, sensor fusion, PCB design, and data analysis. The complementary filter tuning in particular took some iteration — if you find yaw drifting over longer flights, tightening the gyro dead-band or lowering the bias adaptation rate are good places to start.
Feel free to build on it however you like. Add a GPS, radio telemetry, or redesign the PCB for a smaller airframe. I'd love to see where it goes!


Comments