


Hardware components | ||||||
_ztBMuBhMHo.jpg?auto=compress%2Cformat&w=48&h=48&fit=fill&bg=ffffff) |
| × | 2 | |||
 |
| × | 1 | |||
| × | 3 | ||||
 |
| × | 3 | |||
 |
| × | 1 | |||
 |
| × | 1 | |||
| × | 1 | ||||
 |
| × | 1 | |||
Software apps and online services | ||||||
 |
| |||||
Hand tools and fabrication machines | ||||||
 |
| |||||
The nRF24L01 is a great low-cost 2.4GHz transceiver for Arduino projects, but it suffers from limited range—especially when obstacles like walls or trees are involved. If you're working on remote sensors, RC planes, or any IoT devices, this limitation can hinder performance.
To fix that, I built a Range Expander Relay Node—a middle node that listens for incoming packets and relays them forward to the receiver, only activating when necessary to save power.
OverviewThis setup includes these steps:
- Transmitter tries to send directly to receiver.
- If no ACK (acknowledgment of packet) is received, it switches to send via relay.
- Relay node forwards the data to the receiver.
- Transmitter retries direct communication periodically (every 1s).
The relay listens to the transmitter’s messages. If the receiver doesn’t respond (i.e., out of range), the relay steps in and forwards the message
Communication Logic[Transmitter]
|
| (direct communication attempt)
↓
[Receiver]
↑
| (fallback via relay)
|
[Relay Node]- TX sends data normally.
- RX sends acknowledgment (ACK) if it gets the data.
- If no ACK is received by TX, Relay steps in and resends the message.
To conserve energy, the relay stays in listening mode and only activates the radio for retransmission when triggered—great for battery-powered outdoor use!
The relay node uses the LowPower library to sleep when idle and wake on incoming data.
Installs via: Library Manager → "LowPower by RocketScream"Arduino sleeps using:
LowPower.powerDown(SLEEP_FOREVER, ADC_OFF, BOD_OFF);Wakes up using an interrupt on pin 2 triggered by the nRF24L01’s IRQ pin.
Result: relay uses almost no power until a packet arrives.
Note: On the Arduino UNO, only pins 2 & 3 can be used for interrupt.
Setup
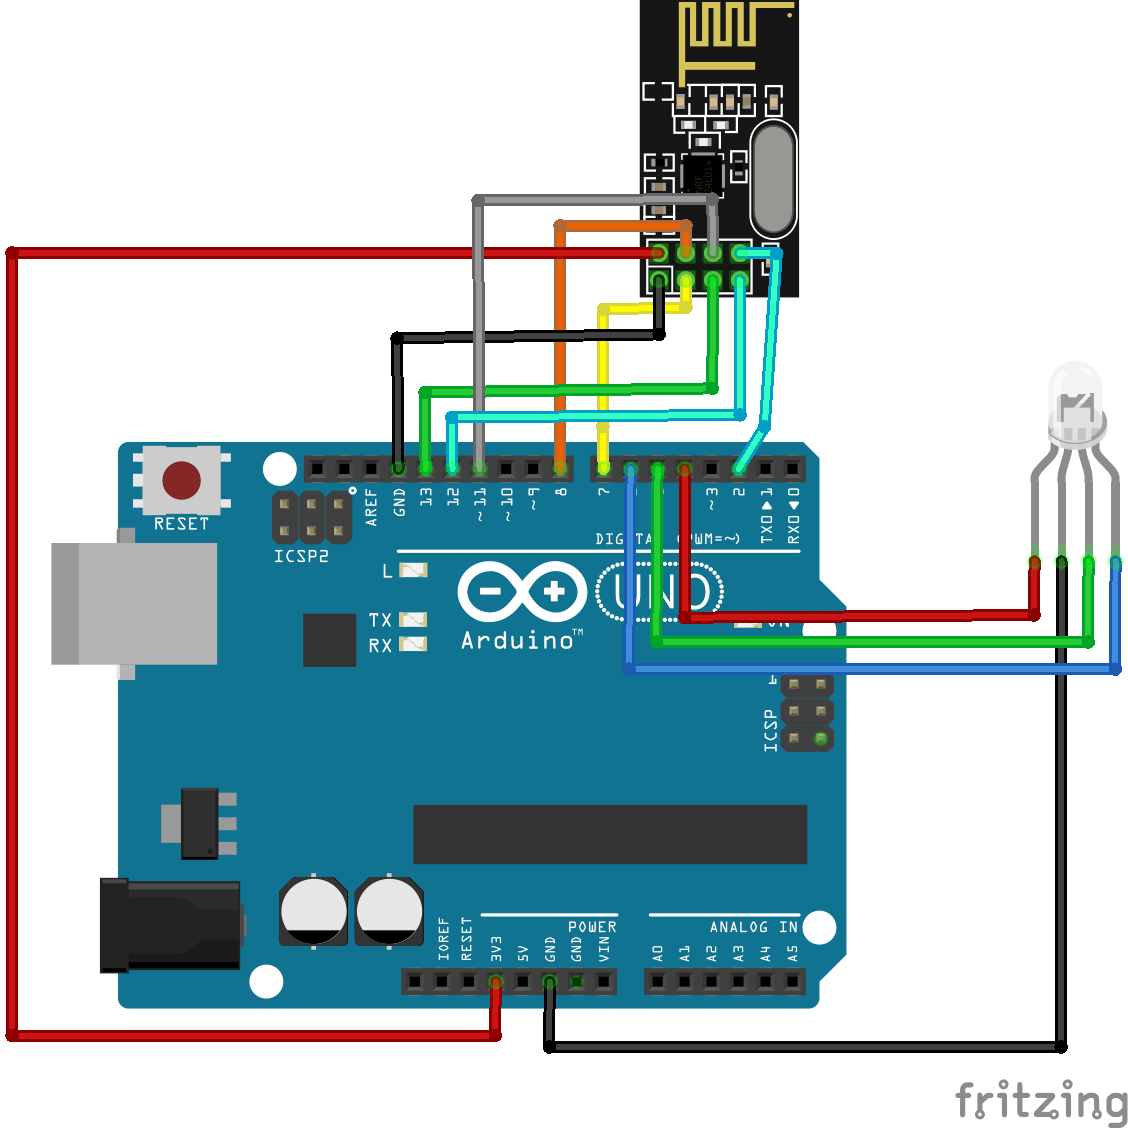
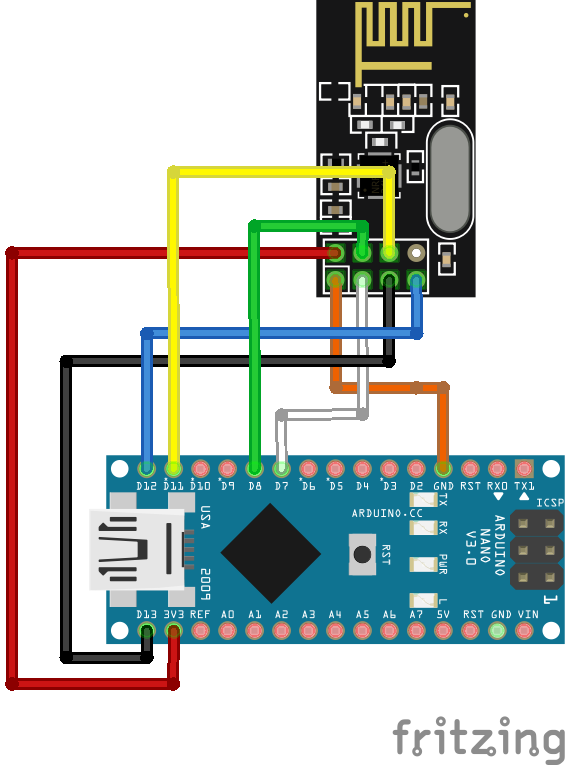
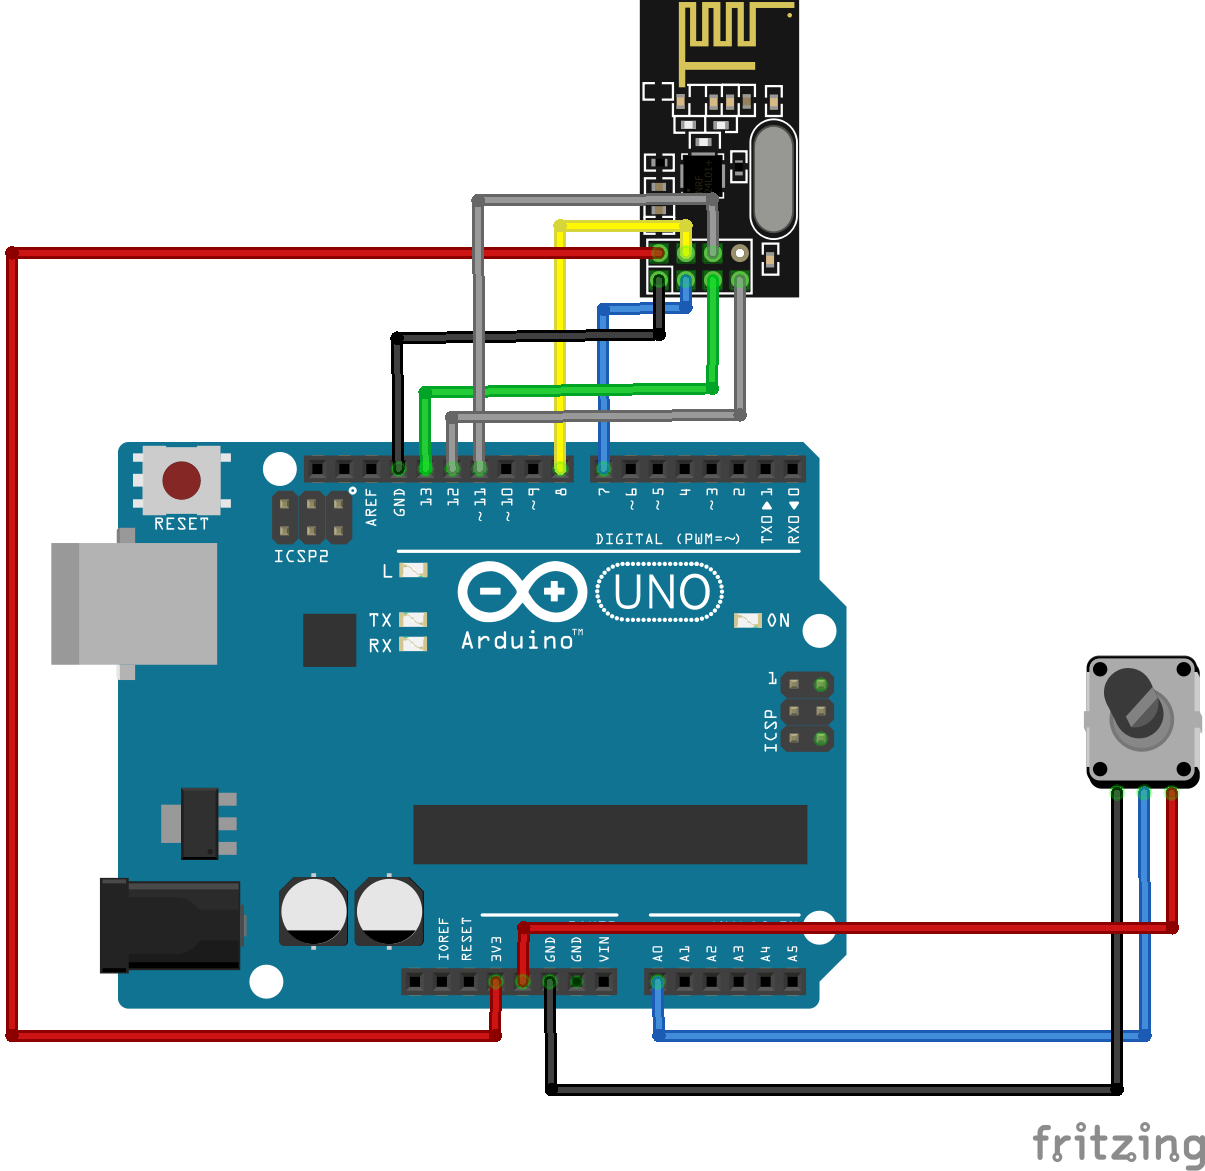
All devices use the same channel (108) and data rate (250KBPS) to ensure compatibility across the network:
radio.setChannel(108);
radio.setDataRate(RF24_250KBPS);
Each node uses unique address pipes to control where data comes from or goes:
Transmitter "77777" → Receiver
Transmitter "88888" → Relay node

Relay Node "88888" ← Transmitter
Relay Node "97777" → Receiver

Receiver "77777" ← Transmitter
Receiver "97777" ← Relay node
Note: While using pipes 1-5 for listening, the first character of the pipe can be the only 1 different (so pipe 1 is "1_pipe", 2 is "2_pipe", 3 is "3_pipe", and etc).
Note: The nrf24lo1+ sends ACK packets on pipe 0 by default so it is best not to use it.
- Transmitter: Uses.openWritingPipe() to write to either the receiver or relay address.
- Relay Node: Uses one reading pipe ("88888") and one writing pipe ("97777") to forward messages.
- Receiver: Uses two reading pipes to accept data from both the transmitter and relay.
This setup allows seamless communication and automatic fallback when the direct link fails.
Transmitter Code(Smart Switching)
If sending to the receiver fails (no ACK), the transmitter switches to the relay:
if (!success && isReceiver) {
  radio.openWritingPipe(relayAddress);
}
Every second, it tries the direct receiver path again:
if (millis() - lastCheckTime >= 1000) {
  radio.openWritingPipe(receiverAddress);
}
Note: This logic ensures the most efficient path (direct to receiver) is always preferred, but communication still works when range is limited.
Receiver Code (Dual Pipe Listening)
The receiver listens for data from both the transmitter and the relay node, using two reading pipes:
radio.openReadingPipe(1, fromTransmitter);
radio.openReadingPipe(2, fromRelay);
In the loop, it checks which pipe the data came from using:
if (radio.available(&pipeNum))
{
  radio.read(&data, sizeof(data));
  Serial.print("Data: ");
  Serial.print(data);
  Serial.print(" | From pipe: ");
  Serial.println(pipeNum);
}
Note: This allows the receiver to accept data directly or via the relay—no changes to wiring or logic needed.
Expander Code:
The relay node acts as a low-power middleman between the transmitter and receiver. It listens on the transmitter’s fallback address ("88888") and forwards any received data to the receiver at address "97777".
- Listening and forwarding: When awake, it reads incoming packets, stops listening briefly, then retransmits to the receiver.
if (radio.available()) {
  radio.read(&data, sizeof(data));
  radio.stopListening();
  delay(5);
  radio.write(&data, sizeof(data));
  radio.startListening();
}- Power saving: If no data arrives for 3 seconds, it returns to deep sleep.
if (millis() - lastPacketTime > 3000) {
  wakeFlag = false;
}- LED status indicators: Show sleep (red), awake (green), and startup (blue) states for easy debugging.
This design ensures the relay conserves battery by sleeping most of the time and only powering up when needed to forward packets, extending operational lifetime in remote or battery-powered setups.
Note: Full code & Schematics are available below ⬇️


Comments