

A Mars rover is a motor vehicle that travels across the surface of the planet Mars upon arrival.
The motion of robot controlling via the internet is one of the easy means as it requires the user to access the designated webpage to guide it. This system can be used in defense applications for detecting landmines in the war field and for bomb detections by mounting a metal detector sensor on it. Further, the size of a device can be miniaturized based upon specific applications.
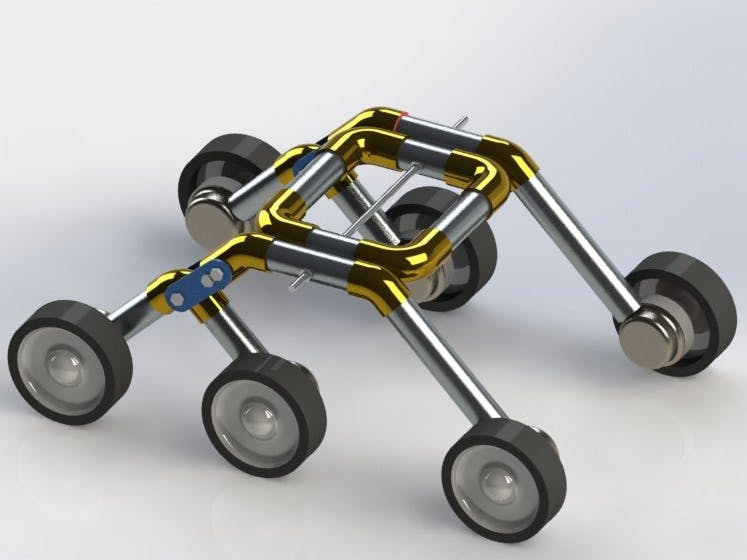
CAD DESIGN:A 12 Volt DC Power Supply has been applying to a microcontroller and Motor Driver. The Microcontroller text input and gives output to the Wi-Fi module. Hereby the directional arrow has been between the microcontroller and Wi-Fi module. Motor Driver is the directional arrow has been used between the Microcontroller and Mobile Control Internet.
Working with the Wi-Fi controlled robot is very easy, we just need to Drag or Slide the joystick in the direction, where we want to move the Robot. If we want to move the Robot in forwarding direction then we need to drag the Joystick ‘circle’ in the forward direction.Like we can move the Robot in Left, Right and Backward direction by Dragging the Joystick in the respective direction. Now as soon as we release the Joystick, it will come back to the Centre and Robot. Blink App sends values from Two AxisJoystick to Arduino through the Wi-Fi medium. Arduino receives the values, compares them with predefined values and moves the robot accordingly in that direction.
We are using a mobile app which is developed Roboindia. After starting bot do some things...
1. Connect our mobile with Nodemcu Wi-Fi (In my case hotspot name is "MyRobot" and Password "iamnotarobot").
2. After that add the IP address in the app (which you maintain on the program). After all of this step, the mobile is used as a controller.
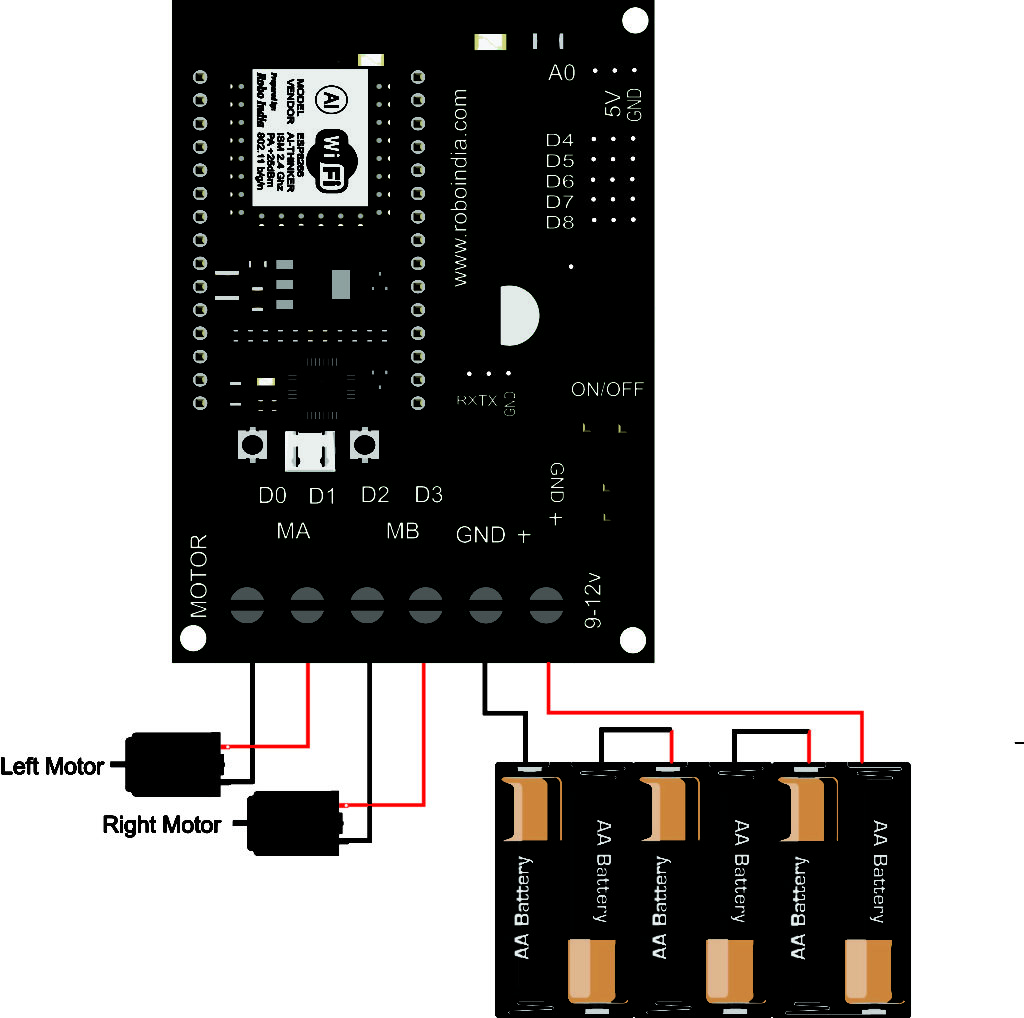
COMPONENT DESCRIPTION:Motor and Motor Driver L293D:
An electric motor is an electrical machine that converts electrical energy into mechanical energy. L293D is a typical Motor driver or Motor Driver IC which allows DC motor to drive in either direction. L293D is a 16-pin IC that can control a set of two DC motors simultaneously in any direction. It means that you can control two DC motor with a single L293D IC. Dual H-bridge Motor Driver Integrated Circuit (IC). Thel293d can drive small and quiet big motors as well, check the VoltageSpecification at the end of this page for more info.
L293D is a typical Motor driver or Motor Driver IC which allows DC motor to drive in either direction. L293D is a16-pin IC that can control a set of two DC motors simultaneously in any direction. It means that you can control two DC motor with a single L293D IC.Dual H-bridge Motor Driver integrated circuit (IC). The l293d can drive small and quiet big motors as well, check the Voltage Specification at the end of this page for more info.
1. L293D is a quadruple high-current half-H driver. TheL293D is designed to provide bidirectional drive currents of up to 600-mA at voltages from 4.5 V to 36 V.
2. All inputs are TTL compatible. Each output is a complete totem-pole drive circuit, with a Darlington transistor sink and a pseudo-Darlington source.
3. Drivers are enabled in pairs, with drivers 1 and 2enabled by 1, 2EN and drivers 3 and 4 enabled by 3, 4EN. • When an enable input is high, the associated drivers are enabled and their outputs are active and in phase with their inputs.
4. When the enable input is low, those drivers are disabled and their outputs are off and in the high-impedance state.
5. A VCC1 terminal, separate from VCC2, is provided for the logic inputs to minimize device power dissipation.
NodeMCU:NodeMCU is an open-source IoT platform. It includes firmware that runs on the ESP8266 Wi-Fi SoC fromEspressif Systems, and hardware which is based on the ESP-12 module. The term"NodeMCU" by default refers to the firmware rather than the development kits. The firmware uses the Lua scripting language. It is based on the Lua project and built on the Espressif NonOS SDK for ESP8266. It uses many opensource projects, such as lua-cjson, and spiffs.
MOTOR:- Rated RPM 30
- Operating Voltage (VDC) 12
- Rated Torque(kg-cm) 5
- Stall Torque (Kg-Cm) 18.8
- Load Current(A) 0.3
- No-Load Current 60 m A
- Motor Diameter(mm) 32
- Shaft Diameter (mm) 6
- Shaft Length (mm) 22
High quality Plastic Tracked Wheel for motors with 6 mmdiameter.
Size:
1. Diameter- 7 CM
2. Width of the wheel - 4 CM
3. Shaft bore - 6 MM
4. Screw provided to tight wheel with motor shaft.
POWER SUPPLY:12V Battery or We used a Mobile power bank for power supply.which gives us 5V/2A output.
COST REPORT:Component Name Price
Nodemcu 300
Motor Driver 345
Tire 199
Motors 732
APPLICATION AND FUTUR SCOPE:1. It can be used as a surveillance robot.
2. For home automation.
3. For control wheel-chair for handicapped.
4. For long-distance controlling of devices.
5. For covering highly dangerous areas etc.
6. For use as an unmanned ground land mine detector.


Comments