


Hardware components | ||||||
 |
| × | 1 | |||
 |
| × | 1 | |||
 |
| × | 1 | |||
Software apps and online services | ||||||
| ||||||
| ||||||
| ||||||
Hand tools and fabrication machines | ||||||
 |
| |||||
We were thinking to ourselves: how can we make our drone smarter? It could already fly, hover, and follow commands, but it felt a bit like any other drone off the shelf. What if we could customize it, add new capabilities, and experiment with its behavior in ways no standard setup allowed?
The BGT60 radarsensor from Infineon is a powerful yet affordable device capable of precisely measuring distance, velocity, and position. In this project, we explored its potential by integrating it into a drone system to measure the drone’s altitude with high accuracy.
The idea was to build something simple but accurate. A setup that could later handle automatic height control on its own.
To keep development light and flexible, we used MicroPython for the radar programming. It’s quick to set up, easy to tweak, and perfect for small experiments like this.
In this post, we focus on the software setup for both the Raspberry Pi and the microcontroller. Documentation for drone assembly and configuration will be linked separately.
Technical BackgroundFMCWRadar
The BGT60 sensor operates on the Frequency Modulated Continuous Wave (FMCW) radar principle, a technique that varies the frequency of the radar signal to measure distance.
This technique allows it to detect objects and measure their distance by analyzing the frequency shift of the reflected waves. The best part? It stays accurate even when the environment is anything but simple.
Telemetry Radio
To transmit flight and sensor data, a telemetry radio system was used. This enables real time communication between the drone and the ground station, ensuring that measurements and control commands are continuously exchanged.
Telemetry data is received via an antenna and sent to the flight controller, enabling real time control and monitoring.
QGroundControl
QGroundControl is the main software used to monitor and configure the drone. It offers an easy-to-use interface for viewing telemetry data, running calibrations, and managing flight operations.
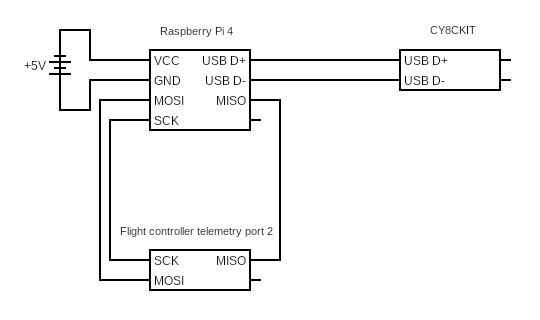
Hardware SetupIn this project, we used the CY8CKIT-062S2-AI Kit from Infineon, which integrates a BGT60 radar sensor.
The core of the setup involves connecting the CY8CKIT board to a Raspberry Pi via USB communication. This connection allows the radar data to be transmitted from the sensor board to the Raspberry Pi, which processes and forwards the information to the flight controller or ground station.
Since the CY8CKIT communicates over USB, the Raspberry Pi’s UART port is still free, which we used to connect to the flight controller’s telemetry port.
To make the setup cleaner, we designed a 3D-printed mount so the radar board sits neatly on top of the Raspberry Pi. The design file for the enclosure is included in the attachments. On the Raspberry Pi, the setup is pretty simple:
On the Raspberry Pi, the setup is pretty simple:
- Installing
minicomto handle serial communication. - Running a custom script to measure and display radar-based distance data.
This provides a simple yet effective way to verify sensor functionality and ensure accurate height readings.
Software Setup CY8CKIT-062STo fetch data from the BGT60 radar sensor, this project uses the officially supported MicroPython library.
If you haven’t set up MicroPython on your PSoC-board yet, just follow the Infineon guide. It’s quick and easy to set up.
We’ve already taken care of the MicroPython radar setup in the last post, so here we’ll focus on how to use it to get real readings.
I used the example project for displaying the current height directly on terminal.
Just make sure your code is saved as 'main.py' inside your persistent memory, so it starts automatically when you power up the board. This can be done by simply uploading the main program into the memory area in the MicroPython Arduino Lab.
After restarting, you’ll see the current height readings show up right in the Arduino Lab terminal.
For creating a new model for the drone, watch this video and follow the official documentation for setup.
For connecting the flight controller with QGroundControl, go to the official PX4 documentation.
Drone CalibrationProper calibration is essential for reliable performance.
- Connection to Controller: Establish communication between the flight controller and the drone system.
- Calibration in QGroundControl: Use the calibration tools in QGroundControl to fine-tune sensors, ensuring accurate altitude and orientation data.
- Connection to Raspberry Pi: Once calibrated, connect the Raspberry Pi to the telemetry port (TELEM2) of the flight controller.
With everything wired up, it was time to see the data flow.
1. Log into the Raspberry Pi via SSH.
2. List all USB devices with
> lsusb3. Use the following command to check whether a USB device was detected and mounted, typically named ttyACM or ttyUSB.
> sudo dmesg | grep -i tty4. Select the correct USB and connect via UART, choose 115200 as baudrate. You should now see the current height plotted. For connection minicom can be used:
> minicom -b 115200 -D /dev/ttyXX5. Start the Drone via QGroundControl. The Current Height can be calculated in real time and will be displayed via the Terminal of the Raspberry Pi.
To make the height data easier to use in future projects, we wrote a short Python script to read one value at a time:
import serial
import re
import time

# Configure your serial port and baudrate
SERIAL_PORT = '/dev/ttyACM1'  # Update to your port
BAUDRATE = 115200

# Regular expression to extract height in cm from the minicom output
height_regex = re.compile(r"Peak detected at: (\d+\.?\d*) cm")

def get_latest_height():
    # Open the serial port
    with serial.Serial(SERIAL_PORT, BAUDRATE, timeout=1) as ser:
        latest_height = None
        while True:
            try:
                line = ser.readline().decode('utf-8').strip()
                if line:
                    match = height_regex.search(line)
                    if match:
                        latest_height = float(match.group(1))
                        print(f"{latest_height}")
                        break
            except KeyboardInterrupt:
                print("Exiting...")
                break
            except Exception as e:
                print(f"Error: {e}")
    return latest_height

if __name__ == "__main__":
    get_latest_height()
The script just grabs the most recent height reading and prints it out, simple and reliable.
By integrating MAVLink communication, the Raspberry Pi can connect to PX4, enabling advanced capabilities such as automatic height control. This lays the foundation for developing an intelligent drone system capable of autonomous flight adjustments based on radar data.
Click here and here to find out more.
I hope this guide helps you explore what’s possible when you combine radar technology with DIY drones! 😊


Comments