


Hardware components | ||||||
 |
| × | 1 | |||
 |
| × | 1 | |||
Software apps and online services | ||||||
 |
| |||||
Nowadays, most cars come with parking sensors pre-installed. But what about older cars? Or cars, where the original sensors no longer work? Is there an easy and cheap way to make a self-made parking sensor?The answer is yes. By using the Infineon BGT60 radar sensor, we can move beyond simple ultrasonic clicks and build a device capable of measuring distance, velocity, and position with industrial-grade accuracy.
Technical BackgroundTo understand how a radar sensor works, you can read my Arduino-Implementation, where I explain the most necessary information as shortly as possible.
Hardware SetupFor this project, we are using the CY8CKIT-062S2-AI Kit from Infineon. This is a "ready-to-go" embedded system that comes with the BGT60 sensor pre-installed, saving us the headache of complex PCB design.
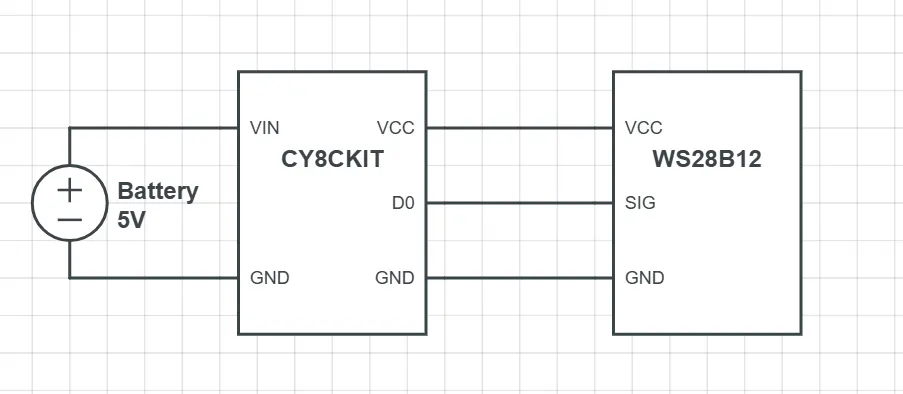
Connecting the LED Strip:
When connecting the LED strip to the CY8CKIT, be careful not to mix up VCC, GND, or Signal. Note that the CY8CKIT operates on 3.3V logic, while most LED strips are rated for 5V.
The CY8CKIT operates on 3.3V logic, while most LED strips are rated for 5V.
- The "Correct" Way: Use a Logic-Level Shifter or Push-Pull-Circuit to boost the 3.3V signal to 5V.
- The "Real World" Way: Many 5V strips are sensitive enough to trigger on a 3.3V signal. Before building a complex circuit, try a direct connection. It might just work!
Getting the code running is straightforward. Infineon provides a dedicated library that handles the complex signal processing of the BGT60.
- Open the Arduino IDE.
- Navigate to Tools -> Manage Libraries.
- Search for "XENSIV BGT60TR13C" and hit install.
- Also, install "Arduino Neopixel" for LED-Control.
One of the biggest challenges in automotive radar is reflection geometry. Most cars have curved bumpers that scatter radar waves away from the sensor rather than reflecting them back.
To solve this, I designed a railway-style mounting system. This allows you to slide the sensor up or down to find the "sweet spot" for your specific vehicle.
Targeting Tip: Radar loves flat, metallic surfaces. When parking, aim your sensor to detect the license plate of the oncoming car. It is the most reliable "reflector" on a vehicle and ensures the most stable distance reading.
Now that the basic distance sensing is working, there are several ways to upgrade this project:
- Audio Feedback: Add a piezo buzzer that increases in frequency as you get closer.
- Wireless Display: Use the onboard Wi-Fi of the CY8CKIT to send distance data directly to your smartphone via a web dashboard.
- Enclosure: 3D print a weatherproof case for the sensor so it survives a rainy day!
Building your own parking sensor with the Infineon BGT60 proves that you don't need a brand-new vehicle to enjoy high-end automotive safety features. With a bit of hardware and the right radar geometry, you’ve transformed a classic car into a precision-guided machine.


Comments