

Hardware components | ||||||
 |
| × | 1 | |||
 |
| × | 1 | |||
| × | 1 | ||||
| × | 1 | ||||
Software apps and online services | ||||||
| ||||||
| ||||||
This project is an extension of my previous project IoT Car and here I have controlled the same car using something newly added to my desk: Magic Gloves. These gloves have special powers and they open the door to many projects.
Steps1. Basic Car
2. Gloves setup
3. Car Setup
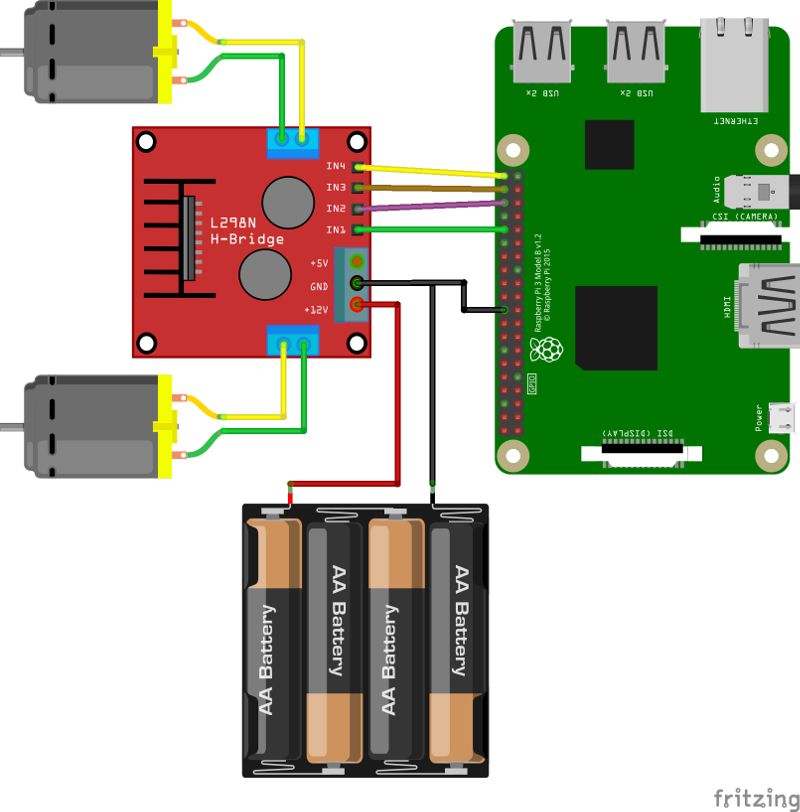
1. Basic CarFor this step, you can follow the similar in my earlier project as there are no changes to it. This incudes assembly as well as wiring diagram
2. Gloves SetupThese gloves come with a basic customizable builtin program but I am going to modify it for my purpose. These gloves have nuilt in Gyro to detect angles and speed of your hand and also potentiometers to detect fingers movements. You need to upload below code into these gloves:
#include <SoftwareSerial.h>
#include "I2Cdev.h"
#include "MPU6050.h"
#include "Wire.h"
#define BTH_RX 11
#define BTH_TX 12
float min_list[5] = {0, 0, 0, 0, 0};
float max_list[5] = {255, 255, 255, 255, 255};
float sampling[5] = {0, 0, 0, 0, 0};
float data[5] = {1500, 1500, 1500, 1500, 1500};
uint16_t ServePwm[5] = {1500, 1500, 1500, 1500, 1500};
uint16_t ServoPwmSet[5] = {1500, 1500, 1500, 1500, 1500};
bool turn_on = true;
SoftwareSerial Bth(BTH_RX, BTH_TX);
float float_map(float in, float left_in, float right_in, float left_out, float right_out)
{
 return (in - left_in) * (right_out - left_out) / (right_in - left_in) + left_out;
}
MPU6050 accelgyro;
int16_t ax, ay, az;
int16_t gx, gy, gz;
float ax0, ay0, az0;
float gx0, gy0, gz0;
float ax1, ay1, az1;
float gx1, gy1, gz1;
int ax_offset, ay_offset, az_offset, gx_offset, gy_offset, gz_offset;
void setup() {
 // put your setup code here, to run once:
 //蓝牙配置
 Bth.begin(9600);
 Bth.print("AT+ROLE=S");  //蓝牙配置为主模式
 delay(100);
 Bth.print("AT+RESET");  //软重启蓝牙模块
 delay(250);
 //MPU6050 配置
 Wire.begin();
 accelgyro.initialize();
 accelgyro.setFullScaleGyroRange(3); //设定角速度量程
 accelgyro.setFullScaleAccelRange(1); //设定加速度量程
 delay(200);
 accelgyro.getMotion6(&ax, &ay, &az, &gx, &gy, &gz);  //获取当前各轴数据以校准
 ax_offset = ax;  //X轴加速度校准数据
 ay_offset = ay;  //Y轴加速度校准数据
 az_offset = az - 8192;  //Z轴加速度校准数据
 gx_offset = gx; //X轴角速度校准数据
 gy_offset = gy; //Y轴角速度校准数据
 gz_offset = gz; //Z轴教书的校准数据
}
//Get individual finger potentiometer data
void finger() {
 // put your main code here, to run repeatedly:
 static uint32_t timer_sampling;
 static uint32_t timer_init;
 static uint32_t timer_lsc = 0;
 static uint8_t init_step = 0;
 if (timer_lsc == 0)
   timer_lsc = millis();
 if (timer_sampling <= millis())
 {
   for (int i = 14; i <= 18; i++)
   {
     if (i < 18)
       sampling[i - 14] += analogRead(i); //Read data from each finger
     else
       sampling[i - 14] += analogRead(A6);  //Read the data of the little finger, because IIC uses A4, A5, so it can't read continuously from A0
     sampling[i - 14] = sampling[i - 14] / 2.0; //Take the mean of the last and current measurements
     data[i - 14 ] = float_map( sampling[i - 14],min_list[i - 14], max_list[i - 14], 2500, 500); //Map measured values to 500-2500, 500 for clenched hands and 2500 for open
     data[i - 14] = data[i - 14] > 2500 ? 2500 : data[i - 14];  // The maximum limit is 2500
     data[i - 14] = data[i - 14] < 500 ? 500 : data[ i - 14];   //The minimum limit is 500
   }
 }
 if (turn_on && timer_init < millis())
 {
   switch (init_step)
   {
     case 0:
       timer_init = millis() + 20;
       init_step++;
       break;
     case 1:
       timer_init = millis() + 200;
       init_step++;
       break;
     case 2:
       timer_init = millis() + 50;
       init_step++;
       break;
     case 3:
       timer_init = millis() + 500;
       init_step++;
       for (int i = 14; i <= 18; i++)
       {
         max_list[i - 14] = sampling[i - 14];
       }
       break;
     case 4:
       init_step++;
       break;
     case 5:
       if ((max_list[1] - sampling[1]) > 50)
       {
         init_step++;
         timer_init = millis() + 2000;
       }
       break;
     case 6:
       timer_init = millis() + 200;
       init_step++;
       break;
     case 7:
       timer_init = millis() + 50;
       init_step++;
       break;
     case 8:
       timer_init = millis() + 500;
       init_step++;
       for (int i = 14; i <= 18; i++)
       {
         min_list[i - 14] = sampling[i - 14];
       }
       turn_on = false;
       break;
     default:
       break;
   }
 }
}
float radianX;
float radianY;
float radianZ;
float radianX_last; //The resulting X-axis tilt angle
float radianY_last; //The resulting Y-axis inclination
float radianZ_last; //The resulting Z-axis tilt angle
//更新倾角传感器数据
void update_mpu6050()
{
 static uint32_t timer_u;
 if (timer_u < millis())
 {
   // put your main code here, to run repeatedly:
   timer_u = millis() + 20;
   accelgyro.getMotion6(&ax, &ay, &az, &gx, &gy, &gz);
   ax0 = ((float)(ax)) * 0.3 + ax0 * 0.7;  //对读取到的值进行滤波
   ay0 = ((float)(ay)) * 0.3 + ay0 * 0.7;
   az0 = ((float)(az)) * 0.3 + az0 * 0.7;
   ax1 = (ax0 - ax_offset) /  8192.0;  // 校正,并转为重力加速度的倍数
   ay1 = (ay0 - ay_offset) /  8192.0;
   az1 = (az0 - az_offset) /  8192.0;
   gx0 = ((float)(gx)) * 0.3 + gx0 * 0.7;  //对读取到的角速度的值进行滤波
   gy0 = ((float)(gy)) * 0.3 + gy0 * 0.7;
   gz0 = ((float)(gz)) * 0.3 + gz0 * 0.7;
   gx1 = (gx0 - gx_offset);  //校正角速度
   gy1 = (gy0 - gy_offset);
   gz1 = (gz0 - gz_offset);
   //Complementary calculation of x-axis inclination
   radianX = atan2(ay1, az1);
   radianX = radianX * 180.0 / 3.1415926;
   float radian_temp = (float)(gx1) / 16.4 * 0.02;
   radianX_last = 0.8 * (radianX_last + radian_temp) + (-radianX) * 0.2;
   //Complementary calculation of y-axis inclination
   radianY = atan2(ax1, az1);
   radianY = radianY * 180.0 / 3.1415926;
   radian_temp = (float)(gy1) / 16.4 * 0.01;
   radianY_last = 0.8 * (radianY_last + radian_temp) + (-radianY) * 0.2;
   //Complementary calculation of y-axis inclination
   radianZ = atan2(ax1, ay1);
   radianZ = radianZ * 180.0 / 3.1415926;
   radian_temp = (float)(gz1) / 16.4 * 0.01;
   radianZ_last = 0.8 * (radianZ_last + radian_temp) + (-radianZ) * 0.2;
 }
}
#define STOP       0
#define GO_FORWARD 1
#define GO_BACK    2
#define TURN_LEFT  3
#define TURN_RIGHT 4
//run,控制六足
void run()
{
 static uint32_t timer;
 static uint32_t step;
 char act;
 static int last_act;
 static uint8_t count = 0;
 if (timer > millis())
   return;
 timer = millis() + 80;
 if (radianY_last < -20 && radianY_last > -90) // The right angle of the palm is greater than 35 degrees and less than 90 degrees, the middle finger extends the ring finger bending
 {
   act = 'f'; //右转
 }
 else if (radianY_last < 90 && radianY_last > 20)    // The left angle of the palm is greater than 35 degrees and less than 90 degrees, the middle finger extends the ring finger bending
 {
   act = 'b'; //左转
 }
 else if (radianX_last < -20 && radianY_last > -90)  //With your palms down, make a fist (middle finger bends), stop
 {
   act = 'l';
 }
 else if (radianX_last < 90 &&  radianX_last > 20)  //With your palms down, open your hand (middle finger straight), move forward
 {
   act = 'r';
 }
 else
 {
   act = 's';
 }
 Bth.print(act);
  /*Bth.print("x");
 if (radianY_last < -130 ||  radianY_last > 130)  //The palm is facing up, the middle finger is bent, the little finger is straight (Spider-Man action), back
 {
   act = GO_BACK;
 }
 if (radianY_last < -130 ||  radianY_last > 130 ) //Hand palm up, open your hand, stop
 {
   act = STOP;
 }
if(data[0]<1000){
   act='a';
   Bth.print(act);
 }
 else if(data[0]>2000){
   act='b';
   Bth.print(act);
 }
 if(data[1]<1000){
   act='c';
   Bth.print(act);
 }
 else if(data[1]>2000){
   act='d';
   Bth.print(act);
 }
 if(data[2]<1000){
   act='e';
   Bth.print(act);
 }
 else if(data[2]>2000){
   act='f';
   Bth.print(act);
 }
 if(data[3]<1000){
   act='g';
   Bth.print(act);
 }
 else if(data[3]>2000){
   act='h';
   Bth.print(act);
 }
 if(data[4]<1000){
   act='i';
   Bth.print(act);
 }
 else if(data[4]>2000){
   act='j';
   Bth.print(act);
 }
 Bth.print('z');*/
}
void loop() {
 finger();
 update_mpu6050();
 run();
}
This code is basically detecting the angle at which you are turning your palm and based on this it sends a character to car.
3. Car SetupIn my previous project, I used PHP and GPIO library to recieve signals and control car. But in this project, I have used Python to process the commands coming from Gloves. Below code receives and processes the incoming commands:
import bluepy.btle as btle
import RPi.GPIO as GPIO
GPIO.setwarnings(False)
GPIO.setmode(GPIO.BOARD)
GPIO.setup(16,GPIO.OUT)
GPIO.setup(18,GPIO.OUT)
GPIO.setup(38,GPIO.OUT)
GPIO.setup(40,GPIO.OUT)
class ReadDelegate(btle.DefaultDelegate):
   def handleNotification(self, cHandle, data):
		if(data=="r"):
			GPIO.output(16,GPIO.HIGH)
			GPIO.output(18,GPIO.LOW)
			GPIO.output(38,GPIO.LOW)
			GPIO.output(40,GPIO.HIGH)
		elif(data=="l"):
			GPIO.output(16,GPIO.LOW)
			GPIO.output(18,GPIO.HIGH)
			GPIO.output(38,GPIO.HIGH)
			GPIO.output(40,GPIO.LOW)
		elif(data=="f"):
			GPIO.output(16,GPIO.HIGH)
			GPIO.output(18,GPIO.LOW)
			GPIO.output(38,GPIO.HIGH)
			GPIO.output(40,GPIO.LOW)
		elif(data=="b"):
			GPIO.output(16,GPIO.LOW)
			GPIO.output(18,GPIO.HIGH)
			GPIO.output(38,GPIO.LOW)
			GPIO.output(40,GPIO.HIGH)
		elif(data=="s"):
			GPIO.output(16,GPIO.LOW)
			GPIO.output(18,GPIO.LOW)
			GPIO.output(38,GPIO.LOW)
			GPIO.output(40,GPIO.LOW)
p = btle.Peripheral("9C:1D:58:1F:B8:18")
p.withDelegate(ReadDelegate())
while True:
	while p.waitForNotifications(0):
		pass
Setting uo raspberry pi to connect to Gloves is also very easy but requires you to run some codes. Please make sure to change MAC address in above code to be same as your gloves BLE mac address. Below commands will help you do gloves connectivity:
1. sudo bluetoothctl
2. agent on
3. default-agent
4. pair XX:XX:XX:XX:XX:XX (put your gloves mac address here)
5. trust XX:XX:XX:XX:XX:XX
You can follow these instructions from this link as well. Once this setup is done, you need to make sure that your code runs as soon as raspberry pi boots. This can be achived by starting it as Service. Use below commands to achieve this:
1. cd /lib/systemd/system/
2. sudo nano car.service (service name)
3. put below code in this service file (car_control.py is pythin code that you saw above):
[Unit]
Description=My Car
After=multi-user.target
[Service]
Type=simple
ExecStart=/usr/bin/python /home/pi/car_control.py
Restart=always
[Install]
WantedBy=multi-user.target
4. sudo chmod 644 /lib/systemd/system/car.service
5. chmod +x /home/pi/car_control.py
6. sudo systemctl daemon-reload
7. sudo systemctl enable car.service
8. sudo systemctl start car.service
9. sudo systemctl status car.service
OperationIn order to run this car, you need to wear your gloves and turn on the car. Move your palm in different angles and see the magic happening.
Check the car in action in this video:


_3u05Tpwasz.png?auto=compress%2Cformat&w=40&h=40&fit=fillmax&bg=fff&dpr=2)
Comments