

_PCQwVYc7hX.png?auto=compress%2Cformat&w=900&h=675&fit=min)
Hardware components | ||||||
_ztBMuBhMHo.jpg?auto=compress%2Cformat&w=48&h=48&fit=fill&bg=ffffff) |
| × | 1 | |||
 |
| × | 1 | |||
 |
| × | 1 | |||
 |
| × | 1 | |||
 |
| × | 1 | |||
 |
| × | 1 | |||
Software apps and online services | ||||||
 |
| |||||
 |
| |||||
Hand tools and fabrication machines | ||||||
 |
| |||||
 |
| |||||
 |
| |||||
Ever wondered if we could scare our friends in the dark and have a good laugh? Ever wondered if we could create a simple artificial ghost and haunt your house?!
Well here is a system that we devised that does exactly so, the system uses an Arduino and the code and schematics were created with Circuito.io ( a fun and easy software that creates the founding blocks of you projects, great for beginners, do check it out! ). Follow on to see how our ''Ghost'' works and how we made it!
This idea came up with the often occurring fear of Darkness! Our system works with the help of a light sensor, which detects the light intensity in the room. Using this the program gets activated when the lights are put off at night, in other words when it's completely dark. We then cleverly recorded and manipulated are voices to make it sound like a ghost. If the person who is pranked turns on the light scared the voice immediately stops. Giving the effect as though there is a real ghost in the room, giving it a haunted feeling and making you roll with laughter as you see your friend freak out!!!
MECHANISM
We made the device portable and small so that it can fit in any small hiding place in your house. We decided to hide it in a book, more of that in the next steps. As we didn't have an Arduino audio shield, we hacked our smartphone to fit into our device. We figure that we needed to click on two buttons, the ''Play'' and the ''Skip''. To do this we used servo motors having tips wrapped in foil, which clicks on the screen either playing or skipping the audio clips. All of the components were mounted on a custom laser cut part that we modeled.
LET'S GET MAKING!Materials Needed:
- LDR ( Photo resistor)
- 9 volt battery + clip
- Jumper wire
- 2 x rubber bands
- And your smartphone!
Assembling the system:
Start by getting the laser-cutting file cut,( though keep in mind that it needs to fit your smartphone) you will need to make few adjustments. Once done peel the protective layer.
Squirt out dabs of hot glue around the servo, making sure that the horns touch the required buttons. Stick both of them firmly in place, you can then move and with the switch and stick the Arduino UNO with a strip of double sided tape. (Follow the pictures to better understand the arrangement).
MAKING THE ALUMINIUM TABS:
Take the leftover pieces of acrylic from the slot and break it into two small tabs. Wrap them with foil and connect arduino's ground pin to it, imitating them to act like your fingers and the touch screen
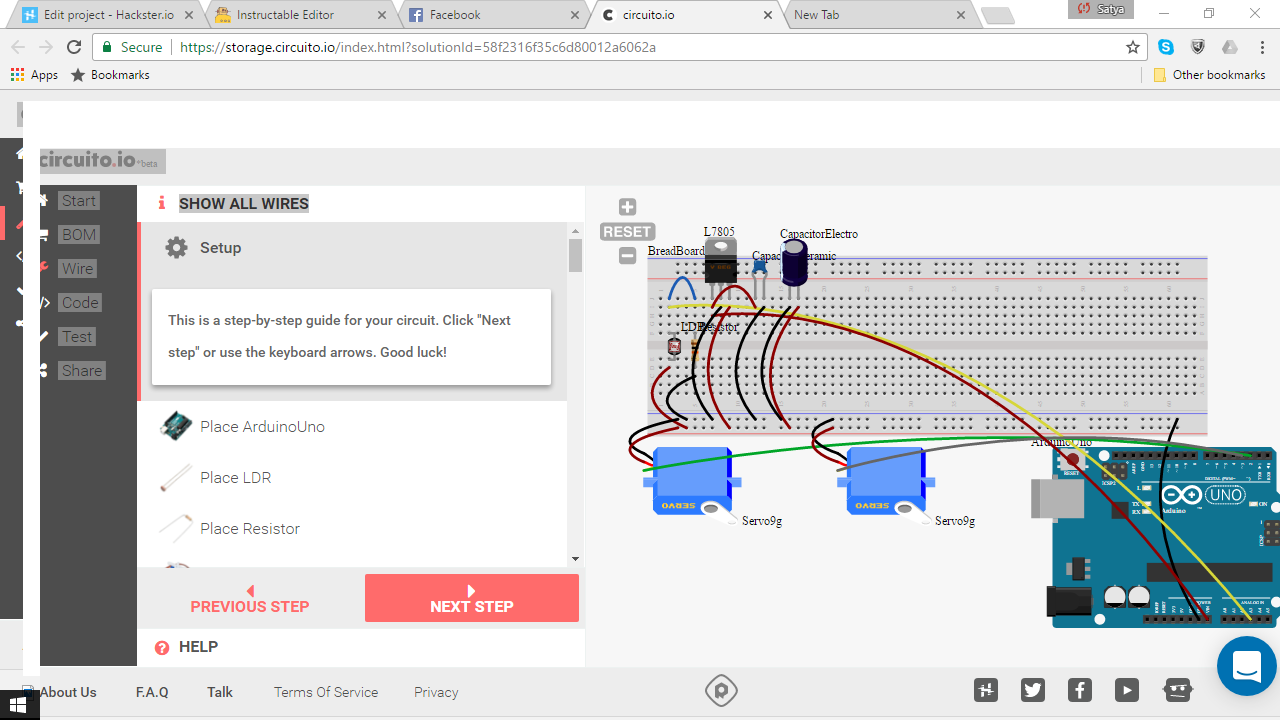
Wire them all up, hooking up the servo motors to the Arduino with jumper wires. Follow the schematics.
THE AUDIO RECORDINGS:
This is one of the most fun parts, it's when your ghost comes to life. Record some spooky ghost lines and be creative in making it scary with sound effects! Then upload the clips to your smartphone in the right sequence and you are nearly done!
YOU'RE DONE!
We had made this cut out book a while back and found it a perfect object to conceal the system. Try and find a none obvious hiding spot or an object like a pot or an old regulator case, etc...
You are ready, wait till evening and prank your friend by slipping in your smartphone and clicking a switch! This spooked us out to even though we made it. It got us hilarious results and we feel it definitely does give a shiver!
Well here you have it a Darkness Activated Ghost. Hope you enjoyed : )
Happy making, cheers!


Comments