


Hardware components | ||||||
 |
| × | 2 | |||
| × | 2 | ||||
| × | 1 | ||||
| × | 1 | ||||
| × | 1 | ||||
 |
| × | 1 | |||
 |
| × | 1 | |||
 |
| × | 50 | |||
 |
| × | 20 | |||
| × | 4 | ||||
Software apps and online services | ||||||
| ||||||
Hand tools and fabrication machines | ||||||
 |
| |||||
 |
| |||||
USBcycle is a bicycle hacked into a USB game controller. It enables you to pedal your way through open-world games of two flavours:
(A) multi-axis joystick-driven games where you control a vehicle with an accelerator, brakes, and steering (like GTA and ETS2 or maybe a flight simulator) plus additional keyboard inputs
(B) WASD FPS "walking" games like Portal, Talos Principle, Half Life, Dear Esther etc.
(A longer video is also available). This project is more about software than hardware; I didn't do any original electronic circuit design. I just put together a pile of off-the-shelf parts and then wrote the Arduino code to turn them into a USB game controller driven by a bicycle. The only cleverness here is in the code and the physical modifications to the bike (and even those are pretty crude).
In this write up I'm using the quote format (immediately below) for asides, disclaimers, and game-specific notes rather than for quoting other people. The Project Hub doesn't offer us much flexibility in formatting, so I'm making the best of what is available.
Disclaimer: After I was almost done with editing this writeup I thought (rather belatedly) I should have a look around and check if anyone else was using the same name for a similar project. To my dismay I did find a "USB Cycle" project, and their logo was embarrassingly similar to mine -- I guess geek minds think alike, ouch -- but I couldn't figure out what it was all about because I can't read Dutch. It was based in the Netherlands and looked kind of academic, with Powerpoint presentations and so on -- and it seemed to have no Twitter activity since early 2014. So I hope that it is dormant or completed, and that the Dutch team will not feel I'm infringing on their public image or trying to steal their street cred. I just want to say for the record that I have no connection with this other project of similar name, had no prior knowledge of its existence when I was building my USBcycle, and only discovered it after I had completed and named my project. The Dutch project seems to be called USB Cycle with a space, whereas mine is called USBcycle without a space. If the USB Cycle team objects to my use of this name, or to my logo, I invite them to contact me; for courtesy's sake I'm willing to use one of the fallback names I came up with, even though these are not as good (so I'm hoping they don't contact me!)USBcycle ... why?
The problem with coastal BC (where I live) is that the winters are really long, dark, wet... not conducive to healthy outdoor exercise. I get out of shape in the winter. I used to be a pretty avid cyclist, but the weather plus our locally bike-unfriendly terrain have reduced me to a winter couch potato. Well, computer potato really, I spend more time playing games or coding than watching TV.
No problem, right? Get an exercise bike! Low-impact indoor exercise, no rain, no mud, no traffic, what could be easier?
The problem with exercise bikes is that they are Boring. I mean, Really Boring. It's hard (for me anyway) to get motivated to do something so insanely boring for even 10 minutes, let alone an hour or more. But I can play immersive computer games for hours without getting bored. Hmmm.
The obvious solution: equip the exercise bike with a video screen and tie it to some kind of interesting game-like software. It's such an obvious solution that quite a few people are working on it at present. Their projects run the gamut from fairly slick licensed training or exercise packages to garage-based Maker efforts. I categorise them roughly into three flavours:
- Advanced bike training simulators & stands (the kind serious professional racers use) offer race course simulations (of real-world courses that the cyclist is preparing for) complete with app-controlled resistance scaled to grade. Some high-tech trainer stands offer a flexible mount so the bike can lean a bit and feel more natural. Very nifty. But the number of courses is fairly small, the software is proprietary, and the hardware is super expensive.
- In the world of academia and prototyping, there are some clever folks tying bikes to Google Earth; a real-time virtual ride across Canada is in progress. That's a very cool project but seems a bit daunting to replicate at home. And frankly, google street view (in my experience) is more like a slide show than animation.
- At the lower end of the market, the "USB game controller bike" is starting to appear; various creative geeks have come up with free or commercial bike/game controller projects (pedal your way through Mario Kart! pedal your way through infinitely generated terrain!). Also, there are a handful of iThing/computer based exercise bike programs offering virtual tracks/courses of varying complexity. And one company is marketing a dedicated USB bike-shaped controller and some simple games to go with it. But it's not generic (it's tied to architecture-specific h/w interfaces and/or to proprietary games from the vendor). And it costs beaucoup bux
Meanwhile, I have a good old MTB that I don't use much any more (getting too old to think that riding around in the rain and cold of a BC winter is fun). And I have a moderately beastly gaming computer (an i7 Hackintosh with a GTX 970, quite adequate as long as I stay in the 1080p world) and I have already paid the license fees for a really good open-world driving simulator -- one so likeable and fun that I've spent over 300 hours driving it. Sitting on my increasingly padded bum all winter driving a virtual truck all over Europe is not helping me stay in shape... but surely these three resources could be combined into a virtual biking setup, at a reasonable cost?
So, early in 2017, I decided to see if I could turn an ordinary off-the-shelf bike into a USB game controller that would enable me to cycle, rather than drive, through the over 45,000 (virtual) km of European roadways in my favourite open-world sim. It took about 4 months because I was really starting from scratch (had never built any homegrown electronics before, other than assembling computers from components, had only the vaguest idea of what an Arduino is), but in the end I succeeded -- and hope that others may decide to do likewise based on my experience.
The end result: a generic bike-to-joystick controller (USBcycle), with a user control panel mounted on the handlebars. The user control panel includes a generous array of buttons (36 at last count!); I have customised my controller by mapping the buttons to commands specific to ETS2, and the final result is a virtual bike touring experience that I really enjoy, which should motivate me to exercise more regularly during the long BC winter.... and I call it...
Complete Ingredients List
An Open World to Ride Through:
- 1 copy of SCS' driving simulator, Euro Truck Simulator 2 (or American Truck Simulator). This sim is available for OSX, SteamOS and Linux as well as Windows. It is available through Steam. The core game only costs $22 CDN but you will want the DLCs; the "whole enchilada" from SCS is more like $60, and you can expand your open world for free with various community map mods.
- plus: a simple mod to make the player's POV more like a cyclist's view of the road. I can provide this mod for you.
Hardware to Run the Open World and Ride Through It:
- 1 gaming computer capable of running ETS2 or ATS at a graphic quality that makes you happy
- 1 Bike or Exercise Gizmo: 1 standard road bike, MTB, recumbent or whatever you've got lying around that has at least one drive wheel, a steering device, and a brake actuator. If your bike gizmo is a real bike then you'll need a training stand (doesn't have to be fancy, I got a cheapie off Ebay). You could use a roller stand, but I think you'd lose the ability to steer using the bike handlebars -- I think twisting the bars when on a roller stand results in falling over, though I haven't verified this personally.
- 1 Controller to make the Bike into a USBcycle:
The USBcycle Controller:
- 2 Arduino Leos
- some hacked-together hardware to mount the sensors appropriately on the bike; not having a 3d printer I like to build stuff out of foamcore, doorskin, 1/4" ply, scrap wood, hot glue, closed-cell packing foam, velcro, electrician's tape, etc.
- various long USB cables, long HDMI cable, long audio cable etc, to carry signals between computer and bike. You can use powered devices to extend these lengths to over 100 feet if need be. I just kept the bike near the computer :-)
- a few specialised (and more expensive) electronic components: one ams 5601 Hall rotary encoder on an I2C breakout board, Adafruit Trellis keypads (I2C again), Adafruit 7 segment display I2C backpack, WiiChuck (this is also I2C) for WASD version.
- a bin of small generic (cheap) electronic components -- resistors, LEDs, capacitors, 7 seg displays, a linear pot, a knob, slide switches, reed switches, a Hall linear encoder (proximity sensor), pushbuttons, solderless prototyping breadboards, small prototyping PCBs, jumper wires, RJ45 connectors and cable, etc.
- a project box with a user control panel, to be mounted on the bike handlebars. fab one up or repurpose a jewellery box or some other box -- about the size of 2 stacked hardback books was comfortable for me, but I'm sure you could make it more compact.
- the usual basic hand tools of the electronics trade, antistat mat, etc. Mostly, they don't have to be super expensive; but I do recommend you buy or borrow a decent soldering iron for the final assembly (and for building kit components such as Adafruit backpacks). A good iron can make all the difference between frustration (and possibly component damage) and success.
- possibly the most important resource for your project: the terrific Arduino community. The forum, the free libraries for almost every breakout board and device under the sun, the zillions of documented projects, the official online doco and tutorials: all this enabled me to go from "what's an Arduino" to a working, fairly complex, project in under 6 months. Admittedly I have a background in both coding and electronics, but I think even an absolute n00b can succeed with Arduino because of the very high quality of support (both official and community).
I guesstimate the total electronics cost to be under $250. I didn't really keep track because I was gearing up for Arduino hacking generally and bought way more parts than ever went into the USBcycle project.
Lastly, when putting it all together for actual use, you need a screen in front of the bike to watch the world go by (at first I just stole the TV from the living room), and it's nice to hear the ambient sound effects if there are any, so:
The Video and Audio Output
- 1 large screen 1080p display to put in front of the bike
- (luxury item) stereo speakers to enjoy game SFX while riding; or you could wear headphones.
------------------------------------------------------------------
The objectives:
First milestone: build a simple WASD controller in which pedalling action determines speed and fwd/reverse. Steer by using a real mouse or emulating mouse movement. Use a portable stepper device as the pedal unit. This was Phase One: a feasibility study and prototype. If this worked out well, I planned to proceed to...
Second milestone: Use a real bike instead of a stepper. Instead of simple WASD keystrokes, emulate the accelerator/brake/steering control axes by instrumenting the bike. Steer using the handlebars, brake with the R-hand brake lever, and accelerate with pedalling speed. Make it feel (sorta) like riding a bike.
Note that as of this version of USBcycle, I have not yet succeeded in getting any telemetry out of the game, so this is a zero-feedback system. The controller cannot know (any more than my Driving Force GT controller knows) the truck speed or position. So it is a fairly dumb system at present. If I were a faster/better C coder, or could find a collaborator, telemetry would open up all kinds of possibilities (like a fan speed controller that would blow air on your face proportionate to your speed, maybe app-controlled resistance so hills are more realistic, etc). That would all be very nifty and is on my list of future projects.
The Development Kit: Arduino
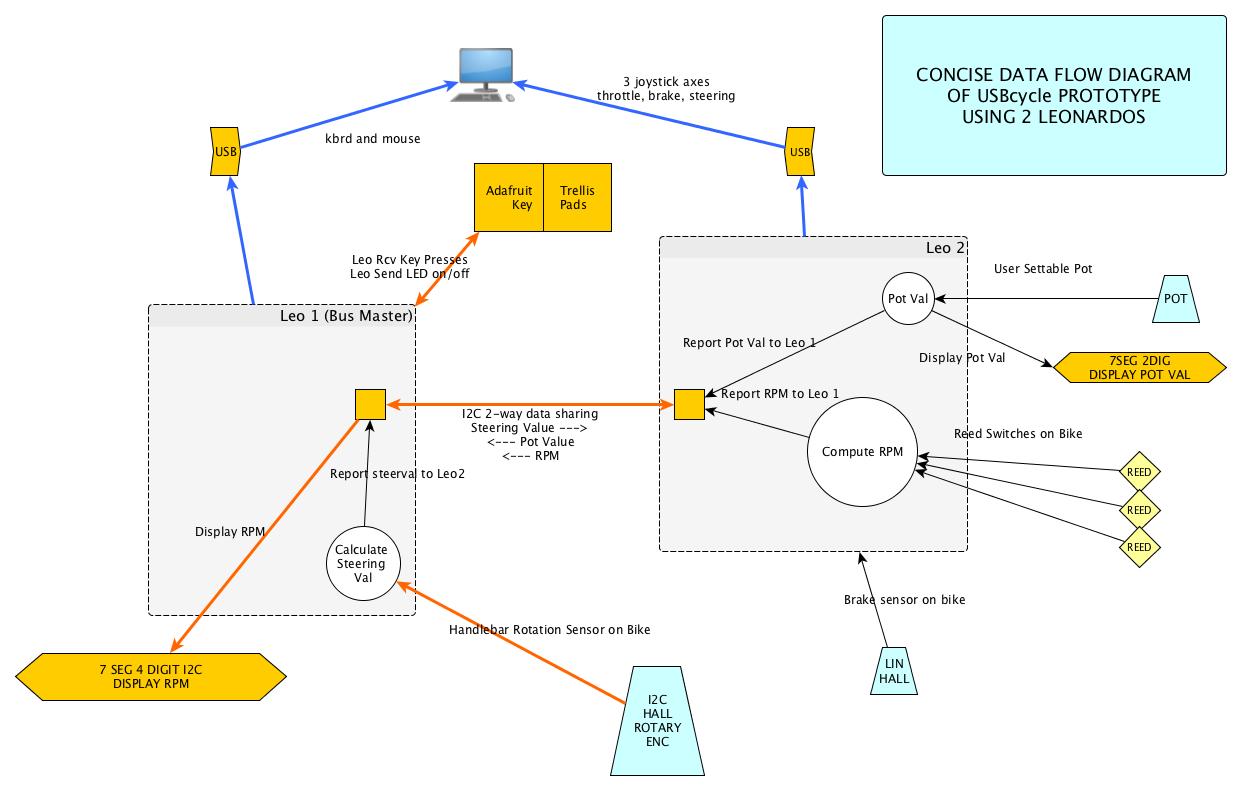
I was starting from zero here, never having done any microcontroller hobby stuff. I decided to use Arduino technology because it seemed popular, well-supported and user-friendly. So I would be using Arduino to build a device that emulates 2 USB HIDs : a keyboard and mouse device, and a joystick with 3 axes. This actually requires 2 'duinos because each one can only emulate one HID.
UPDATE Dec 2017: I don't know why I was so sure of this HID limitation when I started the project. It turns out that one Leonardo can in fact emulate an arbitrary number of HIDs. Probably my app would not have fit in the available memory on one Leo, so my 2-Leo system might have been a good choice anyway; but I am now quite sure that you could fit the whole shebang on one Due.
I knew I needed to provide lots of buttons on a control panel to send keystrokes to the game (which uses a lot of single-key commands); also I needed a mouse equivalent for mouse functions (look-around, navigating menus), or perhaps I would map some other controller to send mouse events. And I needed to accept some inputs from sensors on the bike.
Already it was obvious that the Phase Two version would involve a lot of I/O.
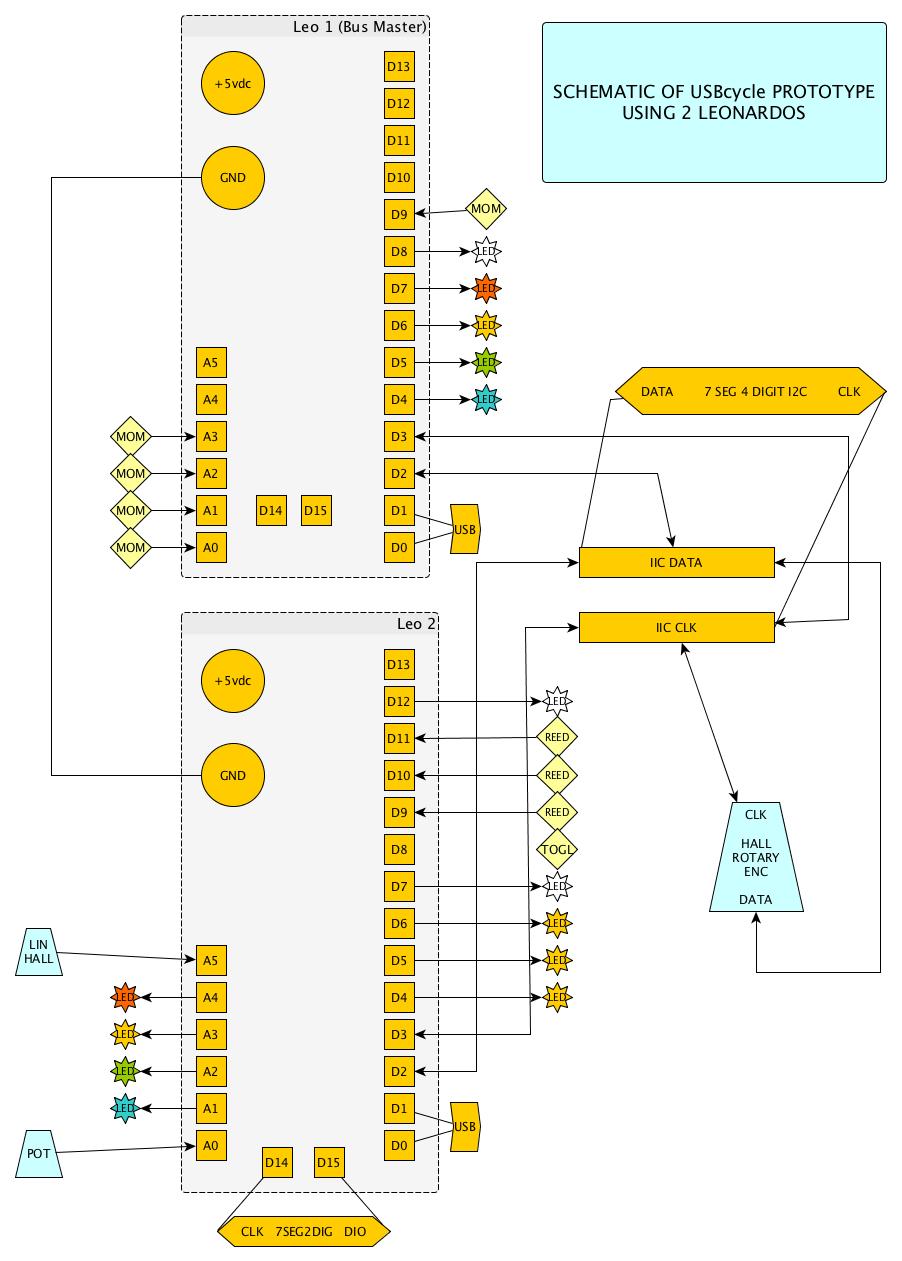
The two Leos, between them, have to monitor all the pushbuttons, knobs and other user-input devices and translate them into game commands; monitor the sensors on the bike and translate their values into joystick axis values; and provide diagnostic and functional feedback by way of LEDs, segment displays, etc. As it turned out, I used almost every I/O port on both Leos, and I could have used a few more. Distributing the work between the two Leos took a bit of thinking and several iterations. The two Leos also had to talk to one another, another challenge!
Fortunately for me, other Arduino users have written many useful libraries including one that permits Arduinos to talk to each other over the IIC (I2C) bus.
This handy bus was a bacon-saver for me. It requires only two wires/pins for communication, and many modern components are able to use it. Not only could I make the two Leos communicate over I2C, but where possible I used sensors and display devices that also "speak" I2C, thus economising on Arduino I/O ports. For example, the Adafruit Trellis keypad gives me 16 buttons using only 4 wires (vdc, gnd, and I2C clk and data) each going to a common bus. I needed 2 of these keypads for a total of 32 buttons -- I could never have fitted the whole application into two Leos without I2C.
I used the standard Arduino development environment for OSX; I tried some other variants (Platformio, etc) but in the end found that the Arduino IDE was adequate when combined with external editing using vi when revision got serious. Revision control has been pretty sketchy so far, mostly achieved by renaming source files at various checkpoints (oh dear, cowboy coding); after achieving the second milestone I'm getting more serious about revision control and using git (locally) for tracking day to day development, and github for publishing.
Other Software
Aside from the 'duino code to run on Leo 1 and Leo 2, I needed to make a simple little mod for ETS2 that would move one of its cameras forward, to centre and down (to approximately a cyclist's head height) so that the truck is not visible (unless you turn your virtual head too far). This is not too difficult (and ETS2 modding is too large a topic to cover here); all you need to know for now is that this mod is available for download on github along with the duino source code.
I wanted the first releasable version to offer the user the option to play the game as normal (apart from using the bike for 3 axis control); but also to let the user conveniently use the game as a virtual "bike touring" experience. That's why I need so many buttons on the control panel: unless you want a stock USB keyboard strapped to your handlebars (which is a legitimate option, I guess), you need a lot of buttons to control your Eurotruck (brakes, lights, trailer hitch, gear shift, camera selection, horn, etc etc). I also wanted higher-level button-press options like "teleport me to the beginning of a particular scenic ride that I enjoy", "set the warp speed of the game to a comfortable subjective bicycle-like speed at my preferred pedalling speed", "make it tomorrow morning because I don't like to ride in the dark", "make the other traffic go away", "make the rain go away." All these commands are avilable via the game's developer console, using keyboard input; given a Leo already acting as a keyboard for single-keystroke commands, I could execute these more complex commands with single button presses.
I wanted the bike touring mode of EBS1 to present fewer trucklike features and more cyclist-pleasing fantasy, which meant a little more game tweaking. Fortunately ETS2 offers lots of user-settable options. In the profile I use for bike touring I have turned off other traffic and all road laws; this means I can ride on the wrong side of the street, break speed limits, run red lights, etc., and there is no one else on the road... a cyclist's dream world! Most of these tweaks can be enabled and disabled without leaving the bike, but not all; some (like road laws and fatigue simulation) are only accessible via layers of in-game menus. To run the truck normally, in a fully-populated and law-abiding world, and pursue a standard campaign of freight pickups and deliveries, I would set up a second profile. I'm including the "touring bike" profile in the distro at GitHub.
I have biked it both ways. It's kind of fun to be an ultra high speed bike courier hauling cargo (even if the rear view mirror does show you a semi and trailer). And it's (imho) even more fun to tour freely just for exercise and sight seeing. The world of ETS2 is well worth being a tourist in.
Project History(Skip this if you are not interested in the evolution of the project, but only in the finished product.)
I knew nothing about Arduino, so I bought a starter kit complete with tutorial book, and did most of the exercises in the book (lighting LEDs, reading photosensors, the usual n00b stuff). I needed to get comfortable with my new toys. This took a couple of weeks.
I ordered cheap components (resistors, capacitors, transistors, LEDs, reed switches, etc) from China on Ebay. This was not such a great idea as it turned out, because most of my stuff took over 90 days to arrive and I needed it long before that. Be warned :-) I ended up buying some things over again in N America because my project would have stalled for months waiting for the cheap Ebay components. Be warned; don't buy anything from China on Ebay unless you are in no hurry for it.
The first step was to fabricate a rough-n-ready rotor (a CD glued to a dowel axis), attach a neodymium magnet to its outer edge, whack together a crude stand for it to sit on, affix three reed switches to the stand (close enough to the CD that the magnet would trigger them), and monitor the reed switches with a Leo. Spinning the CD by hand, I refined the core code that would determine speed and direction of a rotor and smooth out jitters in the measured rpm. (Originally I thought the rotor would be the rear bike wheel, but in the final version it's the pedal assembly.)
The next step was to attach and monitor some kind of user input device, and map its output into USB keyboard/mouse events. I chose a WiiChuck, which is how I was introduced to I2C. Quite quickly, thanks to the excellent libraries available for Arduino, I was able to steer the mouse using the chuck joystick, and map chuck buttons to mouse buttons or to keystrokes. I was quite impressed by then with Arduino -- the community, the hardware, the documentation, the software.
I then built a very simple game controller prototype to drive a basic WASD adventure/shooter game. I used a portable stepper (exercise machine) which is just a pedal unit with adjustable resistance. I instrumented the pedal assembly with magnets and reed switches; the prototype code then correctly determined speed and direction of pedalling.
I mapped speed and direction into WASD keystrokes, such that at low speed one revolution was one "step" in the game (a tap of the W or S key), a moderate speed was walking (holding down a motion key), and a high speed was running (shift+motion key). I was able to navigate a mini world that I had built in Unity, and I could also navigate in Portal, Dear Esther, Timescape and other WASD games. Sitting in a chair, with the WiiChuck in one hand, I could run, walk and jump while pedalling. This was the first project milestone.
I then fired up ETS2 and tried driving the game by keyboard input via my Arduino (it was just one Leo at this point). Driving the truck by keyboard input is no fun, but I was able to pedal my way through Euro Truck land, steering by tilting the WiiChuck, braking with a WiiChuck button, and mousing with the WiiChuck joystick. It was an encouraging moment; the illusion of recumbent cycling was at times convincing, it was fun, and I now knew it would be well worth the effort and expense of building a more sophisticated controller.
For a while I tried to keep both modes (WASD and bike) available, with the idea of having one controller box that could function in either mode -- with pedals+chuck OR with a real bike -- selectable by a switch. This quickly led to cumbersome messy code, and later in the project I pruned all the old WASD code out and split it off into a different branch altogether. I plan to make a one-Leo WASD controller later on in a very compact package.
The next challenge was to mount the bike on the trainer stand and instrument it. I bought a cheapish stand off Ebay, which turned out to be fairly well made and solid. Then came some head scratching. I needed to instrument three moving parts of the bike: pedalling, steering, and braking. I pursued some dead ends which needn't be detailed here; the final versions are as follows:
pedalling: fabricate supports for reed switches to be triggered by neodymium magnet attached to pedal crank arm; wire reed switches to controller box mounted on bike handlebars (I used hardware from a clip-on bike basket that was already installed on the bike).
steering: this was probably the hardest problem to solve. the answer was a very clever solid state device called a magnetic rotary encoder. This little SMD is used in conjunction with a diametrically polarised neody magnet. When the magnet is suspended at an appropriate distance from the chip, the chip can detect their relative rotations with impressive precision.
I attached the magnet to a bracket secured to the bike frame and allowed the chip, on its breakout board, to rotate with the handlebars. A little attention had to be paid to aligning the two properly to get a good continous range of values. So I left a generous window and supported the magnet on a disc of clear plastic for easy positioning, to get it lined up with the rotational axis of the chip below. The rotary encoder breakout is an I2C device (hooray!) so I only had to run four wires to the control box (power, ground, 2 signal lines).
To provide a reasonably realistic feel when steering, and to prevent the bike from trying to lean or fall over (thus trying to deform or rack the trainer stand) when actively steering, I had to do a bit of engineering. At first I thought I would just put the front wheel on a turntable sitting flat on the floor; but it quickly became obvious (as it should have been all along, doh!) that the axis of rotation of the handlebar/fork assembly is, ummm, hardly perpendicular to the floor. So a turntable sitting flat on the floor does not rotate in the correct plane. I ended up building an angled stand to support my basic "lazy susan" turntable:
I try to keep this stand positioned and oriented so that the axis of the fork assembly, if extended downwards, would intersect the stand more or less at the centre of the turntable. This means that the bike tyre actually contacts the stand a little lower down than the centre, but it all seems to work OK; initial motion turns the turntable, giving a soft easy feel, and more extreme steering scrubs the tyre on the turntable surface (notice the scrub marks). The geometry is good enough that the bike does not try to lean during steering, so no torque stress is placed on the trainer stand. It doesn't feel quite natural to steer without leaning, but it will do for now (trainer stands that accommodate leaning are more expensive). This front wheel support does, over time, try to "walk away" from the bike (forward, that is); I've installed eye screws on it with the intention of chaining it to the front legs of the trainer stand.
braking: I am indebted to another bike hacker whose URL I have unfortunately lost, someone who was working on brake sensing for his road bike. I had been scratching my head trying to figure out how to attach encoders to the brake lever mechanism (flex sensor strips? another hall rotary? some kind of pantograph linkage turning a conventional pot?) but his solution was far more elegant. I found and purchased a handful of stainless slotted cross clamps (these are not easy to find; I bought mine from the manufacturer) and attached a neo magnet to one of them; this magnet is then clamped onto the brake cable where it passes along the underside of the top bar of the frame.
A Hall effect linear encoder (proximity detector) is mounted so that as the brake lever is pulled, the magnet approaches the sensor. By adjusting the sensor & magnet mounting locations I could take advantage of the maximum range of values, i.e. almost kiss the sensor at maximum brake pull. This sensor was a cheapie out of one of those Chinese "Arduino inventor kits" (I name no names) and I am not too happy with it; it is unbelievably noisy, but good enough for now. This provides not just a simple "brake on/off" but "amount of brake pedal applied" -- I can brake lightly or hard, just as I would with my Driving Force GT setup.
So now I have three sensors on the bike. The 'duino code on the Leos translates these raw sensor values into a valid range for each of the three controller axes. Thanks to the nifty, feature-rich Joystick library by Matthew Hieronimus, it was a piece of cake to go from raw sensors to HID axes. I highly recommend the app Joystick Show (for OSX) which is very helpful in debugging and sanity-checking.
mouse: What about looking around while riding, and interacting with in-game menus? I was using a WiiChuck when I was sitting in a chair pedalling the portable stepper, but now that I'm on the bike it's harder to use a mouse-equivalent. The WiiChuck is right out, as are other hand-held mouse gizmos, because you need to keep both hands on the bars. I'm using my right hand for braking so any mousing device has to be mounted where my left hand can reach it, and it has to be very small.
There's a real shortage of micro trackball devices on the market today, as I was frustrated to discover. In the end I managed to mount a mini Ergo touch pad on a piece of doorskin velcro'd to the left-hand brake lever (only the right-hand brake lever is used in USBcycle for the brake axis). This is not the perfect solution (no middle button, for a start), but I can use it to look around in the game and to select options from in-game menus.
With joystick axes and mousing all implemented, another milestone was reached when one evening I could get on the bike and ride through Euro Truck land... on my own familiar MTB! It felt surprisingly realistic. I was chuffed. I had to do a little tuning of the steering value map (degrees of rotation dectected : percentage of joystick axis range), but other than that it was immediately ride-able.
Meanwhile, the actual physical layout of the duinos and their associated wiring, LEDs, etc. was getting beyond messy... Here's a quick evolutionary sequence from the very beginning to the out-of-control final bench prototype:
I was using solderless proto boards, an old Electronics Educational Kit from the 80s, any old cables I could find lying around, and there was a sprawling snake's nest next to my computer. What I wanted was a smallish box that would have lights and switches and buttons and stuff on its top panel, with the Leos inside and nice neat modular cables going to the remote sensors; it should be small enough to mount on the bike handlebars, yet big enough to accommodate all the lights and buttons required. And it was time to face the problem of those pushbuttons -- I required so many, and I was out of I/O pins.
I had a working system, it was ride-able and fun -- and now I had to rip it all apart and rebuild it in some kind of Package. And I had to design a front panel. And make sure it all would fit within my I/O port budget. And would not take weeks to fab.
This was one of the most vexing and discouraging phases of the project. I went through a lot of front panel layouts, a long series of paper drawings and scribbles, and am still not really happy with the current version.
As mentioned earlier, in order to economise on ports I used two of Adafruit's "Trellis" switch matrix devices (I2C again!) which have the pleasing option of LED illumination of the buttons. This gave me 32 (!!) buttons for user functions, at no extra cost in I/O ports because the I2C bus was already present. These switch matrices are not the cheapest but imho they were well worth the price.
I used a fairly large I2C 7 segment display (I2C backpack) to show RPM, and many small coloured LEDs to indicate various status and diagnostic values. For example, Leo 2 (monitoring the bike sensors) uses three LEDs to verify the low-level reed switch function: each reed switch lights up its LED as the pedals move the magnet past it, and a red LED lights up if a timeout occurs while watching for reed switches (i.e. pedalling has stopped). More LEDs are used by Leo 1 to verify the speed algorithm (blue for low speed, green for normal pedalling speed, yellow for spinning fast, red for stopped). The colourful LEDs are also used during startup to indicate which phase of initialisation the Arduino code is passing through (green blinks four times fast, blue blinks twice, yellow blinks six times, etc). Thus even without a serial port log and before the I2C bus is up and running, it is possible to tell where early startup activity went wrong, if it did.
One linear pot plus another, smaller, cheaper 4 digit 7seg display suffice for user value inputs; for example, one button reads the current pot value and sets the game warp speed, another button reads the pot value and sets the selected cycling route. Yet another button reads the pot value and sets the in-game time of day. This a little crude and not as pretty as -- but far more economical than -- N knobs for setting N values.
If there is a Version 2 of EBS, I will use a multi line LCD display for all kinds of status info rather than a flower garden of coloured LEDs plus the 2 7seg displays. It's just too bright and distracting, illusion-breaking, reducing the immersion effect. The lone input knob, now a pot, might become a multi-detente encoder and then alter/select values displayed on the screen. I might even go nuts and install a full colour LED matrix display, if there's enough memory left in the Leos for the associated libraries :-)
Wiring up the prototype control box (after the sad demolition of my bench prototype) was a nightmare. The solderless prototyping which I had been doing for a few months is so easy and fluid and risk-free... I was now anxious about frying any of my components, or making wiring errors that would be messy to fix. I was also short of supplies (wire that I had ordered from China had not arrived yet, of course) and so ended up using jumper cables, hard-soldered into PCB protoboards. I found Adafruit's quarter-boards very handy; I would cut them in half and use them for groups of LEDs or as busses. (Note to Canadians: you can save on shipping and duties and get a pretty good selection of Adafruit parts from Canadian sources such as Elmwood Electronics and Digi-Key Canada.)
In the end I made my box out of doorskin and foamcore (my favourite fabrication materials), with wooden side rails and openings for cables. It is not a pretty thing, but it's a reasonable size and holds all the components securely. I envision some future version that uses a custom PCB (designed with Fritzing perhaps?) or a stock large proto PCB with wire wrapping -- but it was beyond my capacity (and attention span) for the first version. I just soldered tiny wires for a couple of evenings, cussed a whole lot, and dreaded the first power-up. Would it go Pffft?
As it turned out, I made no wiring errors (though I did lose one small standalone LED and one LED on a Trellis pad, probably because of overcooking during assembly). Nothing expensive or essential went Pffft. With another few code revisions, I was able to use the Trellis keypads for user input (I made them fully illuminated, so they give visual confirmation of keypress and make a nice showy display during init). It was at this juncture that I put some time into diagnostic LED codes for boot time, since in the final version I would no longer have the IDE running and displaying diagnostic messages during startup. As mentioned earlier, I established a simple blink/colour code that indicates each phase of initialisation on each of the Leos, with a final "victory message" reading "DONE" on the 4 digit 7seg. I heartily recommend taking the time to do this LED diagnostic trickery for any 'duino project whose init function is more than a few lines in length.
I now had a compact bike-mounted control console with many push buttons (though never enough! I added 4 more tactile momentaries as you see from the photos) plus lots of twinkly lights plus one knob and a few slide switches. Simple code mapped the buttons to ETS2 keystroke functions or even entire "developer console" commands (such as teleporting to set coordinates, changing weather, etc). I then needed long USB cables, which fortunately are pretty cheap these days, to reach from the control box on the bike to the gaming computer. And since my long-suffering partner would like our living-room TV back :-) I needed a large display to put in front of the bike. I went on a bender and bought a 43 inch 1080p screen. After careful tuning of its various picture settings, I got it to match my main computer monitor -- more or less. For the price it's not bad.
My system was complete! I had a 3-axis "bike joystick" that provided accelerator, brake and steering for my favourite open world driving game. User controls were all located on the handlebars so no keyboard was needed. I could ride around Europe! My first long ride -- over an hour -- was in one of my favourite locations (Iceland) and it was a real thrill.
I took a couple of months off over the summer to pursue my other passion (sailing). On coming home I started documenting the project, preparatory to publication here. I installed the newest release of ETS2 and related VLC and ProMods and verified that EBS still worked fine. Some friends came over one evening who were curious about the project and for the first time ever, I let someone else try it out. It was a hit! the novice test rider quickly learned to steer and brake, loved the gorgeous highly detailed ETS2 scenery (who wouldn't), and had a great time. My first "market test" (for a completely open-source project!) was a success. I'll be letting other friends and neighbours test-drive the setup over the next few weeks, hoping to get some useful feedback and feature suggestions.
BUGS and GOTCHASFairly few really. I mentioned that the cheap and nasty Hall linear encoder I used was very noisy, and I'd like to replace it with a better one "one of these days" (but it works well enough that I'm not highly motivated).
There is also a mysterious issue with the pot used for entering user command parameters; when it's turned up to values higher than about 60 percent, it interferes in some way with transmission of the rpm value from Leo 2 to Leo 1. The symptom is that even though the low level LEDs show that the reed switches are being triggered, Leo 1 thinks that RPM is zero and pedalling has stopped. This dropout in RPM puzzled me for a long time because at moderate pot values (.4 to .55) it happens fairly rarely, very intermittently, and I was not using higher values while pedalling.
Then one day I tried to turn game subjective (warp) speed up to 99 percent to get through a boring freeway segment quickly, while pedalling at the time, and suddenly I had no accelerator (rpm) at all! It quickly became clear that the pot was the culprit. It may be interfering with the I2C in some way; "one of these days" I will take a close look at the wiring and see if those wires cross inside the case. The two Leo pins involved are well separated physically, so the wires seem to be the prime suspect. The immediate fix is to turn the pot back down to zero after successfully setting a value; this prevents any interference.
These are the only two glitches/bugs I can recall. I have made plenty of dumb coding errors, have often loaded the wrong sketch onto a Leo by forgetting to switch ports before upload, have plugged jumper cables in the wrong spot and so on, but the hardware and IDE have been far more reliable and error-free than the builder :-)
Game-specific components provided
(for those who understand something about ETS2 modding, profiles, etc)
I provide a "rich start" profile called "Cyclist" which uses a Mercedes Actros and owns enough garages to be self-supporting (i.e. you are making money even if you don't take any in-game jobs).
I also provide a simple velofication mod. The mod, BikeView, moves camera 5 forward and down to a cyclist's head position about 1 metre in front of the truck grille. This of course looks a little scary if you turn your head too far :-) The mod also turns off almost all the truck sounds (leaving only tyre noise plus the air brakes and air shifter sounds which amuse me).
What next? Fixes, improvements, and wild-eyed notions
Since completing Phase Two of EBS I have biked many hours through the Euro Truck Simulator virtual world, looking for particularly pretty, scenic, or challenging rides. My favourite 10 rides are hard coded into the Arduino source (making this config-file-driven is a future possibility, but involves more peripherals for the Leos, like an SD card reader). Although the feel is not quite like a real bike it is good enough for a first attempt. Here are the Known Issues (things that bug me) as of today:
The truck is an obvious problem. Our "bike" is really a camera mounted on a boom extending outward from the truck radiator. The truck is visible if you turn your head too far. And the truck's vast shadow is obtrusively and distractingly visible if a light source is aft of your head position. This is definitely an illusion-breaker. I mean to ask the ETS2 community for some help with this: perhaps the truck can be made flat, or invisible? Ideally I'd like an utterly flat platform with the existing "cyclist" mover mounted on it. "Mover" is ETS2 jargon: a 3d model that moves around the landscape on a set path, providing background visual interest, as in pedestrians, airplanes, boats, trains etc. If the (existing) cyclist mover model could be mounted on the chassis in place of the truck body, the cast shadow would look correct. A "dashboard" showing hands on handlebars (as seen by in-game camera 1) and a bike computer would also be pretty cool :-)
Acceleration is ridiculously slow, because you are really driving a multi-ton truck with a bike as the gas pedal -- and it takes a while to get moving. This is very un-bike-like and probably the biggest illusion-breaker at present. I have not yet come up with any way around it. If I knew when the truck was fully stopped, I could have some multiplier factor for initial acceleration that would greatly exaggerate the "gas pedal" position (multiply your pedaling effort, in other words, for a jackrabbit start). But without telemetry I can't tell the difference between "I've stopped pedalling because I'm coasting down a long hill at a good clip" and "I've stopped pedalling because I've stopped the truck." So for now, getting up to road speed involves a lot of hard, fast pedalling as the truck grinds through its 11 gears. Of course, cardio exercise is the point, so maybe this is not such a bad thing? Another solution would be to make the truck lighter, with a more "sports car" feel (and this should be possible because there are sports car mods for the game).
This is on my list of improvements for next version. "Cyclist2," a near-future project, will use a 3rd party sports car mod instead of a full sized truck, to reduce that humongous shadow that looms over you when the sun is aft of your POV. I'm also hoping to get better initial acceleration with a lighter vehicle. Maybe I can even cajole an experienced ETS truck modder into gluing a cyclist onto a vehicle chassis for me :-)
The sound effects are not very bicycle-like. I have turned off most of the truck's sfx, but you can still hear those air brakes; and the tyre noise is not very bike-like. Ideally I'd like to find some bike sfx (like chain rattle, gear shift clunking etc, maybe a bit of brake squeal or chatter) to replace the truck sfx.
The truck still has its full physical dimensions and collision property, and the "cyclist" camera is out in front of it on centreline, leading the truck by several feet. Sometimes I clip bits of the world with the truck, forgetting that it's behind me and much wider than a bike; and steering it around tight corners can be tricky because the actual front wheels are behind me. Riding as if you are towing a trailer helps a little. A super narrow chassis with a minimal body would help with the collision issues.
In order to maintain a bike-like experience, I turn down the master speed ("warp") of the game to about 50 percent. This means that while the truck thinks it is doing 80 kph, what the screen shows me looks subjectively like 40 kph. This enables me to map the full 11 gears of the truck to a reasonable (slightly superhuman, but hey, this is virtuality!) apparent cycling speed. However, this means that as you pass through the world, pedestrians are walking in slow mo, water is flowing in slo mo, etc. It's a little surreal at times. A "truck" with an appropriate bicycle top speed and gearing would be an improvement, so your best all-out pedalling effort would still only get you an Olympic cyclist's top speed.
One long-term possibility (daunting, but not impossible), if I can get telemetry working (a big if), would be to figure out the bike's actual real-world speed based on rear wheel RPM (instead of pedal RPM) and regulate the truck speed to match. This would be tricky, but might solve the warp speed issue.
Every now and then I have to stop and refuel, another illusion breaker; but the Euro trucks are fairly efficient so it isn't often. I can live with that. We can pretend it's a cafe stop :-)
I have also at times considered a Steven Spielberg "flying bike" version, in which a switch on your dashboard will let you rise from the ground and pedal through the air. It's a bit silly, but might be fun; the world of ETS2 looks good from a few metres up.
Despite all these little nits to be picked, this first release version of USBcycle and EuroBikeSimulator is still very satisfying. I am sight-seeing in ETS2 land (I can campaign too if I want) while at the same time riding my bike. I can testify that on a cold, dark, rainy evening in BC it is a real pleasure to get on the bike and take a ride through the south of France, or across the clean bright snow fields of Iceland, or (for more exercise) over the Pyrenees or on a precipitous logging road in Norway. It is always midsummer in ETS2. The days are long (especially in the polar regions!) and bright, the trees are lush and green. You can almost feel the warmth and smell the cut hay. Birds sing and the water shimmers and the highway beckons you on, into a map so large that you can ride for hours without ever retracing your steps. I wouldn't trade it for any of the "cyber cycling" apps I have seen on the market thus far.Do Try This at Home, Kids!
A few caveats
My gaming machine is not state of the art, but it is reasonably powerful. If you have a less powerful machine, you may have to run ETS2 (and other similar 3d open world games/sims) at a lower resolution than what you see in my screen shots. For comparison, the guts of my OSX gaming platform are: Intel Core i7 4GHz, 16 GB RAM; Asus GTX970 "Strix" 4GB VRAM. If you have similar horsepower you should be able to experience the same graphics quality. ETS2 does offer several preset graphics quality levels plus individual, customised tuning, making it easy to throttle the rendering engine to the capability of your hardware.
Also: the videos and stills you see in my writeup and youtube presentation are from a "maxed out" map of ETS2. The base game map from SCS is smaller and less scenic. Therefore I recommend getting the "Euro Truck Simulator Essentials" deal from Steam (or SCS), consisting of the base game plus the 3 DLCs called Vive La France, Going East, and Scandinavia. For a richer world, I recommend adding ProMods as well, and if you just have to have the biggest world you possibly can -- add RusMap and Project Balkans. These last three mods are free (ProMods would like a donation but you can get it for free). Note however that ProMods requires all DLCs for core ETS2 (Scandinavia, Going East, and Vive La France) as it is built on top of them.
ETS future
Rumour has it that Spain and Italy will be added eventually by SCS (more DLCs no doubt, they have to earn their crust), and requests are in for Greece and Turkey and just about everywhere else. Don't expect these any time soon, but the world should continue to grow -- courtesy of both the core team at SCS and the enthusiastic modder community.
If you ever get tired of Europe, SCS is working steadily on American Truck Simulator. Since USBcycle is a generic USB controller, it should work with ATS, except for the hard-wired "favourite rides" of course. It would be necessary to import the Mercedes Actros truck into ATS, or reproduce the truck mods with an ATS native truck, but that is not a big job. I have not tried it yet, but it's on my ToDo list. There are also some "way out there" map mods for exotic locations such as Brazil.
USBcycle as generic controller
If trucking (or bike touring) is not your thing at all, then you can always build a USBcycle to pedal your way through other driving games, or a WASDbike to pedal your way through FPS games like Portal 2, Talos Principle, Dear Esther, Quern, Obduction, etc. Only small modifications would be needed to make the WASD code work with a treadmill, x-country trainer, rowing machine, etc.
As of late October 2017, the LeoWASD code supports both the standard walking simulator and one keyboard-driven driving game, Crash Drive 2.
If you have a bike but no gaming computer, and you want to know how much would it cost to build one of these things I can't really answer that with much accuracy, because it all depends on what graphics quality you insist on. I can give you a ballpark estimate for a setup similar to my own -- at least $2000 CDN for a gaming computer more or less equivalent to mine, $200 or so for a trainer stand (though you could find a used one and save a lot), another $250 or so for the Arduinos and related hardware, $60 for the ETS2 Euro Package license, and many evenings of your time to set it all up.
I suspect that the best audience for this project is someone who already has a good gaming computer, some hardware and software hacking experience, and a bike :-) The place to start if you want to build one of these is my github repository.
Let's keep in touch
If you would like to reproduce (and evolve) my USBcycle / Euro Bike Simulator project, I am happy to share code, ideas, etc. Please let me know how yours turned out! I would also be delighted to collaborate on improvements, especially game mods that would enhance the bike experience. If you adapt the core USBcycle code to some other exercise machine, that would also be of great interest to me. If you discover other open-world driving games that work well with a USBcycle, I'd like to start a list.
ACKNOWLEDGEMENTSI'm very grateful to the Arduino online community for all their help, advice, libraries, answers, documentation, etc. -- I could never have done this without that huge support network. Appreciation and thanks to the team at SCS, authors of Euro Truck Simulator 2 and American Truck Simulator. Also props and bouquets to the ProMods team, authors of (imho) the highest-quality add-on map for ETS2. Both the ProMods and SCS forums have answered many of my silly n00b questions, and I tip my hat to the entire user community for ETS2, a most creative and courteous mob of virtual truckers. Another hat tip to the TonyMacx86 website which taught me how to build a gaming-capable Hackintosh. Lifelong gratitude to my Dad who taught me how to solder and de-solder when I was about eight :-) and who set a fine example of DIY, tinkering, and creative use of old junk. Thanks to friend & neighbour Amanda who kindly volunteered to help with videography and to appear in some of the shots. Thanks to my partner, who didn't complain when I stole the TV :-) and who doesn't think I'm totally crazy when I spend hours riding a bike around virtual Europe (or hours at the workbench, or hours staring at Arduino code). And thanks to all those makers and tinkerers everywhere who remind us that it can be done!
ERRATA and AFTERTHOUGHTSI notice a couple of minor errors in this article, so I'll start an Errata section.
- The small 7seg LED display is a 4-digit, not a 2-digit unit. I intended to use a 2-digit unit but when it came to assembly time, that 4-digit was what I had in the drawer. [EDITED main text to correct this error Oct 25 2017]
- EDITED main text to correct "radially" to "diametrically" in describing neody magnets suitable for use with Hall rotary encoder.
High Level Schematic for USBcycle Prototype


_3u05Tpwasz.png?auto=compress%2Cformat&w=40&h=40&fit=fillmax&bg=fff&dpr=2)
Comments