This summer, I wanted to build something interesting with the Arduino set that I had (BTW, my summer is in April and May). After a lot of brainstorming with my father, I decided to use RFID for my locker's locking mechanism.
After I learned how to program and use the RFID, I decided to learn how to use an RGB LED as well. I already knew how to use a servo and a buzzer, so I was finally ready to assemble it.
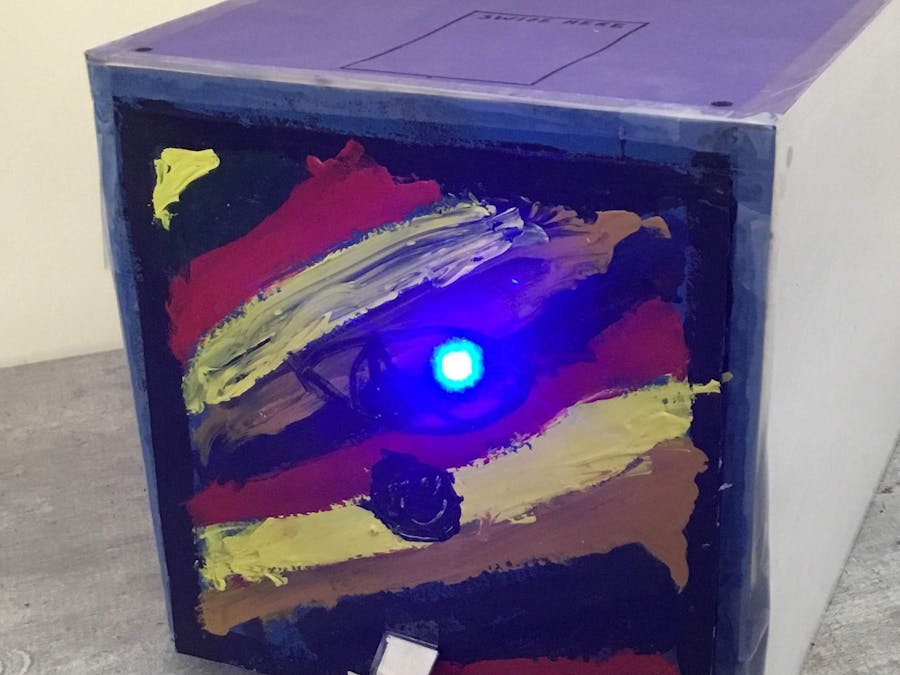
So here's how it work: (You can skip this paragraph and see the two videos below.) Once you switch it on, the RGB LED turns blue, indicating that it is ready, and the servo goes to position 0 (if it wasn't) and closes a latch, locking the locker. When I swipe the wrong card (in this case, my keychain), the RGB LED turns red and the buzzer buzzes for 10 seconds. For those 10 seconds, the locker will not accept any card, not even the correct one. After 10 seconds, the RGB LED turns blue again. Once the correct card is swiped, the RGB LED turns green and the servo opens the latch, allowing the door to be opened. If the correct card is swiped again, the servo closes the latch, locking the locker, and the RGB LED turns back to blue. If you were to open a serial monitor, it would give the message "Access denied" when you swipe the wrong card, "Authorized access" when you swipe the correct card and "Locking...Locked" when you swipe the correct card for the second time.
Everything was ready except the frame of the locker. I taped chart together and used ice-cream sticks to make it sturdy. Once I assembled the circuit into the locker, it was finally ready.
I am really proud of the locker I have built. Have fun!
Works on any Arduino Uno systems with the required controls
// Created by Surya Skywalker. This code will be used in the locker. when the correct card is swiped, light goes gren and door opens and when swiped a second time, door closes and light goes// to blue. when wrong card is swiped, ligh goes red and buzzer beeps. #include<SPI.h>#include<MFRC522.h>#include<Servo.h>#define SS_PIN 10#define RST_PIN 9#define Buzzer 8 // Pin 3 connected to + pin of the BuzzerServomyservo;// create servo object to control a servo// twelve servo objects can be created on most boardsMFRC522mfrc522(SS_PIN,RST_PIN);// Create MFRC522 instance.intpos=0;// variable to store the servo positionintnum=0;intredPin=2;intgreenPin=4;intbluePin=7;intcounter=0;constintbuzzerPin=8;voidsetup(){// put your setup code here, to run once:Serial.begin(9600);// Initiate a serial communicationSPI.begin();// Initiate SPI busmfrc522.PCD_Init();// Initiate MFRC522Serial.println("Approximate your card to the reader...");Serial.println();myservo.attach(3);// attaches the servo on pin 9 to the servo objectmyservo.write(0);//Set the servo at position 0pinMode(redPin,OUTPUT);pinMode(greenPin,OUTPUT);pinMode(bluePin,OUTPUT);setColor(0,0,225);// bluepinMode(Buzzer,OUTPUT);// Set buzzer pin to an Output pindigitalWrite(Buzzer,LOW);// Buzzer Off at startup}voidloop(){// put your main code here, to run repeatedly:// Look for new cardsif(!mfrc522.PICC_IsNewCardPresent()){return;}// Select one of the cardsif(!mfrc522.PICC_ReadCardSerial()){return;}//Show UID on serial monitorSerial.print("UID tag :");Stringcontent="";byteletter;for(bytei=0;i<mfrc522.uid.size;i++){Serial.print(mfrc522.uid.uidByte[i]<0x10?" 0":" ");Serial.print(mfrc522.uid.uidByte[i],HEX);content.concat(String(mfrc522.uid.uidByte[i]<0x10?" 0":" "));content.concat(String(mfrc522.uid.uidByte[i],HEX));}Serial.println();Serial.print("Message : ");content.toUpperCase();if(content.substring(1)=="4A 31 07 85")//change here the UID of the card/cards that you want to give access{if(num%2==0){setColor(0,225,0);// Greenmyservo.write(180);Serial.println("Authorized access");Serial.println();}else{Serial.println("Locking...");myservo.write(0);delay(750);Serial.println("Message : Locked");Serial.println();setColor(0,0,225);// Blue}num=num+1;delay(3000);}else{setColor(225,0,0);// RedSerial.println("Access denied");Serial.println();beep(1000,10000);setColor(0,0,225);// Blue}}voidsetColor(intred,intgreen,intblue){#ifdef COMMON_ANODEred=255-red;green=255-green;blue=255-blue;#endifanalogWrite(redPin,red);analogWrite(greenPin,green);analogWrite(bluePin,blue);}voidbeep(intnote,intduration){//Play tone on buzzerPintone(buzzerPin,note);delay(duration);//Stop tone on buzzerPinnoTone(buzzerPin);delay(50);//Increment countercounter++;}


_ztBMuBhMHo.jpg?auto=compress%2Cformat&w=48&h=48&fit=fill&bg=ffffff)


Comments