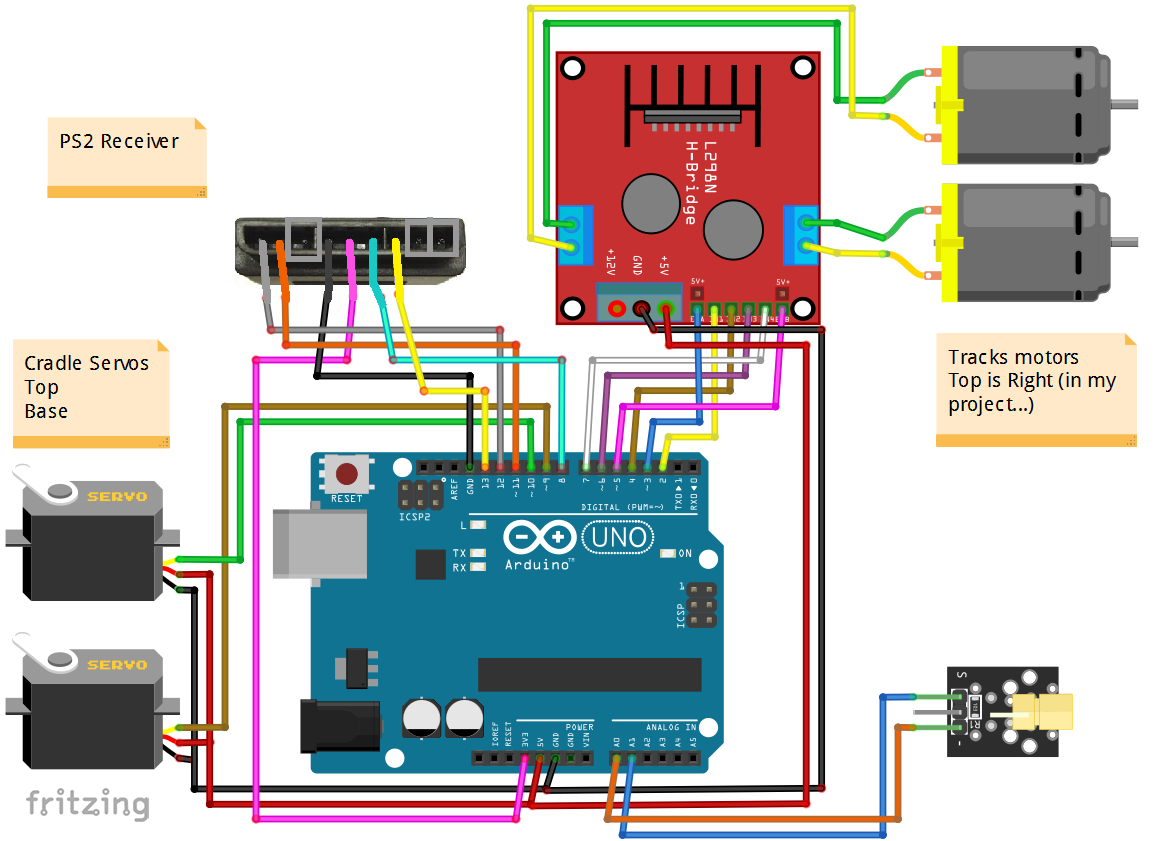
/* This code is for RC LASER tank / Self propelled LASER Turret
 * Refer to www.SurtrTech.com or SurtrTech YouTube channel for more details
 */

#include <PS2X_lib.h>  //Libraries needed PS2 Receiver and Servo
#include <Servo.h>

Servo Servo1;        //Declaring cradle servos, Servo1 is the base
Servo Servo2;

PS2X ps2x;          //Declaring the PS2X controller

int error = 0;      //PS2X stuff to detect errors and type of controller
byte type = 0;
byte vibrate = 0;  //vibration of the controller

int a,b;

//Motor A Right motor for my project
int in1 = 2;
int in2 = 4;
int EnA = 3; //I'm controlling the speed also

//Motor B
int in3 = 6;
int in4 = 7;
int EnB = 5;

void setup(){

 Serial.begin(9600);  //Serial monitor will help you to see values and know if your controls are detected or not
 error = ps2x.config_gamepad(13,11,8,12, true, true);   //setup pins and settings:  GamePad(clock, command, attention, data, Pressures?, Rumble?) check for error
 type = ps2x.readType();
 pinMode(in1, OUTPUT);
 pinMode(in2, OUTPUT);
 pinMode(EnA, OUTPUT);
 pinMode(in1, OUTPUT);
 pinMode(in2, OUTPUT);
 pinMode(EnB, OUTPUT);
 pinMode(A0,OUTPUT);                 //Those lines concern the LASER, I ran out of pins and I put A0 as GND
 pinMode(A1,OUTPUT);                 //And the A1 provides 5v if I press the X button
 digitalWrite(A0,LOW);
 Servo1.attach(9);
 Servo2.attach(10);

}

void loop(){
   a=Servo1.read(); //Reading the previous servos positions is an important step so we can know where they should position next
   b=Servo2.read();

   ps2x.read_gamepad(false, vibrate);          //read controller and set large motor to spin at 'vibrate' speed
   vibrate = ps2x.Analog(PSAB_BLUE);          //this will set the large motor vibrate speed based on
   digitalWrite(A1,vibrate);                  //if the vibrate takes a value > threshold it will set the A1 (LASER) to high
   Stop();                                   //As long as no stick is pushed we stop, otherwise move accordingly

   //Forward sequence
   if(255-ps2x.Analog(PSS_LY) > 130){         //This is how I detect that the stick is pushed up the value gotten should be 130-255
   Serial.println("Forward");                 //And the 255-... before is just to arrange values because it was inverted
   Forward();
   }

   //Backward sequence
   if(255-ps2x.Analog(PSS_LY) < 120){
   Serial.println("Backward");
   Backward();
   }

   //Right sequence
   if(ps2x.Analog(PSS_LX) > 130){           //X Axis wasn't inverted that's why you don't see the 255-...
   Serial.println("Right");
   Right();
   }

   //Left sequence
   if(ps2x.Analog(PSS_LX) < 120){
   Serial.println("Left");
   Left();
   }

   //Cradle Right
   if(255-ps2x.Analog(PSS_RX) < 120){           //If the stick is pointed to the right
   Serial.println("C Right");                   //We read the current servo position (a=Servo1.read())
   Serial.println(ps2x.Analog(PSS_RX));         //And we decrement '1'
   a=a-1;                                       //Then we write the new position which is a-1 you can change the '1' to higher to make it turn fast
   Servo1.write(a);

   //Cradle Left
   }
   if(255-ps2x.Analog(PSS_RX) > 130){
   Serial.println("C Left");
   Serial.println(ps2x.Analog(PSS_RX));
   a=a+1;
   Servo1.write(a);
   }

    //Cradle Up
   if(255-ps2x.Analog(PSS_RY) < 120){
   Serial.println("C Up");
   Serial.println(ps2x.Analog(PSS_RY));
   b=b+1;
   Servo2.write(b);

   //Cradle Down
   }
   if(255-ps2x.Analog(PSS_RY) > 130){
   Serial.println("C Down");
   Serial.println(ps2x.Analog(PSS_RY));
   b=b-1;
   Servo2.write(b);
   }

 delay(50);
}

void Forward(){
  int  F1 = map(255-ps2x.Analog(PSS_LY), 130, 255, 0, 255);     //Changing the signal received from 130-255 to 0-255 to be able to write that value as PWM signal
  digitalWrite(in1, LOW);                                       //To control the speed
  digitalWrite(in2, HIGH);
  analogWrite(EnA,F1);
  digitalWrite(in3, HIGH);
  digitalWrite(in4, LOW);
  analogWrite(EnB,F1);
  Serial.println(F1);


}


void Backward(){
  int  F2 =  map(255-ps2x.Analog(PSS_LY), 120, 0, 0, 255);
  digitalWrite(in1, HIGH);
  digitalWrite(in2, LOW);
  analogWrite(EnA,F2);
  digitalWrite(in3, LOW);
  digitalWrite(in4, HIGH);
  analogWrite(EnB,F2);
  Serial.println(F2);
}


void Right(){
  int  F3 =  map(255-ps2x.Analog(PSS_LX), 120, 0, 0, 255);
  digitalWrite(in1, LOW);             //Turning sequence that suited me I stop on track and turn the other
  digitalWrite(in2, LOW);             //You can turn them on different sides to make it turn fast
  analogWrite(EnA,F3);
  digitalWrite(in3, HIGH);
  digitalWrite(in4, LOW);
  analogWrite(EnB,F3);
  Serial.println(F3);

}


void Left(){
  int  F4 =  map(255-ps2x.Analog(PSS_LX), 130, 255, 0, 255);
  digitalWrite(in1, LOW);
  digitalWrite(in2, HIGH);
  analogWrite(EnA,F4);
  digitalWrite(in3, LOW);
  digitalWrite(in4, LOW);
  analogWrite(EnB,0);
  Serial.println(F4);

}

void Stop(){
  digitalWrite(in1, LOW);
  digitalWrite(in2, LOW);
  analogWrite(EnA,0);
  digitalWrite(in3, LOW);
  digitalWrite(in4, LOW);
  analogWrite(EnB,0);

}

_ztBMuBhMHo.jpg?auto=compress%2Cformat&w=48&h=48&fit=fill&bg=ffffff)


_3u05Tpwasz.png?auto=compress%2Cformat&w=40&h=40&fit=fillmax&bg=fff&dpr=2)
Comments