

Hardware components | ||||||
 |
| × | 1 | |||
Software apps and online services | ||||||
 |
| |||||
| ||||||
In this tutorial, we'll be using the Wemos D1 mini (ESP8266 based development board) and a button shield to create a smart IoT button that messages or voicemails your friends.
Before you beginTo get set up with the Wemos D1 mini, you'll need to follow our tutorial on getting started with the ESP8266. It details setting up the correct environment to complete the rest of this tutorial.
You'll also need to follow our tutorial on getting started with MessageBird. The MessageBird API adds capabilities like voice, video, and messaging to their applications. This enables businesses to provide the right communication experience for their customers.
Connecting the hardware- Connect the button shield to the Wemos development board. When connecting it, make sure that the pin naming on the board matches that of the of the button shield, e.g.
TXtoTX,RSTtoRSTetc. - Connect the board to your computer via micro USB cable.
In the Arduino IDE, Go to Sketch > Include Libraries > Manage Libraries.Install each of the following libraries by searching for their name in the search bar within the modal. A button will appear in the bottom right of the box that will allow you to install the library.
- ArduinoJson
- ESP8266WiFi
- ArduinoHttpClient
If a library doesn't show up in the results when you search for it, you may need to update your Arduino IDE version. You can download the latest version here.
The CodeIn the Arduino IDE, copy and paste the code named Wia Code.
Replace the values of the following variables (Place the correct value between the quotation marks right of the variable names in the code):
your-ssid- with your WiFi network nameyour-password- with your WiFi network passwordyour-device-secret-keywith your device secret key from the Wia dashboard(the one that begins with d_sk)
Make sure the correct board is selected - go to Tools > Board and select Wemos D1 mini Pro.Make sure the correct port is selected - Tools > Port.
Click Sketch > Upload in the menu.
The code above publishes the three distinct Events to Wia. shortPress, doublePress and longPress. Each Event corresponds to the different types of button press that we coded onto the board. We will need three different types of Events to set up our Flows in the Wia dashboard later.
Certain versions of the ArduinoJson library will cause an error in the code above. If you get an error (such as 'StaticJsonBuffer' does not name a type) when compiling the code, open Sketch > Include library > Manage libraries, search for ArduinoJson and click update.
Go to your Wia dashboardand view the Events as they come in via the Device debugger.
Handling the different types of button pressTo handle our different button presses, we will be setting up different flows that all will correspond to different actions. This will enable us to do different things with our button pressing.
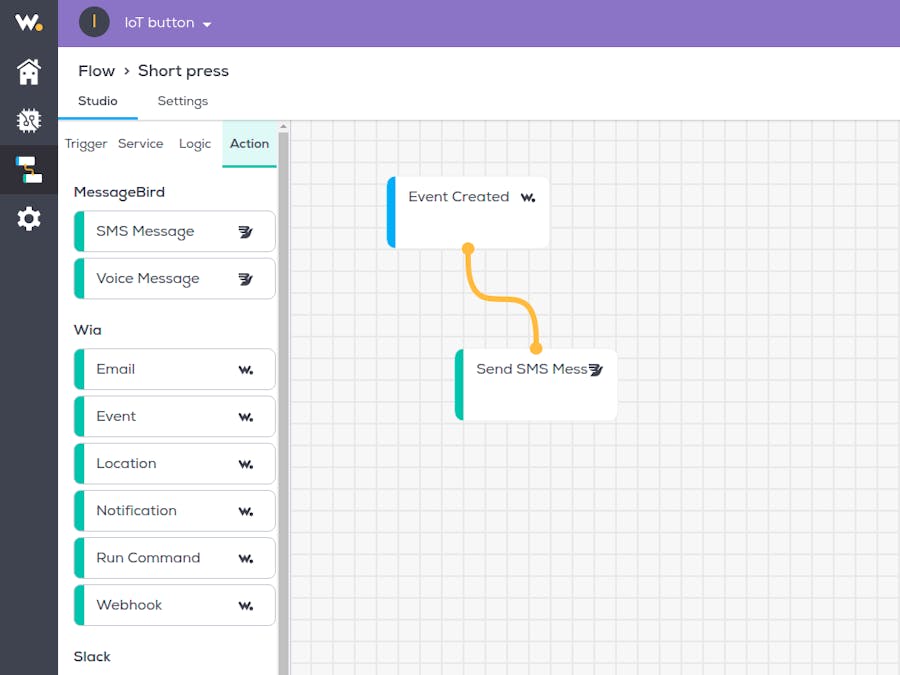
Go to your Wia dashboardand click Flows in the left hand side menu. Create a new Flow with any name you like.
In Flow Studio, drag an Event Created node from the triggers section and:
- Enter
shortPressas the theName - Enable the Device that matches the one you added to the code earlier
Next, under the Action tab on the left panel, drag over an SMS Message node from the MessageBird section:
- Enter the following:
- Originator (Your number or Name)
- Recipients phone numbers (NOTE: enter the country code with no spaces i.e. +14568893405)
- Body message. You can enter whatever you like here as long as it’s less than 160 characters
Click update, then connect the Event Created node to the Send SMS Message node.
For doublePress, we will repeat the same process by building another Flow, except this time we will switch out the Send SMS Message node with a Send Voice Message node.
- Enter the phone numbers (NOTE: enter the country code and have no spaces i.e. +14568893405)
- Enter your Body message (You have up 1000 characters in one message).
Once you have set up Flows for both shortPress and doublePress, go ahead and press your IoT button and see the results.
Now you are a King/Queen of MessageBird!
Note: We still haven’t used our longPress Event yet so we are going to leave that up to you, to see what you come up with.
That's it for now!


Comments