Kristian Blåsol
Published © GPL3+

PIR Sensor Activated Halloween Scare Prank

A motion activated light and sound installation to scare the trick or treaters.

BeginnerFull instructions provided2 hours13,493
PIR Sensor Activated Halloween Scare Prank

Things used in this project

Hardware components

Arduino UNO
Arduino UNO
×1
PIR-sensor
×1
MP3 module
A generic MP3 module that we solder some pins to the buttons.
×1
5 mm LED: Red
5 mm LED: Red
Two red LEDs for the Eyes.
×2
LED (generic)
LED (generic)
A cold white LED for the lightning effect
×1
2 Relay Module
Two relays to act as switches to the MP3 module.
×1

Story

Read more

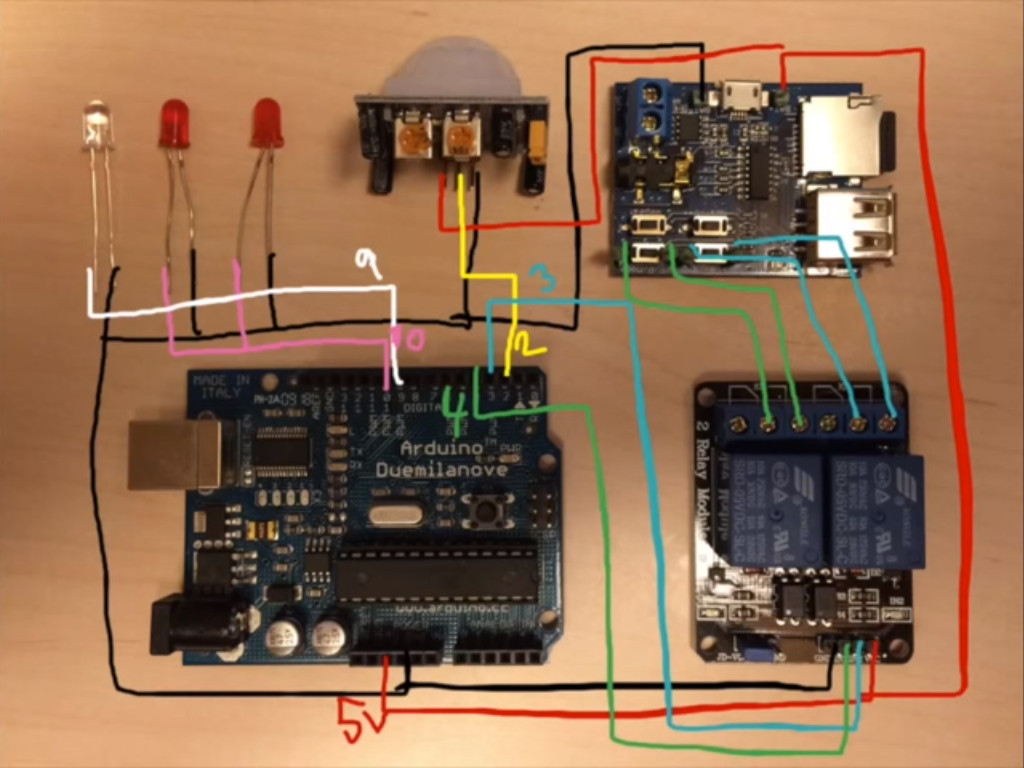
Schematics

Schematics of the Halloween scare box.

It is well explained in the video if there are any questions.

Code

Halloween Arduino scare box

Arduino
A simple installation to scare visiting trick or treaters using motion sensors, lights and sounds...
//Example of using the PIR-sensor, great for Halloween pranks and scares in your yard or porch.
//Watch the video for full walk through and examples: 
//part 1. pir-sensor and lights: https://youtu.be/ZAUXMoygVOU
//part 2. sound: https://www.youtube.com/watch?v=uR_UTPioQYc

int pirSensor=2;
int previousPin = 3;
int pausePin = 4;
int statusLed=10;
int led = 9;           // the pin that the LED is attached to

void setup(){
  pinMode(pirSensor, INPUT);
  pinMode(statusLed, OUTPUT);
  pinMode(previousPin, OUTPUT);
  pinMode(pausePin, OUTPUT);
  pinMode(led, OUTPUT);  
}

void loop(){

  if (digitalRead(pirSensor) == HIGH) {
    //Sound!
    digitalWrite(pausePin, HIGH);
    delay(100);
    digitalWrite(previousPin, LOW);
    delay(100);
        digitalWrite(previousPin,HIGH);
   delay(2000);
   
    //Glowing Eyes effect
   digitalWrite(statusLed, LOW);
   delay(100);
   digitalWrite(statusLed, HIGH);
   analogWrite(led, 0);
   //Here we put whatever code is when Pir-sensor is activated 
   for (int i=0; i<255; i++) {
     Serial.println(i);
     analogWrite(led, i);    
     delay(5);
   }
   digitalWrite(statusLed, LOW);
   delay(100);
   digitalWrite(statusLed, HIGH);
   delay(100);  
   digitalWrite(statusLed, LOW);
   delay(100);
   digitalWrite(statusLed, HIGH);
   delay(100);
   digitalWrite(statusLed, LOW);
   delay(100);
   digitalWrite(statusLed, HIGH);
   delay(100);
   digitalWrite(statusLed, LOW);
   delay(2000);  
   for (int i=255; i>=0; i--) {
     Serial.println(i);
     analogWrite(led, i);    
     delay(5);
   }
   
  digitalWrite(statusLed, HIGH);
  analogWrite(led, 0);

//End glowing eyes effect
    //End Sound! 
   delay(2000); 
     digitalWrite(previousPin, HIGH);
    delay(100);
    digitalWrite(pausePin, LOW);
    delay(100);
    digitalWrite(pausePin, HIGH);
    delay(1000);


  } 
  else {
    digitalWrite(statusLed, HIGH);
    analogWrite(led, 0);
  }
}

Credits

Kristian Blåsol

Kristian Blåsol

5 projects • 34 followers
Maker, Dad, Geek, Musician, System Engineer, Android Tinkerer... (Not in that specific order)

Comments