


Hardware components | ||||||
_ztBMuBhMHo.jpg?auto=compress%2Cformat&w=48&h=48&fit=fill&bg=ffffff) |
| × | 1 | |||
 |
| × | 1 | |||
 |
| × | 1 | |||
 |
| × | 1 | |||
 |
| × | 1 | |||
Software apps and online services | ||||||
 |
| |||||
 |
| |||||
Hand tools and fabrication machines | ||||||
 |
| |||||
| ||||||
 |
| |||||
There are many amazing things that you could do with an Arduino Board, like play a song using a passive buzzer. However, to make things a bit more challenging, I decided to combine this buzzer and interface it with a 16:2 ratio Liquid Crystal Display. Using the same hardware schematic, you can play an 8 note song or one of the other songs provided. You can even program your own!
If this project interested you, check out my other projects -
Step 1: Gather the Necessary PartsFor this project, you need -
- An Arduino Board
- Some jumper wires
- A half-breadboard
- A Passive Buzzer
- A Liquid Crystal Display (16:2 ratio)
For non-Arduino related materials, you might need -
- Cardboard
- Box
- Tape
- Glue
This part is really up to you, and it has to do with how you want to make those last touches.
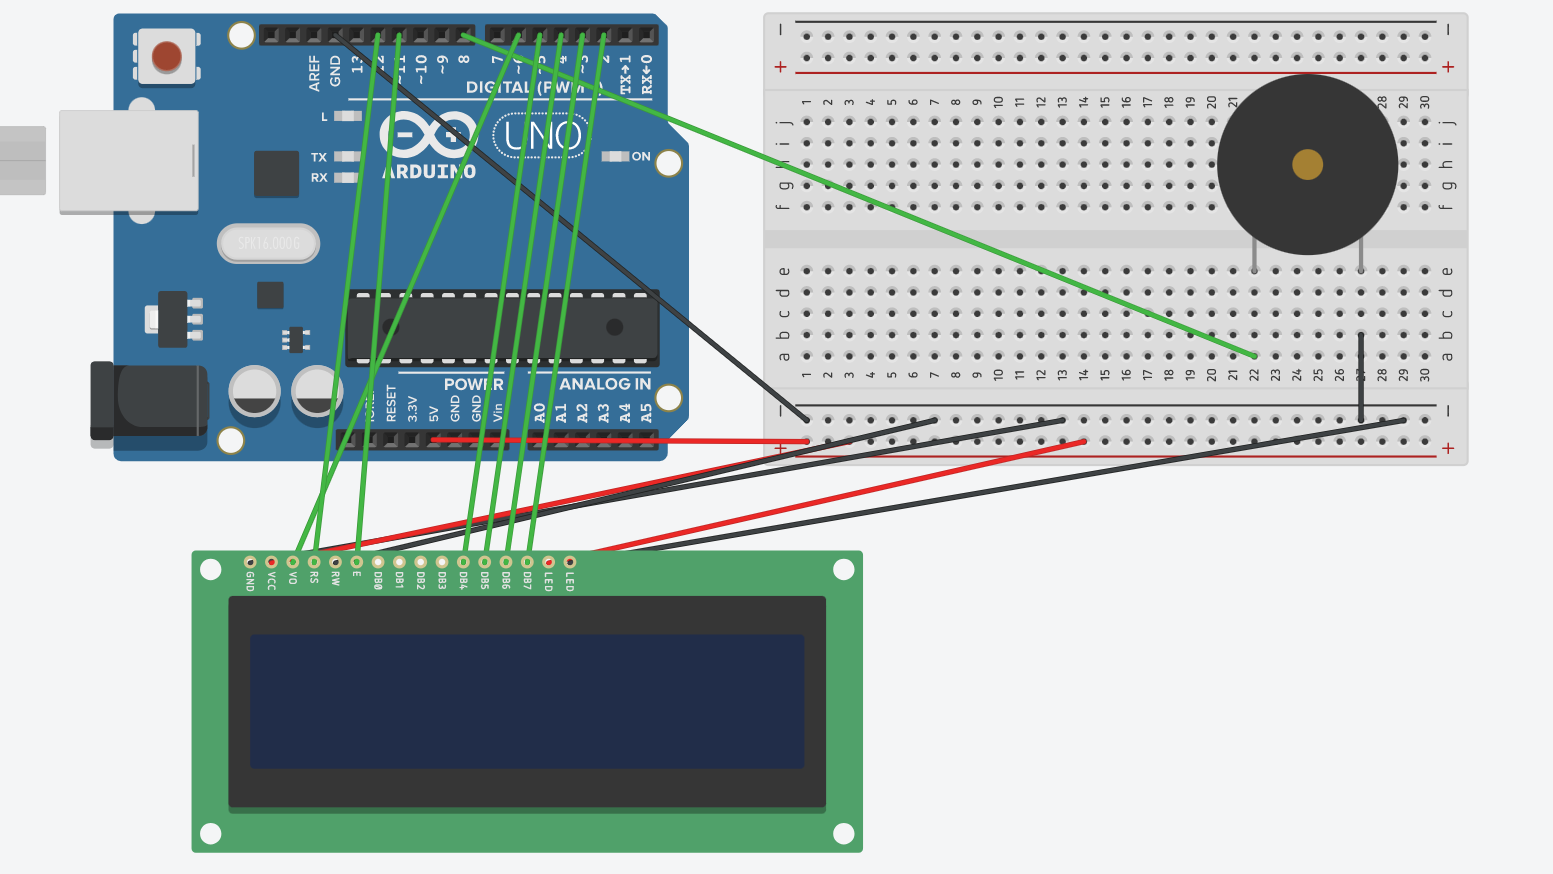
Step 2: Hardware SchematicsStep1: Preparing the Breadboard
For almost any Arduino project, one must start off by connecting the 5V to the positively charged row and by connecting GRND to the negatively charged row.
Step2: Passive Buzzer
The first major step for this project is attaching the passive buzzer. One side of the passive buzzer goes to the negatively charged row (GRND), and the other side goes to Digital Pin 8.
Step3: Liquid Crystal Display Setup
By far the most complicated part of this project, the LCD Display requires many connections. If the picture is not clear, they are listed below in order from the pin 1 to 16 in on the LCD.
Pin 1 --> GRND (Negatively charged row)
Pin 2 --> 5V (Positively charged row)
Pin 3 --> Digital Pin 6
Pin 4 --> Digital Pin 12
Pin 5 --> GRND (Negatively charged row)
Pin 6 --> Digital Pin 11
Pins 7-10 --> No Connections
Pin 11 --> Digital Pin 5
Pin 12 --> Digital Pin 4
Pin 13 --> Digital Pin 3
Pin 14 --> Digital Pin 2
Pin 15 --> 5V (Positively charged row)
Pin 16 --> GRND (Negatively charged row)
And there you have it! Give yourself a pat on the back, because you have officially finished the hardware portion of this project.
Step 3: SoftwareThere are three different codes at the bottom of the page - one with an 8 note melody, one with a happy birthday song (made by me), and one with the melody of the Coffin Dance meme (melody notes and durations by Sohail 8 - here. I added onto the code to make it compatible with the soundbox.)
All of the codes are compatible with the same breadboard schematic, and their only major difference is the int melody part (where you write the notes) and the int noteDurations (where you say how long each note is). However, all of them say the same thing on the LCD (Song complete- Congratulations!) when the program ends.
Below is a step-by-step breakdown of what the code means for the first one (8 note melody).
#include "pitches.h"
#include <LiquidCrystal.h>
int melody[] = {
 NOTE_E5, NOTE_D5, NOTE_C5, NOTE_E5, NOTE_D5, NOTE_C5, NOTE_C5, NOTE_C5};
int noteDurations[] = {
 4, 4, 2, 4, 4, 2, 8, 4
};
int Contrast=75;
LiquidCrystal lcd(12, 11, 5, 4, 3, 2);
The first two lines here are including the libraries for pitches and the library for Liquid Crystal. The pitches library defines dozens of pitches already so you don't have to, while the Liquid Crystal Library lessens the amount of wires needed to achieve a working LCD display, freeing space and crucial ports on your board.
Int melody is saying the 8 notes in the melody. Think about piano note names. The number at the end is the number octave that it plays. Int Note Durations is saying how long each note is - Four means quarter note, 8 means eighth note, and 2 means quarter note. These two groups of code, int melody and int note durations, are what must be changed to alter how the song sounds.
Int Contrast is the amount of contrast on the Lcd screen. This can be adjusted. LiquidCrystal LCD is saying the pins that the LCD is connected to.
void setup() {
 for (int thisNote = 0; thisNote < 8; thisNote++) {
   int noteDuration = 1000 / noteDurations[thisNote];
   tone(8, melody[thisNote], noteDuration);
   int pauseBetweenNotes = noteDuration * 1.25;
   delay(pauseBetweenNotes);
   noTone(8);
 }
 analogWrite(6, Contrast);
 lcd.begin(16,2);
 lcd.setCursor(0,0);
 lcd.print("Song Complete");
 lcd.setCursor(0,1);
 lcd.print("Congratulations!");
}
void loop() {
 //Nothing to see here :)
}
The first few lines of code here state that as long as all eight notes haven't been played, the buzzer should continue playing. After that, it says that the pause between notes is 25% greater than the duration of the previously played note itself. At this point, the buzzer has finished and the LCD is about to display its message.
AnalogWrite connects the contrast to pin 6, which is where we connected the contrast pin on the LCD to in the hardware schematics. Lcd.begin starts the LCD screen and says that we are working with one that has a 16:2 ratio. Lcd.set cursor sets the typing to the top left. The next line tells it to write "Song Complete". This process is repeated for the second row, except the second row says, "Congratulations!". These messages can be changed by altering the code under the double-quotes.
And then of course, we have the void loop function, usually the segment with the most code, now the segment with no code at all.
The difference with the 8 note melody and the two other songs can be seen in the int melody and the int noteDurations part.
Below is the int melody and the int NoteDurations for my Happy Birthday song.
int melody[] = {
 NOTE_D5, NOTE_D5, NOTE_E5, NOTE_D5, NOTE_G5, NOTE_FS5, NOTE_D5, NOTE_D5, NOTE_E5, NOTE_D5, NOTE_A5, NOTE_G5, NOTE_D5, NOTE_D5, NOTE_D6, NOTE_B5, NOTE_G5, NOTE_FS5, NOTE_E5, NOTE_C6, NOTE_C6, NOTE_B5, NOTE_G5, NOTE_A5, NOTE_G5};
int noteDurations[] = {
 8, 8, 4, 4, 4, 2, 8, 8, 4, 4, 4, 2, 8, 8, 4, 4, 4, 4, 4, 8, 8, 4, 4, 4, 2,
};
As you can see, the notes and note durations are different.
Below is the int melody and int noteDurations for the Coffin Dance meme.
//By sohail8
int melody[] = {
 NOTE_AS4, NOTE_AS4, NOTE_AS4, NOTE_AS4,
 NOTE_AS4, NOTE_AS4, NOTE_AS4, NOTE_AS4,
 NOTE_AS4, NOTE_AS4, NOTE_AS4, NOTE_AS4,
 NOTE_AS4, NOTE_AS4, NOTE_AS4, NOTE_AS4,
 NOTE_AS4, NOTE_AS4, NOTE_AS4, NOTE_AS4,
 NOTE_D5, NOTE_D5, NOTE_D5, NOTE_D5,
 NOTE_C5, NOTE_C5, NOTE_C5, NOTE_C5,
 NOTE_F5, NOTE_F5, NOTE_F5, NOTE_F5,
 NOTE_G5, NOTE_G5, NOTE_G5, NOTE_G5,
 NOTE_G5, NOTE_G5, NOTE_G5, NOTE_G5,
 NOTE_G5, NOTE_G5, NOTE_G5, NOTE_G5,
 NOTE_C5, NOTE_AS4, NOTE_A4, NOTE_F4,
 NOTE_G4, 0, NOTE_G4, NOTE_D5,
 NOTE_C5, 0, NOTE_AS4, 0,
 NOTE_A4, 0, NOTE_A4, NOTE_A4,
 NOTE_C5, 0, NOTE_AS4, NOTE_A4,
 NOTE_G4,0, NOTE_G4, NOTE_AS5,
 NOTE_A5, NOTE_AS5, NOTE_A5, NOTE_AS5,
 NOTE_G4,0, NOTE_G4, NOTE_AS5,
 NOTE_A5, NOTE_AS5, NOTE_A5, NOTE_AS5,
 NOTE_G4, 0, NOTE_G4, NOTE_D5,
 NOTE_C5, 0, NOTE_AS4, 0,
 NOTE_A4, 0, NOTE_A4, NOTE_A4,
 NOTE_C5, 0, NOTE_AS4, NOTE_A4,
 NOTE_G4,0, NOTE_G4, NOTE_AS5,
 NOTE_A5, NOTE_AS5, NOTE_A5, NOTE_AS5,
 NOTE_G4,0, NOTE_G4, NOTE_AS5,
 NOTE_A5, NOTE_AS5, NOTE_A5, NOTE_AS5};
int noteDurations[] = {
 4,4,4,4,
 4,4,4,4,
 4,4,4,4,
 4,4,4,4,
 4,4,4,4,
 4,4,4,4,
 4,4,4,4,
 4,4,4,4,
 4,4,4,4,
 4,4,4,4,
 4,4,4,4,
 4,4,4,4,
 4,4,4,4,
 4,4,4,4,
 4,4,4,4,
 4,4,4,4,
 4,4,4,4,
 4,4,4,4,
 4,4,4,4,
 4,4,4,4,
 4,4,4,4,
 4,4,4,4,
 4,4,4,4,
 4,4,4,4,
 4,4,4,4,
 4,4,4,4,
 4,4,4,4,
 4,4,4,4,
};
This is a full song. All you have to do to put in your own song is to edit this segment of any of the codes and insert the notes/note durations. Or, you can find one online that uses the pitches library.
Flash any of the three codes onto the Arduino and get ready for installation.
Step 4: Final touches and InstallationThe final step is to put the whole project in a design. I used a box like this -
And used it to make this design -
I used a power bank attached to the sign and opened it to its on switch and its recharge plug. The final video playing Happy birthday is at the top of the page, but below is it playing coffin dance -
And that's it for now! I would love to see your feedback on the project in the comments section.

Comments