

Hardware components | ||||||
 |
| × | 1 | |||
| × | 1 | ||||
| × | 1 | ||||
 |
| × | 1 | |||
 |
| × | 1 | |||
 |
| × | 1 | |||
Software apps and online services | ||||||
| ||||||
 |
| |||||
Hand tools and fabrication machines | ||||||
 |
| |||||
With the release of the Jibo SDK, we don't need to have the actual robot to start simulating behaviors and applications (known as "skills"). Because Jibo will need an Internet connection to perform speech recognition in the cloud, we can use that to host a web server on the robot itself. Using our Jibo web server, we can receive sensor data from various connected devices.
For this project, we'll attach an accelerometer to a Particle Photon and place it on top of a washer and dryer stack. Whenever the washer or dryer is running, the accelerometer will pick up the vibrations and "arm" the Photon. Once the vibration stops, the Photon will trigger an IFTTT event that will send an HTTP POST request to Jibo. The robot will then notify us that our laundry is ready!
This tutorial is based on the SparkFun Blynk Board Washer/Dryer Alarm tutorial by JIMB0.
Step 1: Install the Jibo SDKFollow this guide to install the Jibo SDK. Feel free to do the "Hello World" exercise to familiarize yourself with Atom editor and the SDK.
Step 2: Initialize Project DirectoryFor Jibo, projects are known as "skills." In Atom, select Jibo > New Skill and give the skill a name, such as "laundry-alert."
Open up a console (for Windows, I recommend Git Bash), navigate to your project directory (e.g. ~/github/laundry-alert) and enter
npm install
This will initialize a project directory and install the required packages for Jibo.
Note: if you are feeling particularly lazy, the Jibo Laundry Done animation, behavior, and code can be found in the jibo-laundry-done repository.
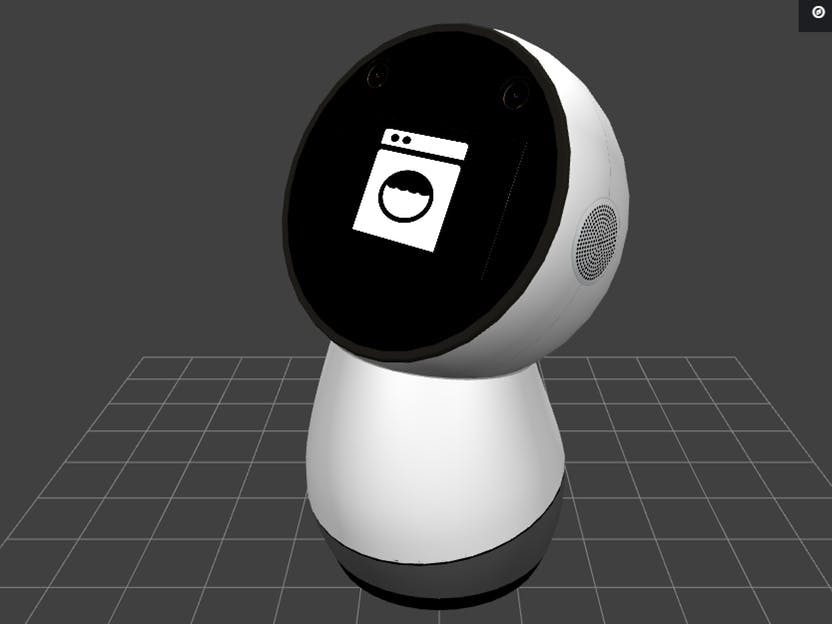
We want our little robot to move and display a washing machine on its screen when it receives the "laundry done" notification from IFTTT. To start, we'll use a public domain image (a washing machine clip art) that replaces Jibo's eye.
Save the image below as washing-machine.png.
Copy it to laundry-alert/animations/textures.
Now, we'll create the actual animation. To learn how to make your own animations, see the Animation Basics in the Jibo Video Tutorials. To make life easier, you can just download the laundry-done.keys file (see attachments) and copy it to laundry-alert/animations.
The .keys file is a listing of all the key frames, so just copying it in to the project will re-create the animation.
Back in Atom, close and open the animations folder (left browser pane). This should reload the files. Click on laundry-done.keys to open the animation editor. If you wish, click the play button (just above the timeline editor) to preview the animation.
In addition to animations, we can define custom behaviors for Jibo. Behaviors offer a way to control how Jibo interacts with the world without having to do much programming. We can also call behaviors from the main code, which we'll do in the next step.
In the project, go to Behaviors > main.bt. This is the main behavior for Jibo and is started by the main code (in index.js). Right-click on Sequence and select New Child. From the Behavior list, select Parallel and click Choose.
Right-click on Parallel and add a Subtree, which executes another defined behavior. In the animPath pane, select the idle.bt behavior. Right-click on the Subtree and choose to add a Decorator, which defines a modification to the behavior. Right-click in the Decorator Type pane, and add a WhileCondition. By default, the WhileCondition decorator says to execute while(true), meaning forever, so we'll leave it that way.
Right-click on the Subtree behavior and select Add Sibling Below. This will create an action that executes at the same time as our idle.bt behavior, since they are both defined under the Parallel behavior. Select Sequence as the behavior, which says to execute everything under it in order. Add a WhileCondition decorator to the Sequence, and leave it as default (while(true)).
Right-click on the newly created Sequence behavior and add a New Child. Select the TextToSpeech behavior. In the first pane under Behavior Arguments, change the string to The laundry is done. Add a decorator and change it to StartOnEvent. In the Decorator Arguments, change the event to laundry. The TestToSpeech event will not start executing until it sees the event "laundry" emitted from our main code.
Right click on TextToSpeech, and select Add Sibling Below. Choose PlayAnimation. In the animPath pane, select laundry-done.keys so that Jibo plays the custom animation we created earlier.
And that's it for the behavior! To start, Jibo will perform its intro "bow" and then idle while waiting for the "laundry" event from the code (that we're about to write). Once it receives the "laundry" event, Jibo will look up and to the side slightly and show the washing machine logo before returning to its idle animation (while waiting for another "laundry" event).
Select File > Save to save the behavior.
Step 5: Write the Main Jibo CodeNavigate to src/index.js. This is the main code that gets called after Jibo is initialized. You'll see some default code that initializes the main.bt behavior tree and starts running it. We will add some of our own code that turns Jibo into a web server and listens for an HTTP POST request with an attached JSON body of
{"message": "clothes done"}
If it receives this, it will then emit the "laundry" event to main.bt, which will run the laundry done animation and text-to-speech sequence.
Copy the code from index.js in the Attachments section to src/index.js.
Select File > Save to save the code.
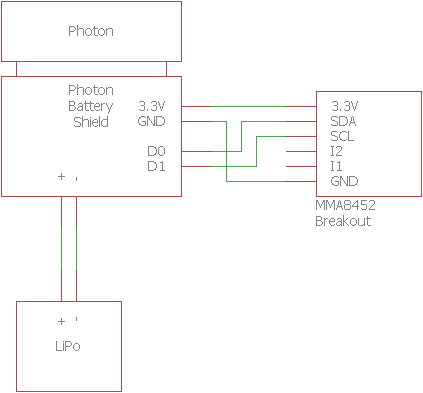
Step 6: Construct the Laundry SensorYou can solder headers on the MMA8452 Breakout or direct connect via wires. Either way, attach the Photon to the Battery Shield, and make the following connections between the Battery Shield and accelerometer:
- 3V3 (Photon) to 3.3V (MMA8452)
- GND to GND
- D0 to SDA
- D1 to SCL
Follow the Getting Started Guide on Particle's site to set up the Photon and connect it to your WiFi network.
Navigate to the Particle IDE, and in Code, click Create New App. Give it a name like Laundry-Alarm-IFTTT.
Go to Libraries, and search for SPARKFUNMMA8452Q. Click Include in App.
Back in the main app, replace the code with the code found in laundry-alarm-ifttt.ino (see Attachments).
Make sure your Photon is on and connected to the Internet. Click Flash to upload the code.
Step 8: Calibrate and Run the SensorPlace the Photon, Battery Shield, and accelerometer on your washer or dryer (whichever you want to monitor). As the sketch is running, turn on the washer or dryer, and the LED on D7 should light up after a few seconds. If it does not, lower the shakeThreshold integer and try running the code again.
Turn off the washer/dryer, and the LED should turn off. If it does not, raise the shakeThreshold integer. You might have to do this a few times to find the right threshold for your particular washer or dryer.
Once you are satisfied with the threshold, upload the code one last time to the Photon, plug in a battery, and leave it on the washer or dryer.
Step 9: Define the IFTTT RecipeNavigate to ifttt.com, and create a profile (if you do not already have one). Head to My Recipes, and select Create a Recipe. Click this, and search for Particle. Select the Particle logo, and choose New event published. For Event Name, enter laundry-done, and select your device under Device Name.
To fill out the next part, you'll need your public IP address. Go to this site and write down your IPv4 address.
Back on IFTTT, click that, search for Maker, and click on the Maker channel. Choose Make a web request. In the URL, put in your public IP address followed by the port: http://xx.xx.xx.xx:4242. For Method, select POST. For Content, select application/json. And then for the Body, enter {"message": "clothes done"}.
Click Create Action. Back in My Recipes, your new recipe should be on (listed in color).
Step 10: Punch a Hole in Your RouterOK, not literally, but we do need to open port 4242 to allow for our POST request to reach the Jibo emulator (and potentially the real Jibo robot) from the IFTTT servers.
Open a command terminal and enter ifconfig (OS X or Linux) or ipconfig (Windows) to get your local IP address.
Find your router manufacturer on this site to see how to enable port forwarding. Set up the port forwarding rule as follows:
- Description: Laundry done
- Starting Port: 4242
- Ending Port: 4242
- Local IP: <Local IP Address>
- Protocol: Both
Add the rule and click Apply (or Update).
Step 11: Run It!Make sure that the Photon motion sensor is running on top of your washer or dryer and that the IFTTT recipe is enabled. Back in the Jibo SDK, click the Run button. You should see a virtual representation of Jibo. He'll do his intro bow and then begin to idle.
Run your washer or dryer. The D7 LED on the Photon should come on. When the washer/dryer stops, the LED will turn off, and you should see Jibo (in the emulator) give you notification (it might take up to 30 seconds for the IFTTT request to reach Jibo).
Once the actual Jibo hardware is shipped, we should be able to upload this skill to the developer version and have him tell us when our clothes are ready. In the meantime, we can keep adding and expanding to skills in the SDK.
IFTTT offers a fantastic way to "glue" various hardware sensors and controllers to Jibo across the Internet. For example, you could use a current sensor to see if the stove is still on or hack a relay into your house wiring to control the lights. What other fun ways can you think of to use Jibo as a hub for your IoT devices?

Comments