

Hardware components | ||||||
 |
| × | 1 | |||
_ztBMuBhMHo.jpg?auto=compress%2Cformat&w=48&h=48&fit=fill&bg=ffffff) |
| × | 1 | |||
 |
| × | 1 | |||
 |
| × | 1 | |||
 |
| × | 1 | |||
 |
| × | 1 | |||
 |
| × | 1 | |||
 |
| × | 1 | |||
 |
| × | 1 | |||
 |
| × | 1 | |||
 |
| × | 1 | |||
 |
| × | 1 | |||
Hand tools and fabrication machines | ||||||
 |
| |||||
 |
| |||||
 |
| |||||
 |
| |||||
 |
| |||||
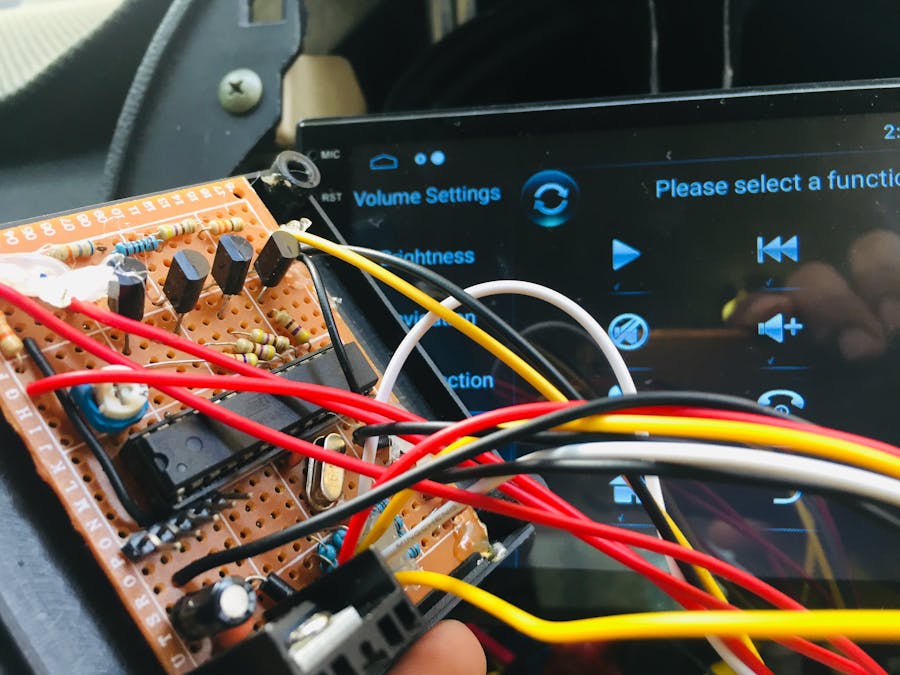
If you are a regular visitor to my website or YouTube Channel, you have already experience the same kind of project. The purpose of making this project is to make help the vehicle owner that they have no Steering Wheel audio control switches. But I know including me it is very helpful to control audio using such physicals switches.
The previous tutorial was about making a simple controller with switches. But I wanted to improve it especially for traditional volume controllers and few more important switches. Accordingly, I was done some researches to make this project successful. I will show those testing projects as well later. Watch the Video Description.
The final project is included especially two controllers with Rotary Encoders. One is for Volume and another one is for move the back and next.
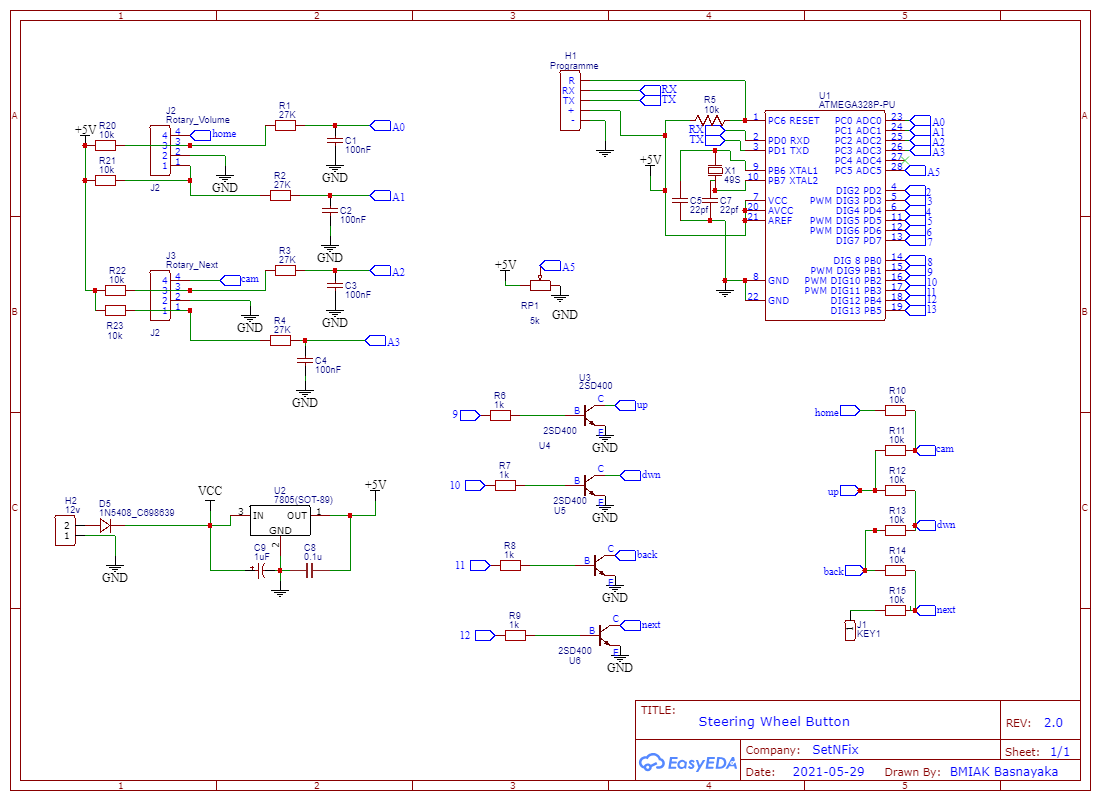
You may need the following parts, Atmega 328P IC - 01
16Mhz Cristal - 01 22pf ceramic capacitors - 02
D400 Transistors - 04
Rotary Encoders - 02
7805 Regulator - 01
104 pf Ceramic - 01
10uf capacitor - 01
IN 4001 Diode - 01
27k (1/4W)Resistors - 04
100 pf Capacitors - 04
10k (1/4W)Resistors - 10
5k Preset - 01
1 k (1/4W) Resistors 01
Wires
Arduino Board
Soldering equipment's
Connectors, etc,
Plastic Box
Read the Following circuit diagram carefully before making the project.
You can use the following PCB plan for easy construction.
You can use the following link to download the diagram. How to connect the wires. 01. Give the power 12 volts from the car ACC wire and ground the pin correctly. 02.Connect KEY 1 wire with the KEY 1 of the unit and There may be two wires called “KEY” and “KEY 1” in-car head unit. Sometimes the “KEY” wire will not work correctly. If so connect the KEY 1 wire with the car steering wheel control unit.
03.Tune the correct delay to activate the switch using the 5k preset.
Go to theSettings>Steering Wheel Learningof your car head unit Then,
Touch the "volume UP button" of the car head unit and rotate to right side the rotary encoder 1. If the device is not detected or the click is too much long, adjust the delay time using 5k variable resistors (preset)
Then Touch the "volume DOWN" button of the car head unit and rotate to the left side the rotary encoder 1.
Accordingly, you can program all the keys.
Check the video for more details. Steering Learning


Comments