

Hardware components | ||||||
 |
| × | 1 | |||
| × | 1 | ||||
 |
| × | 1 | |||
 |
| × | 1 | |||
 |
| × | 1 | |||
 |
| × | 1 | |||
 |
| × | 1 | |||
Software apps and online services | ||||||
| ||||||
The LightBlue Bean is an Arduino compatible microcontroller with integrated Bluetooth Low Energy that you can program wirelessly from your smartphone or desktop.
We will get the ambient temperature using inbuilt temperature sensosor on LightBlue Bean and save it in a text file on the SD card.
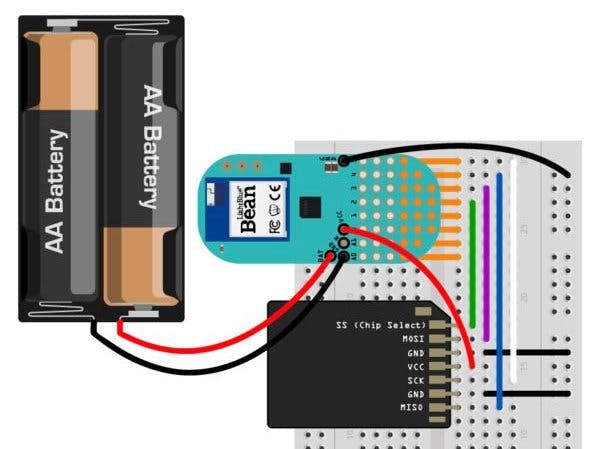
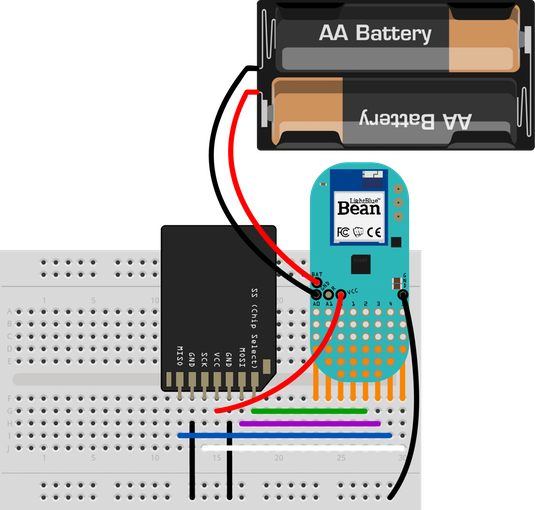
To connect the LightBlue Bean to a breadboard, solder male headers to the back of the Bean. Then solder female headers to the front side on BAT, VCC and the two GNDs.
To wire the SD card to the breadboard we can either buy a SD card breakout board or solder male headers directly on the pins on the adapter.
Take the male headers and put the short end against the pins on the SD card adapter. To avoid melting the plastic, put a drop of solder on the soldering iron and quickly put it on the SD card adapter pin and male header.
Put the SD card and Bean next to each other on the breadboard. Put jumper wires from pin A0 – pin 5 under the Bean to cover the gap in the middle of the breadboard.
To connect the SD card to the Bean we need to wire the following pins to each other:
- Pin 2 – SS
- Pin 3 – MOSI
- Pin 4 – MISO
- Pin 5 – SCK
- VCC – VCC
Also connect the two GNDs on the SD card to GND on the breadboard and then connect the batteries to BAT and GND on the Bean.
Modify SD libraryTo read the audio files from the SD card we will use the SD library that is preinstalled in the Arduino IDE. We will need to modify it a bit though to use it with the LightBlue Bean.
To find the library, navigate to the Arduino app in Finder, right click the icon and choose “Show package contents”.
From there, open
Contents > Resources > Java > libraries > SD > utility > Sd2PinMap.h
Upload this code to your Bean:
/* This example shows how to get the ambient temperature in degrees Celsius from the Bean's built-in temperature sensor and log it on an SD card using the SD library. Please note that you have to modify the SD library to use it with the Bean. In Sd2PinMap.h, line 278-281, change the pins to the following: SS_PIN = 2; MOSI_PIN = 3; MISO_PIN = 4; SCK_PIN= 5; This example code is in the public domain. */#include <SD.h>const int chipSelect = 2;uint8_t temp;void setup(){ Serial.begin(); // Check if the card is present and can be initialized if (!SD.begin(chipSelect)) { Serial.println("SD fail"); return; }}void loop(){ // Get the ambient temperature with a range of -40C to 87.5C temp = Bean.getTemperature(); // Open the data file File dataFile = SD.open("datalog.txt", FILE_WRITE); // If the file is available, write to it: if (dataFile) { dataFile.println(String(temp)); dataFile.close(); } // If the file isn't open, send an error message over serial else { Serial.println("error opening datalog.txt"); } // Sleep for a minute before we read the temperature again Bean.sleep(60000);}
To write data on the SD card, we need a .txt file that we can print it to.
Create an empty .txt file, name it datalog and load it to the SD card. Put the SD card in the adapter on the breadboard and collect that temperature data like there’s no tomorrow!


Comments