

Hardware components | ||||||
 |
| × | 1 | |||
_ztBMuBhMHo.jpg?auto=compress%2Cformat&w=48&h=48&fit=fill&bg=ffffff) |
| × | 1 | |||
| × | 2 | ||||
 |
| × | 1 | |||
| × | 1 | ||||
 |
| × | 3 | |||
 |
| × | 2 | |||
Hand tools and fabrication machines | ||||||
 |
| |||||
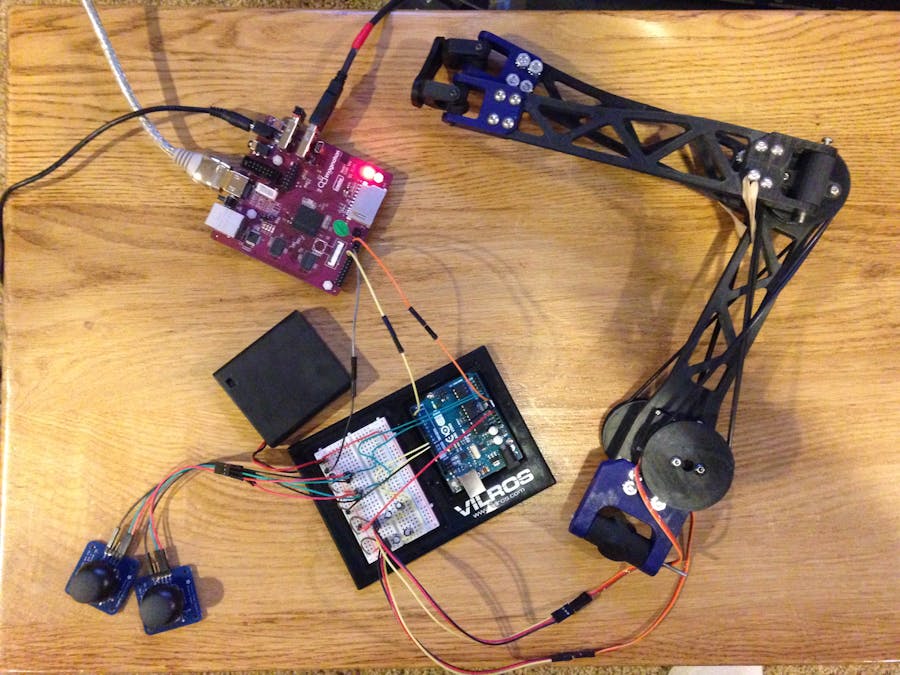
The main idea of this project was to build a robotic arm that can be controlled through user input, while also using the Ci20 to create a 3D rendering of the arm on screen.
In this area of my project, I used the python opengl library to create a 3D render of the robotic arm I built. This was a very challenging project. Prior to this I had no experience in 3D graphics processing. It took me quite some time to understand how to build this type of program. With the help of python opengl tutorials by Sentdex on Youtube, I was able to gain a better understanding of this subject, giving me a starting base of knowledge to expand upon with this project.
There were a few things in the overlying subject of 3D graphics that I was initially confused on. The main two being:
- Camera Positioning
- Object Translation and Rotation
When it comes to camera positioning there is a very important idea to grasp. This idea is that, the camera does not move; it is the world that moves around it. The camera is located at (0,0,0) facing negative z. In order to 'move' the camera, the entire world must be translated and rotated with reference to it. In the case of the camera, the objects on screen are all being moved with respect to it so it appears as though the camera is doing the moving. This also creates the situation where coordinates in the translate and rotate functions must be inverted in order to have their desired effects.
The other area I had problems with was translation and rotation of objects. I had a hard time understanding how to move objects, because the functions for moving objects are the same as 'moving' the camera, only in this case they are actually moving. An aspect that is important to note in 3D graphics is, the order translations and rotations take place in, because their order affects their outcome. Changing the order of a translation and rotation can have drastically different results.
The bulk of the program was inspired by the Sentdex python opengl tutorials, but after the first few I set out on my own to learn my way, through trial and error, and simply doing it to see what works.
This program creates three 3D objects: The axes, the humerus, and the radius. The first is simply a cross section of planes, 50 by 50 units, colored red, blue, and green. I added this to add a reference point for the motion of the arm as it is translated and rotated. The humerus is the upper bone of the arm, and remains static. The radius is one of the two bones in the fore arm. I would have added the ulna bone, but was strapped for time on this project. The radius can be controlled through the G and H keys, rotating and translating it up and down.
This was an area that took a good chunk of my time to figure out; how to sync up the joint of the elbow in the 3D model. The main problem is that the radius's local origin is not based in the upper part of the object, but in the bottom part. This means that it rotates from the bottom not the top. When the radius is rotated it must also be translated back to the elbow joint in order for it to meet up. When trying to figure out this part, I really over thought it. I was using inverse trig functions to try and determine the distance vertically and horizontally it had to be translated. But it turned out I didn't need that, all I needed were two functions.
So my code went from this:
glRotatef(a,1,0,0)
a = rad(a)
glTranslatef(10-10*math.atan(a),0,0)
glTranslatef(0,20+20*math.atan(a),0)
To this:
glRotatef(a,1,0,0)
glTranslatef(20,0,0)
Which was surprising, that the simple code is exactly what I needed for it to work. I learned most of the things for this project through trial and error, and now I know what not to do.
These are some notes that I took as I programmed or when I had a problem that I didn't understand. They were mainly just for my reference, but some of them have coherent information on them, if they are legible.
I designed all of the parts for this arm myself in Solidworks. They were then printed on my school's 3D printer. This was actually my first experience of printing something that I designed from a 3D printer, all other times I merely left it digital.
I learned quite a few things from this aspect of my project. I learned key lessons in design and engineering. Mainly through my mistakes and tries, I learned good habits for designing something.
The design of this robotic arm is inspired by human anatomy. It is comprized of three main bones and a number of joints to give a realistic range of motion. There are two sets of pulleys that are driven through the two microservos. The main idea for replicating the motion of a human forearm, relies on the pulleys. They act as tendons to pull up the radius and ulna bones. The two pulleys can act in tandom to pull the arm up or down. But the major point in this design is that when the servos go in opposite directions, it creates a twisting motion, similar to how the wrist works.
There are somethings that I could have designed better, mainly the connections for the pulleys and servo mounts. The current belts are actually very large specialty o-rings. They may be a good size and fit, but they do tend to slip. I could have also used flat belts and toothed pulleys to have a more reliable transfer of motion. I had also run into some problems along the way as I designed this arm. For a little while I was left without servos because the ones I had initially installed on the arm had broken. They broke due to an error of my own, while attempting to adjust their trim pots. After they broke I took the opportunity to buy much stronger servos, as well as back ups in case the new ones failed.
I learn much from this project, but can always learn much more. This project helped to serve as a foundation for me to continue on with other projects, as well as update and maintain this one.
Arm Design Sketches
Arduino and Ci20 Schematic
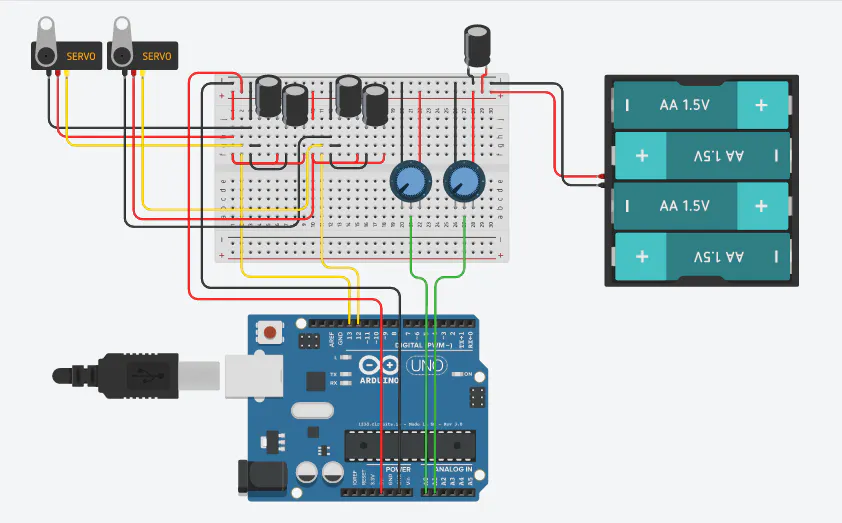


Comments