


I have been making and building models since the 60's. I would so often desire and model or prop back then companies didn't provide or if they did they weren't authentic enough. This later lead me to a career in Hollywood making such things for the movies. But always I have had this passion to make things for myself, just because I could.
Whether it was a radio controlled airplane or a big model of the USS Enterprise (which I also made from scratch) I would just make it happen.
So when I saw the "Iron Giant" I fell in love.
Growing up as I did in the 50s and 60s was that same period as the film. As a boy I use to dream of having a Robby the Robot. Later on a B-9 from "Lost in Space". But once I saw the Giant, I had come home.
So as usual I got on the net and looked around for a nice model of the Giant but could fine one. They were either too small or inaccurate. Then the light bulb turned on. I could make it myself! Big enough I could stand and look at it in the eyes.
Next step was to search for plans and I found that there was little to go on except the film and some drawings none of which were three views.
So I asked Adam Savage if he knew of any plans that could help. And he told me the Mondo 3 foot toy was a good reference. He had checked with Brad Bird who claimed the same thing.
So off I went scaling up 4 views taken from the toy and making templates by hand that I would use to make up the masters later to be molded in RTV 1065 with epoxy glass mother molds. The actual parts will be made in epoxy glass as well. They will be lighter and stronger than BJB 1630 resin which I have used in the past.
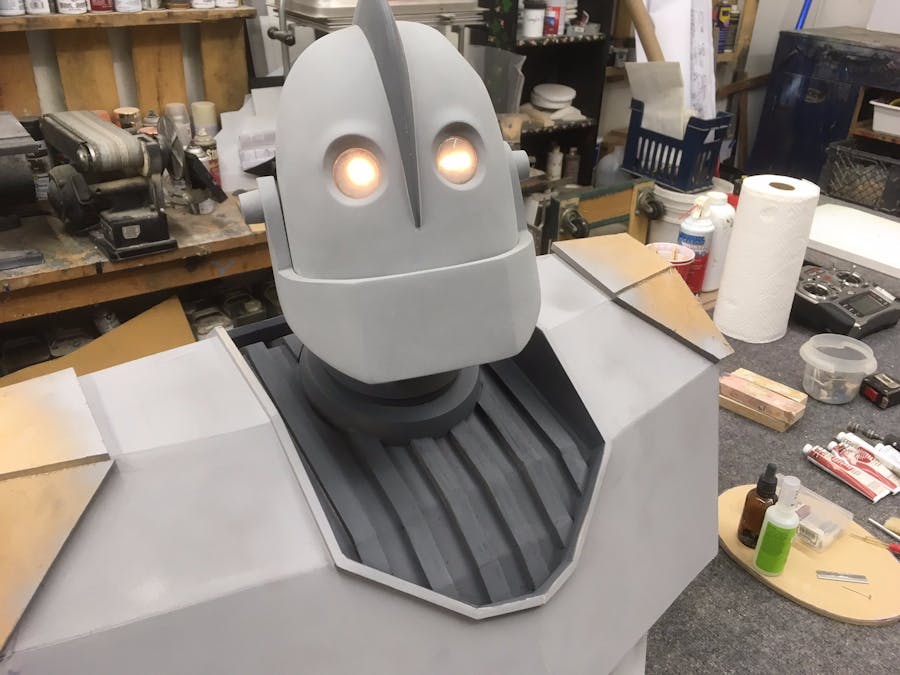
At this point in the project, I have made the head and molded it. I cast up the head, the jaw, lighted the eyes and hinged the jaw.
I am now working on the chest or torso which I have found quite challenging. Much harder to scratch build than a 6 foot Enterprise. The torso is made from a combination of MDF under structure and 060 polystyrene and hard wood.
That's the short story for now and I will be adding to it as I go with pictures and video as I can.
The head master started life as a a 2D profile cut out of MDF. I added pink foam and carved it to the contours and sanded to shape. You can see the print outs to scale of the toy front on and side view.
Then I epoxy glassed the head and sanded it as smooth as I could.
Then a layer of Evercoat glazing putty and a hefty sanding.
Then for that final smoothing Bondo air cure red putty.
After a lot of primer and sanding I started on the fin and jaw using the same techniques. The jaw as made of polystyrene.
The Eyes ere later cut in, putty and the ridges added with the same putty. I'm a sculptor so it was easy for me.
More to come.
Actually after looking at the picture I did the shapes around the eyes with Apoxie Sculpt. A two part epoxy that sculpts like clay and tales a few hours to cure.
After a lot more work and primer and filling I got those iconic eye ridges. The parts on the jaw hinge point were done on the lathe out of hardwood. The fin on the head was a polystyrene template in 2D and then willed with Evercoat glazing putty and sanded to shape.
This is are weekly show and this shows most of the steps to make the head master:

Comments