


Hardware components | ||||||
 |
| × | 3 | |||
 |
| × | 4 | |||
_ztBMuBhMHo.jpg?auto=compress%2Cformat&w=48&h=48&fit=fill&bg=ffffff) |
| × | 1 | |||
Software apps and online services | ||||||
 |
| |||||
 |
| |||||
Hand tools and fabrication machines | ||||||
 |
| |||||
 |
| |||||
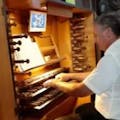
The damaged Yamaha E-10 AR has gained a new lease of life as a MIDI controller for Hauptwerk / Grand Orgue
The damaged Yamaha E-10 AR has gained a new lease of life as a MIDI controller for Hauptwerk / Grand Orgue
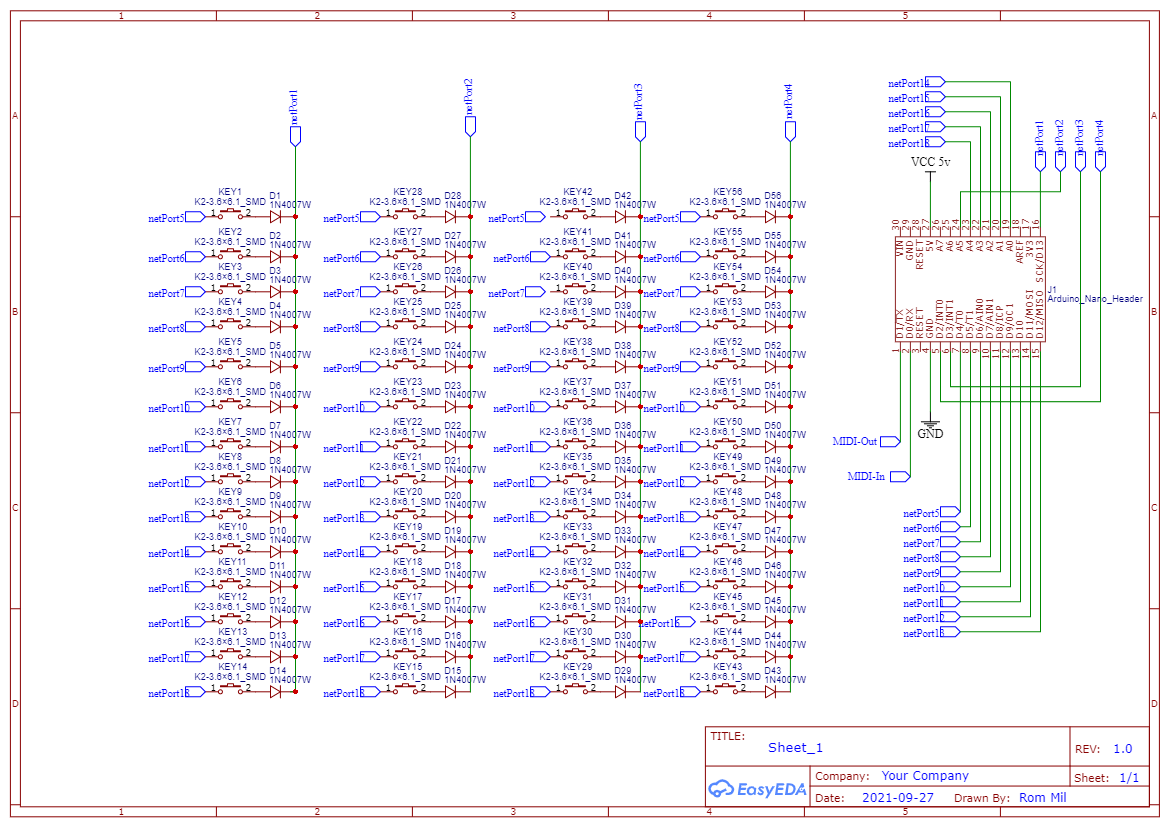
I used 3 Arduino NANO, 4 Adruino PRO MINI (328 / 5v / 16Mhz) and 1 Arduino UNO. In the software I used the Control Surface library - written by PieterP * https://github.com/tttapa/Control-Surface * (28-01-2019). I used the pipes possibilities that this library offers. This made it possible to connect the MIDI (TX) output of one Arduino module with the MIDI (RX) input of another module. To finally connect the 16u2 chip in the Arduino UNO to the RX, which works as a MIDI-LUFA interface. * https://doremifasollasi.wordpress.com/jak-przerobic-arduino-uno-w-interface-midi-usb/ *
Include the Control Surface library in code Arduino IDE ver. 1.8.19
Note the code: The F note is implemented as F_. See: https://tttapa.github.io/Control-Surface-doc/Doxygen/da/dc1/FAQ.html#faq-midi-note-f
- Registry_p1_no_matrix_2_NANO_chanell_5_Yamaha_konradi
- Registry_p2_no_matrix_2_NANO_chanell_5_Yamaha_konradi
- Registry_p3_no_matrix_2_NANO_chanell_5_Yamaha_konradi
- Potencjometrs_and_matryca_5x7_Yamaha_konradi
- Potencjometr_and_matrix_5x5_for_pedal_Yamaha_konradi
- Pistons_matrix 4x8_and_potecjometr_NANO_Yamaha_konradi
- Man-I-matrix_13x5_for_Yamaha_konradi
- Man-II-matrix_13x5_for_Yamaha_konradi
- Registry_Yamaha_konradi_no_matrix_2
Registry_p1_no_matrix_2_NANO_chanell_5_Yamaha_konradi
C/C++/**
* for ATmega328p or Arduino uno, nano, pro mini
* Autor: Romuald Milewski
*
* The third processor for registers converted Yamaha E-10AR to a MIDI console
* @brief This example demonstrates the use of push buttons that send note
* events.
*
* ### Connections
*
* - 2: momentary push button (to ground)
* - 3: momentary push button (to ground)
*
* The internal pull-up resistors for the buttons will be enabled automatically.
*
* ### Behavior
*
* Pressing the first button will send note on/off events on middle C.
* Pressing the second button will send note on/off events for middle C sharp.
*
* Written by PieterP, 28-01-2019
* https://github.com/tttapa/Control-Surface
*/
// Include the Control Surface library
#include <Control_Surface.h>
// Instantiate a MIDI over USB interface.
//USBDebugMIDI_Interface midi;
//HardwareSerialMIDI_Interface midi;
//HardwareSerialMIDI_Interface midi = Serial;
HardwareSerialMIDI_Interface midiser = Serial;
//HairlessMIDI_Interface midi;
MIDI_PipeFactory<1> pipes;
using namespace MIDI_Notes;
// Instantiate the momentary push buttons that send out MIDI Note events.
NoteButton buttons[] = {
//{2, note(C, 4)}, // digital input pin, note number
//{3, note(Db, 4)},
// If you want to set the channel specifically, you can use:
// for UNO , nano
{12, {note(C, 2), CHANNEL_5}},
{11, {note(Db, 2), CHANNEL_5}},
{10, {note(D, 2), CHANNEL_5}},
{9, {note(Eb, 2), CHANNEL_5}},
{8, {note(E, 2), CHANNEL_5}},
{7, {note(F, 2), CHANNEL_5}},
{6, {note(Gb, 2), CHANNEL_5}},
{5, {note(G, 2), CHANNEL_5}},
{4, {note(Ab, 2), CHANNEL_5}},
{3, {note(A, 2), CHANNEL_5}},
{2, {note(Bb, 2), CHANNEL_5}},
{A5, {note(B, 2), CHANNEL_5}},
{A4, {note(C, 3), CHANNEL_5}},
{A3, {note(Db, 3), CHANNEL_5}},
{A2, {note(D, 3), CHANNEL_5}},
{A1, {note(Eb, 3), CHANNEL_5}},
{A0, {note(E, 3), CHANNEL_5}},
{13, {note(F, 3), CHANNEL_5}},
};
void setup() {
// Initialize everything
Control_Surface.begin();
midiser >> pipes >> midiser; //all incoming midi from Serial is looped back
midiser.begin();
}
void loop() {
// Update the control surface
Control_Surface.loop();
midiser.update();
}
Registry_p2_no_matrix_2_NANO_chanell_5_Yamaha_konradi
C/C++/**
* for ATmega328p or Arduino uno, nano, pro mini
* Autor: Romuald Milewski
*
* The second processor for registers converted Yamaha E-10AR to a MIDI console
* @brief This example demonstrates the use of push buttons that send note
* events.
*
* ### Connections
*
* - 2: momentary push button (to ground)
* - 3: momentary push button (to ground)
*
* The internal pull-up resistors for the buttons will be enabled automatically.
*
* ### Behavior
*
* Pressing the first button will send note on/off events on middle C.
* Pressing the second button will send note on/off events for middle C sharp.
*
* Written by PieterP, 28-01-2019
* https://github.com/tttapa/Control-Surface
*/
// Include the Control Surface library
#include <Control_Surface.h>
// Instantiate a MIDI over USB interface.
//USBDebugMIDI_Interface midi;
//HardwareSerialMIDI_Interface midi;
//HardwareSerialMIDI_Interface midi = Serial;
HardwareSerialMIDI_Interface midiser = Serial;
//HairlessMIDI_Interface midi;
MIDI_PipeFactory<1> pipes;
using namespace MIDI_Notes;
// Instantiate the momentary push buttons that send out MIDI Note events.
NoteButton buttons[] = {
//{2, note(C, 4)}, // digital input pin, note number
//{3, note(Db, 4)},
// If you want to set the channel specifically, you can use:
// for UNO , nano
{A5, {note(Gb, 3), CHANNEL_5}},
{A3, {note(G, 3), CHANNEL_5}},
{A2, {note(Ab, 3), CHANNEL_5}},
{A1, {note(A, 3), CHANNEL_5}},
{A0, {note(Bb, 3), CHANNEL_5}},
{A4, {note(B, 3), CHANNEL_5}},
{13, {note(C, 4), CHANNEL_5}},
{12, {note(Db, 4), CHANNEL_5}},
{11, {note(D, 4), CHANNEL_5}},
{10, {note(Eb, 4), CHANNEL_5}},
{9, {note(E, 4), CHANNEL_5}},
{8, {note(F, 4), CHANNEL_5}},
{7, {note(Gb, 4), CHANNEL_5}},
{6, {note(G, 4), CHANNEL_5}},
{5, {note(Ab, 4), CHANNEL_5}},
{4, {note(A, 4), CHANNEL_5}},
{3, {note(Bb, 4), CHANNEL_5}},
{2, {note(B, 4), CHANNEL_5}},
};
void setup() {
// Initialize everything
Control_Surface.begin();
midiser >> pipes >> midiser; //all incoming midi from Serial is looped back
midiser.begin();
}
void loop() {
// Update the control surface
Control_Surface.loop();
midiser.update();
}
Registry_p3_no_matrix_2_NANO_chanell_5_Yamaha_konradi
C/C++/**
* for ATmega328p or Arduino uno, nano, pro mini
* Autor: Romuald Milewski
*
* The third processor for registers converted Yamaha E-10AR to a MIDI console
* @brief This example demonstrates the use of push buttons that send note
* events.
*
* ### Connections
*
* - 2: momentary push button (to ground)
* - 3: momentary push button (to ground)
*
* The internal pull-up resistors for the buttons will be enabled automatically.
*
* ### Behavior
*
* Pressing the first button will send note on/off events on middle C.
* Pressing the second button will send note on/off events for middle C sharp.
*
* Written by PieterP, 28-01-2019
* https://github.com/tttapa/Control-Surface
*/
// Include the Control Surface library
#include <Control_Surface.h>
// Instantiate a MIDI over USB interface.
//USBDebugMIDI_Interface midi;
//HardwareSerialMIDI_Interface midi;
//HardwareSerialMIDI_Interface midi = Serial;
HardwareSerialMIDI_Interface midiser = Serial;
//HairlessMIDI_Interface midi;
MIDI_PipeFactory<1> pipes;
using namespace MIDI_Notes;
// Instantiate the momentary push buttons that send out MIDI Note events.
NoteButton buttons[] = {
//{2, note(C, 4)}, // digital input pin, note number
//{3, note(Db, 4)},
// If you want to set the channel specifically, you can use:
// for UNO , nano
{A3, {note(C, 5), CHANNEL_5}},
{A2, {note(Db, 5), CHANNEL_5}},
{A1, {note(D, 5), CHANNEL_5}},
{A0, {note(Eb, 5), CHANNEL_5}},
{13, {note(E, 5), CHANNEL_5}},
{12, {note(F, 5), CHANNEL_5}},
{11, {note(Gb, 5), CHANNEL_5}},
{2, {note(G, 5), CHANNEL_5}},
{3, {note(Ab, 5), CHANNEL_5}},
{4, {note(A, 5), CHANNEL_5}},
{5, {note(Bb, 5), CHANNEL_5}},
{6, {note(B, 5), CHANNEL_5}},
{7, {note(C, 6), CHANNEL_5}},
{8, {note(Db, 6), CHANNEL_5}},
{9, {note(D, 6), CHANNEL_5}},
{10, {note(Eb, 6), CHANNEL_5}},
// {A4, {note(E, 6), CHANNEL_5}},
// {A5, {note(F, 6), CHANNEL_5}},
};
//Potenciometrs
CCPotentiometer potentiometer1(A5, {MIDI_CC::Channel_Volume, CHANNEL_1});
void setup() {
// Initialize everything
Control_Surface.begin();
midiser >> pipes >> midiser; //all incoming midi from Serial is looped back
midiser.begin();
}
void loop() {
// Update the control surface
Control_Surface.loop();
midiser.update();
}
Potencjometrs_and_matryca_5x7_Yamaha_konradi
C/C++/**
*
* for ATmega1284p or Arduino mega
* @brief This example demonstrates the use of push buttons that send note
* events.
*
* ### Connections
*
* - 2: momentary push button (to ground)
* - 3: momentary push button (to ground)
*
* The internal pull-up resistors for the buttons will be enabled automatically.
*
* ### Behavior
*
* Pressing the first button will send note on/off events on middle C.
* Pressing the second button will send note on/off events for middle C sharp.
*
* Written by PieterP, 28-01-2019
* https://github.com/tttapa/Control-Surface
*/
// Include the Control Surface library
#include <Control_Surface.h>
// Instantiate a MIDI over USB interface.
//USBDebugMIDI_Interface midi;
//HardwareSerialMIDI_Interface midi;
//HardwareSerialMIDI_Interface midi = Serial;
HardwareSerialMIDI_Interface midiser = Serial;
//HairlessMIDI_Interface midi;
MIDI_PipeFactory<1> pipes;
using namespace MIDI_Notes;
// Instantiate the momentary push buttons that send out MIDI Note events.
/**
NoteButton buttons[] = {
//{2, note(C, 4)}, // digital input pin, note number
//{3, note(Db, 4)},
// If you want to set the channel specifically, you can use:
// for UNO , nano
{15, {note(C, 2), CHANNEL_11}},
{16, {note(Db, 2), CHANNEL_11}},
{17, {note(D, 2), CHANNEL_11}},
{18, {note(Eb, 2), CHANNEL_11}},
{19, {note(E, 2), CHANNEL_11}},
{20, {note(F, 2), CHANNEL_11}},
{21, {note(Gb, 2), CHANNEL_11}},
{22, {note(G, 2), CHANNEL_11}},
{23, {note(Ab, 2), CHANNEL_11}},
};
*/
//Potenciometrs
CCPotentiometer potentiometer1(A0, {MIDI_CC::Channel_Volume, CHANNEL_16});
CCPotentiometer potentiometer2(A1, {MIDI_CC::Channel_Volume, CHANNEL_15});
CCPotentiometer potentiometer3(A2, {MIDI_CC::Channel_Volume, CHANNEL_14});
CCPotentiometer potentiometer4(A3, {MIDI_CC::Channel_Volume, CHANNEL_13});
CCPotentiometer potentiometer5(A4, {MIDI_CC::Channel_Volume, CHANNEL_12});
CCPotentiometer potentiometer6(A5, {MIDI_CC::Channel_Volume, CHANNEL_11});
CCPotentiometer potentiometer7(A6, {MIDI_CC::Channel_Volume, CHANNEL_2});
CCPotentiometer potentiometer8(A7, {MIDI_CC::Channel_Volume, CHANNEL_3});
// The note numbers corresponding to the buttons in the matrix
const AddressMatrix<4, 7> addresses = {{
{ 36, 37, 38, 39, 40, 41, 42},
{ 43, 44, 45, 46, 47, 48, 49},
{ 50, 51, 52, 53, 54, 55, 56},
{ 57, 58, 59, 60, 61, 62, 63},
}};
NoteButtonMatrix<4, 7> buttonmatrix = {
{2, 3, 4, 5}, // column pins
{6, 7, 8, 9, 10, 11, 12}, // row pins
addresses, // address matrix
CHANNEL_7, // channel and cable number
};
void setup() {
// Initialize everything
Control_Surface.begin();
midiser >> pipes >> midiser; //all incoming midi from Serial is looped back
midiser.begin();
}
void loop() {
// Update the control surface
Control_Surface.loop();
midiser.update();
}
Potencjometr_and_matrix_5x5_for_pedal_Yamaha_konradi
C/C++/**
* pedal
* for ATmega1284p or Arduino mega
* @brief This example demonstrates the use of push buttons that send note
* events.
*
* ### Connections
*
* - 2: momentary push button (to ground)
* - 3: momentary push button (to ground)
*
* The internal pull-up resistors for the buttons will be enabled automatically.
*
* ### Behavior
*
* Pressing the first button will send note on/off events on middle C.
* Pressing the second button will send note on/off events for middle C sharp.
*
* Written by PieterP, 28-01-2019
* https://github.com/tttapa/Control-Surface
*/
// Include the Control Surface library
#include <Control_Surface.h>
// Instantiate a MIDI over USB interface.
//USBDebugMIDI_Interface midi;
//HardwareSerialMIDI_Interface midi;
//HardwareSerialMIDI_Interface midi = Serial;
HardwareSerialMIDI_Interface midiser = Serial;
//HairlessMIDI_Interface midi;
MIDI_PipeFactory<1> pipes;
using namespace MIDI_Notes;
// Instantiate the momentary push buttons that send out MIDI Note events.
NoteButton buttons[] = {
//{2, note(C, 4)}, // digital input pin, note number
//{3, note(Db, 4)},
// If you want to set the channel specifically, you can use:
// for UNO , nano
{12, {note(C, 7), CHANNEL_9}},
// {13, {note(Db, 7), CHANNEL_5}},
{A0, {note(D, 7), CHANNEL_9}},
// {A1, {note(Eb, 7), CHANNEL_5}},
// {A2, {note(E, 7), CHANNEL_5}},
// {A3, {note(F, 7), CHANNEL_5}},
// {A4, {note(Gb, 7), CHANNEL_5}},
// {A5, {note(G, 7), CHANNEL_5}},
};
//Potenciometrs
CCPotentiometer potentiometer1(A1, {MIDI_CC::Channel_Volume, CHANNEL_9});
//CCPotentiometer potentiometer2(A7, {MIDI_CC::Channel_Volume, CHANNEL_4});
//CCPotentiometer potentiometer3(A3, {MIDI_CC::Channel_Volume, CHANNEL_13});
//CCPotentiometer potentiometer4(A4, {MIDI_CC::Channel_Volume, CHANNEL_14});
//CCPotentiometer potentiometer5(A5, {MIDI_CC::Channel_Volume, CHANNEL_15});
// The note numbers corresponding to the buttons in the matrix
const AddressMatrix<5, 5> addresses = {{
{ 36, 37, 38, 39, 40},
{ 41, 42, 43, 44, 45},
{ 46, 47, 48, 49, 50},
{ 51, 52, 53, 54, 55},
{ 56, 57, 58, 59, 60},
}};
NoteButtonMatrix<5, 5> buttonmatrix = {
{2, 3, 4, 5, 6}, // column pins
{7, 8, 9, 10, 11}, // row pins
addresses, // address matrix
CHANNEL_4, // channel and cable number
};
void setup() {
// Initialize everything
Control_Surface.begin();
midiser >> pipes >> midiser; //all incoming midi from Serial is looped back
midiser.begin();
}
void loop() {
// Update the control surface
Control_Surface.loop();
midiser.update();
}
Pistons_matrix 4x8_and_potecjometr_NANO_Yamaha_konradi
C/C++/**
* for ATmega1284p or Arduino mega
* @brief This example demonstrates the use of push buttons that send note
* events.
*
* ### Connections
*
* - 2: momentary push button (to ground)
* - 3: momentary push button (to ground)
*
* The internal pull-up resistors for the buttons will be enabled automatically.
*
* ### Behavior
*
* Pressing the first button will send note on/off events on middle C.
* Pressing the second button will send note on/off events for middle C sharp.
*
* Written by PieterP, 28-01-2019
* https://github.com/tttapa/Control-Surface
*/
// Include the Control Surface library
#include <Control_Surface.h>
// Instantiate a MIDI over USB interface.
//USBDebugMIDI_Interface midi;
//HardwareSerialMIDI_Interface midi;
//HardwareSerialMIDI_Interface midi = Serial;
HardwareSerialMIDI_Interface midiser = Serial;
//HairlessMIDI_Interface midi;
MIDI_PipeFactory<1> pipes;
//Potenciometrs
CCPotentiometer potentiometer1(A1, {MIDI_CC::Channel_Volume, CHANNEL_11});
//CCPotentiometer potentiometer2(A2, {MIDI_CC::Channel_Volume, CHANNEL_12});
//CCPotentiometer potentiometer3(A3, {MIDI_CC::Channel_Volume, CHANNEL_13});
//CCPotentiometer potentiometer4(A4, {MIDI_CC::Channel_Volume, CHANNEL_14});
//CCPotentiometer potentiometer5(A5, {MIDI_CC::Channel_Volume, CHANNEL_15});
// The note numbers corresponding to the buttons in the matrix
const AddressMatrix<4, 8> addresses = {{
{ 36, 37, 38, 39, 40, 41, 42, 43},
{ 44, 45, 46, 47, 58, 49, 50, 51},
{ 52, 53, 54, 55, 56, 57, 58, 59},
{ 60, 61, 62, 63, 64, 65, 66, 67},
}};
NoteButtonMatrix<4, 8> buttonmatrix = {
{2, 3, 4, 5}, // column pins
{6, 7, 8, 9, 10, 11, 12, A0}, // row pins
addresses, // address matrix
CHANNEL_9, // channel and cable number
};
void setup() {
// Initialize everything
Control_Surface.begin();
midiser >> pipes >> midiser; //all incoming midi from Serial is looped back
midiser.begin();
}
void loop() {
// Update the control surface
Control_Surface.loop();
midiser.update();
}
/**
 * for ATmega1284p or Arduino mega
 * @brief   This example demonstrates the use of push buttons that send note
 *          events.
 *
 * ### Connections
 *
 *  - 2:  momentary push button (to ground)
 *  - 3:  momentary push button (to ground)
 *
 * The internal pull-up resistors for the buttons will be enabled automatically.
 *
 * ### Behavior
 *
 * Pressing the first button will send note on/off events on middle C.
 * Pressing the second button will send note on/off events for middle C sharp.
 *
 * Written by PieterP, 28-01-2019
 * https://github.com/tttapa/Control-Surface
 */

// Include the Control Surface library
#include <Control_Surface.h>

// Instantiate a MIDI over USB interface.
//USBDebugMIDI_Interface midi;
//HardwareSerialMIDI_Interface midi;
//HardwareSerialMIDI_Interface midi = Serial;
HardwareSerialMIDI_Interface midiser = Serial;
//HairlessMIDI_Interface midi;

MIDI_PipeFactory<1> pipes;

using namespace MIDI_Notes;
// Instantiate the momentary push buttons that send out MIDI Note events.
NoteButton buttons[] = {
    //{2, note(C, 4)}, // digital input pin, note number
    //{3, note(Db, 4)},

    // If you want to set the channel specifically, you can use:
    // for UNO , nano
 //   {12, {note(C, 7), CHANNEL_5}},
 //   {13, {note(Db, 7), CHANNEL_5}},
 //   {A0, {note(D, 7), CHANNEL_5}},
  //  {A1, {note(Eb, 7), CHANNEL_5}},
 //   {A2, {note(E, 7), CHANNEL_5}},
 //   {A3, {note(F, 7), CHANNEL_5}},
  //  {A4, {note(Gb, 7), CHANNEL_5}},
  //  {A5, {note(G, 7), CHANNEL_5}},

};
//Potenciometrs
//CCPotentiometer potentiometer1(A6, {MIDI_CC::Channel_Volume, CHANNEL_1});
//CCPotentiometer potentiometer2(A7, {MIDI_CC::Channel_Volume, CHANNEL_4});
//CCPotentiometer potentiometer3(A3, {MIDI_CC::Channel_Volume, CHANNEL_13});
//CCPotentiometer potentiometer4(A4, {MIDI_CC::Channel_Volume, CHANNEL_14});
//CCPotentiometer potentiometer5(A5, {MIDI_CC::Channel_Volume, CHANNEL_15});
// The note numbers corresponding to the buttons in the matrix
const AddressMatrix<5, 13> addresses = {{
  {  36,  37,  38,  39,  40, 41,  42,  43,  44,  45, 46, 47, 48},
  {  35,  49,  50,  51,  52, 53,  54,  55,  56,  57, 58, 59, 60},
  {  34,  61,  62,  63,  64, 65,  66,  67,  68,  69, 70, 71, 72},
  {  33,  73,  74,  75,  76, 77,  78,  79,  80,  81, 82, 83, 84},
  {  32,  85,  86,  87,  88, 89,  90,  91,  92,  93, 94, 95, 96},

}};

NoteButtonMatrix<5, 13> buttonmatrix = {

  {2, 3, 4, 5, 6}, // column pins
  {7, 8, 9, 10, 11, 12, 13, A0, A1, A2, A3, A4, A5}, // row pins

  addresses,    // address matrix
  CHANNEL_1,    // channel and cable number
};
void setup() {
    // Initialize everything
    Control_Surface.begin();
    midiser >> pipes >> midiser; //all incoming midi from Serial is looped back
     midiser.begin();
}

void loop() {
    // Update the control surface
    Control_Surface.loop();
    midiser.update();
}
/**
 * for ATmega1284p or Arduino mega
 * @brief   This example demonstrates the use of push buttons that send note
 *          events.
 *
 * ### Connections
 *
 *  - 2:  momentary push button (to ground)
 *  - 3:  momentary push button (to ground)
 *
 * The internal pull-up resistors for the buttons will be enabled automatically.
 *
 * ### Behavior
 *
 * Pressing the first button will send note on/off events on middle C.
 * Pressing the second button will send note on/off events for middle C sharp.
 *
 * Written by PieterP, 28-01-2019
 * https://github.com/tttapa/Control-Surface
 */

// Include the Control Surface library
#include <Control_Surface.h>

// Instantiate a MIDI over USB interface.
//USBDebugMIDI_Interface midi;
//HardwareSerialMIDI_Interface midi;
//HardwareSerialMIDI_Interface midi = Serial;
HardwareSerialMIDI_Interface midiser = Serial;
//HairlessMIDI_Interface midi;

MIDI_PipeFactory<1> pipes;

using namespace MIDI_Notes;
// Instantiate the momentary push buttons that send out MIDI Note events.
NoteButton buttons[] = {
    //{2, note(C, 4)}, // digital input pin, note number
    //{3, note(Db, 4)},

    // If you want to set the channel specifically, you can use:
    // for UNO , nano
 //   {12, {note(C, 7), CHANNEL_5}},
 //   {13, {note(Db, 7), CHANNEL_5}},
 //   {A0, {note(D, 7), CHANNEL_5}},
  //  {A1, {note(Eb, 7), CHANNEL_5}},
 //   {A2, {note(E, 7), CHANNEL_5}},
 //   {A3, {note(F, 7), CHANNEL_5}},
  //  {A4, {note(Gb, 7), CHANNEL_5}},
  //  {A5, {note(G, 7), CHANNEL_5}},

};
//Potenciometrs
//CCPotentiometer potentiometer1(A6, {MIDI_CC::Channel_Volume, CHANNEL_1});
//CCPotentiometer potentiometer2(A7, {MIDI_CC::Channel_Volume, CHANNEL_4});
//CCPotentiometer potentiometer3(A3, {MIDI_CC::Channel_Volume, CHANNEL_13});
//CCPotentiometer potentiometer4(A4, {MIDI_CC::Channel_Volume, CHANNEL_14});
//CCPotentiometer potentiometer5(A5, {MIDI_CC::Channel_Volume, CHANNEL_15});
// The note numbers corresponding to the buttons in the matrix
const AddressMatrix<5, 13> addresses = {{
  {  36,  37,  38,  39,  40, 41,  42,  43,  44,  45, 46, 47, 48},
  {  35,  49,  50,  51,  52, 53,  54,  55,  56,  57, 58, 59, 60},
  {  34,  61,  62,  63,  64, 65,  66,  67,  68,  69, 70, 71, 72},
  {  33,  73,  74,  75,  76, 77,  78,  79,  80,  81, 82, 83, 84},
  {  32,  85,  86,  87,  88, 89,  90,  91,  92,  93, 94, 95, 96},

}};

NoteButtonMatrix<5, 13> buttonmatrix = {

  {2, 3, 4, 5, 6}, // column pins
  {7, 8, 9, 10, 11, 12, 13, A0, A1, A2, A3, A4, A5}, // row pins

  addresses,    // address matrix
  CHANNEL_2,    // channel and cable number
};
void setup() {
    // Initialize everything
    Control_Surface.begin();
    midiser >> pipes >> midiser; //all incoming midi from Serial is looped back
     midiser.begin();
}

void loop() {
    // Update the control surface
    Control_Surface.loop();
    midiser.update();
}
Registry_Yamaha_konradi_no_matrix_2
C/C++/**
* for ATmega328p or Arduino uno, nano, pro mini
* Autor: Romuald Milewski
*
* The first processor for registers converted Yamaha E-10AR to a MIDI console
* @brief This example demonstrates the use of push buttons that send note
* events.
*
* ### Connections
*
* - 2: momentary push button (to ground)
* - 3: momentary push button (to ground)
*
* The internal pull-up resistors for the buttons will be enabled automatically.
*
* ### Behavior
*
* Pressing the first button will send note on/off events on middle C.
* Pressing the second button will send note on/off events for middle C sharp.
*
* Written by PieterP, 28-01-2019
* https://github.com/tttapa/Control-Surface
*/
// Include the Control Surface library
#include <Control_Surface.h>
// Instantiate a MIDI over USB interface.
//USBDebugMIDI_Interface midi;
//HardwareSerialMIDI_Interface midi;
//HardwareSerialMIDI_Interface midi = Serial;
HardwareSerialMIDI_Interface midiser = Serial;
//HairlessMIDI_Interface midi;
MIDI_PipeFactory<1> pipes;
using namespace MIDI_Notes;
// Instantiate the momentary push buttons that send out MIDI Note events.
NoteButton buttons[] = {
//{2, note(C, 4)}, // digital input pin, note number
//{3, note(Db, 4)},
// If you want to set the channel specifically, you can use:
// for UNO , nano
{12, {note(C, 2), CHANNEL_5}},
{11, {note(Db, 2), CHANNEL_5}},
{10, {note(D, 2), CHANNEL_5}},
{9, {note(Eb, 2), CHANNEL_5}},
{8, {note(E, 2), CHANNEL_5}},
{7, {note(F, 2), CHANNEL_5}},
{6, {note(Gb, 2), CHANNEL_5}},
{5, {note(G, 2), CHANNEL_5}},
{4, {note(Ab, 2), CHANNEL_5}},
{3, {note(A, 2), CHANNEL_5}},
{2, {note(Bb, 2), CHANNEL_5}},
{A5, {note(B, 2), CHANNEL_5}},
{A4, {note(C, 3), CHANNEL_5}},
{A3, {note(Db, 3), CHANNEL_5}},
{A2, {note(D, 3), CHANNEL_5}},
{A1, {note(Eb, 3), CHANNEL_5}},
{A0, {note(E, 3), CHANNEL_5}},
{13, {note(F, 3), CHANNEL_5}},
};
void setup() {
// Initialize everything
Control_Surface.begin();
midiser >> pipes >> midiser; //all incoming midi from Serial is looped back
midiser.begin();
}
void loop() {
// Update the control surface
Control_Surface.loop();
midiser.update();
}


_3u05Tpwasz.png?auto=compress%2Cformat&w=40&h=40&fit=fillmax&bg=fff&dpr=2)
Comments