

Hardware components | ||||||
 |
| × | 1 | |||
 |
| × | 1 | |||
| × | 1 | ||||
 |
| × | 1 | |||
 |
| × | 1 | |||
Software apps and online services | ||||||
| ||||||
 |
| |||||
| ||||||
| ||||||
| ||||||
Within 30 minutes hooking up a Cloud-based monitoring system with associated Smartphone-App to graphically view the data from everywhere.
You do not believe this? With VS-Code and PlatformIO already installed on your PC and an already existing Azure subscription you can! If Software Tools still have to be installed and if you are not familiar with these tools it might last longer.
The code is on GitHub, the 'how to' is provided here.
Monitoring the action of a heating burner is a good means to check if attempts to reduce oil- or gas-consumption are really effective.
Another use case is to check remotely if your heating burner is working, in winter to prevent freezing of water pipes.
Heating burners are noisy and mostly located in a separate room.
These are ideal prerequisites to monitor their activity easily and non-invasively with a microphone connected to a WiFi enabled microcontroller. Reaching your WiFi-router from the heating location is mandatory.
The code contains a so called WiFi-Manager, which means, that when you power up the device, the WiFi credentials and Azure credentials can be entered using the browser of your phone and are then stored permanently (until overwritten) on the device.
But now let's start:
Connect the microphone to the Esp32The code in the repository is adaped to an Esp32 DevKitC V4 as shown in the picture.
If you want to use an Adafruit HUZZAH32 – ESP32 Feather Board, connect it as shown in the picture below and change the code in the scetch (already there but commented out).
Download the code from the repository: RoSchmi/Esp32_WiFiManager_HeatingSurvey: Monitor action of heating burner by its sound and store states in Azure Storage Tables (github.com)
(click the green ‘Code’ button on the GitHub page, download the.zip file, copy it to your standard folder for PlatformIO applications and extract it in this folder)
Start VS-Code (PlatformIO must already be installed), open the ‘File’ menu, click ‘Open folder’, navigate to your PlatformIO working directory and select the folder ‘Esp32_WiFiManager_HeatingSurvey-master’ (take the last folder with this name in the hierarchy if you got a subfolder from the.zip extraction).
Now you have to wait some time until all the included libraries are automatically installed.
Then, just build the application to see what happens:
Probably you will get an error message since a little patch is needed to achieve a larger stack size in the Esp32 for this application:
Patch: Using Windows Explorer navigate to:
C:\Users\thisUser\.platformio\packages\framework-arduinoespressif32\cores\esp32\
In this folder search the file ‘main.cpp’ and rename it into ‘main.cpp_original’.
Then copy the modified file ‘main.cpp’ - which you can find in the folder ‘patches’ of the program-repository - to the folder where you just renamed the original file.
If the error message persists when you are trying to build the program again, in VS-Code navigate to.pio -> build and erase the folder ESP32 before building the application again.
Hopefully after this the application should compile without errors.
Deploy the application to the Esp32 by clicking on the ‘PlatformIO:Upload’ arrow next to the ‘PlatformIO:build’ button shown above.
Btw: Eventually you have to revert these changes for the compilation of other programs for the Esp32
(see: ESP32 Stack configuration (reloaded) - Development Platforms - PlatformIO Community )
Create an Azure Storage Account- If you don’t have an Azure subscription, create one for free before you begin. ( Learn what you can do with an Azure free account - YouTube )
- Then create a Storage Account. ( Create a storage account - Azure Storage | Microsoft Docs ): On the page Home – Microsoft Azure click on the ‘+’ sign in the left upper corner to create a new resource. In the menue search for Storage Account or select it when already visible. Click on the Create Button. Under Replication select ‘Locally-redundant storage’ if you want to select the cheapest variant. When the storage account is created click on the name of the Account on the ‘Home’ page of the portal. Then select ‘Access keys’ in the left column of the page. Then click on ‘Create Access Keys’ and copy the first Access Key to your clipboard. Store the name of your Storage Account and the Key in a save place on your PC. The name you should note will look like: ‘mynamexyz’, the key will look like: 3J+rsY2Wp6d9dOB/MoN5tXczzLj4aPkhjqxPcJgS2GtJyiCu6pbM/tzKNm3s4UhSdZpAs+R1UtmaAOjg+1r7LA==
You will need both to be entered on your phone when your browser connects to the Portal page which is opened by the Esp32 application for one minute after powering up the device.
Put into operationBefore starting the application to work, you should have the rather long key of the Azure Storage Account ready on your smartphone so that you can insert it with ‘Copy and Paste’ when needed.
I usually type in the key on my PC and send it to the phone via E-mail (not really secure, I know). Additionally you should have the Portal password ready (you need it only one time per phone for the first connection).
The Portal password looks like ‘MyESP_xxxxxxxx’ where ‘xxxxxxxx’ is the ID of your Esp32. Additionally you should have your WiFi credentials and the name of your Azure Storage Account ready.
For the first operation let the application start connected to your PC after upload: Click the ‘PlatformIO:SerialMonitor’ Icon to see the debug messages. After spitting out some other status messages the application will wait after the message: ‘[WM] startConfigPortal : Enter loop’ to get in contact with your smartphone.
Now for example on an iPhone got to ‘Settings’ -> ‘WLAN’. You can see that your Esp32 has opened a Network like ‘ESP_34B7BD48’.
Try to connect to this SSID and you will be requested to enter a password. It would be ‘MyESP_34B7BD48’ for this special Esp32 (for security reasons you can change this password in the code). Enter the password and if the connection is successful the ‘Portal Page’ for configuration will open in the browser of your phone. Now you can enter the WiFi credentials of your WiFi router, credentials of your Azure Storage Account and a value for the threshold for sound volume to distinguish between On and Off (usually around 200). Saving the Configuratian page will store the credentials permanently on the Esp32 and will start operation. In your Azure Storage Account five tables will be created (AnalogValuesXYYYY and OnOffx01xYYYY to OnOffx04xYYYY) where YYYY stands for the actual year. The tables will automatically be filled with data, once every 5 minutes and every time the sound volume crosses the threshold.
Visualize data stored in the CloudAs a first step use the free tool ‘Microsoft Azure Storage Explorer’ to have a look if the tables are created and gathering of data is working. As a mobile App for iOS ‘AzureTabStorClient’ can be used.
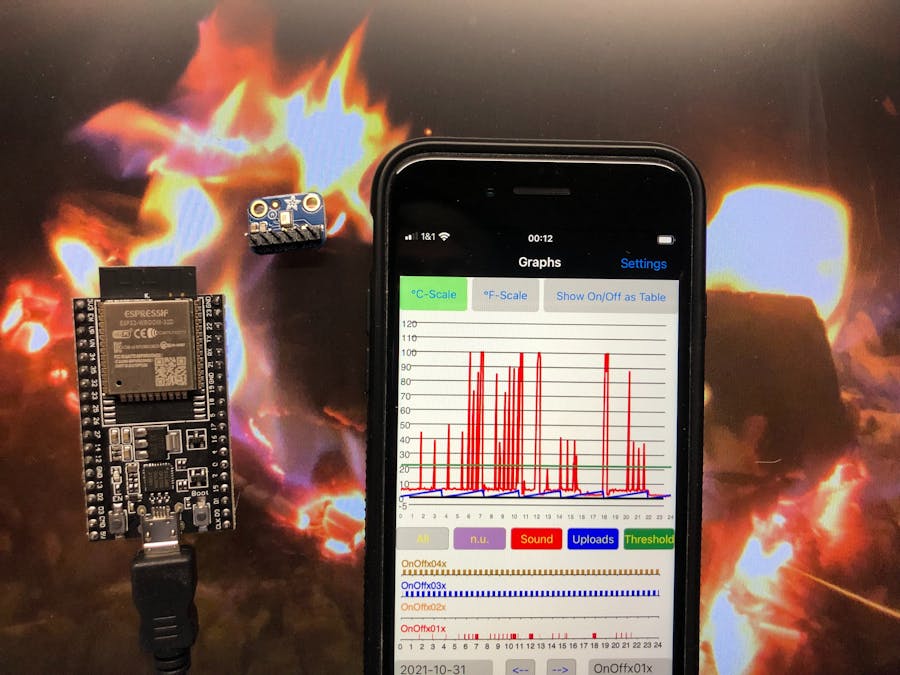
If data are successfully stored in the Cloud, use the APP ‘Charts4Azure’ (iOS and Android) to visualize the tables graphically. Make sure to enter the matching tablenames in the 'Settings' part of the App that the App can find the correct tables.
On the chart the line named 'OnOffx01x' represents the On/Off-states of the burner. 'OnOffx02x' is empty in this application and the remaining two lines are only toggling their states every 15 min. These free On/Off lines can be used for other On/Off sensors (modification of the application by developers). In the upper part the red line represents the sound volume, the green line represents the threshold and the blue line represents an upload counter which is always reset after 50 uploads. This line will be disrupted if the program resets spontaneously or by watchdog action. Of course these analog graphs can be used by developers to represent other analog sensors.
Adapt the App to your needsSince this application uses a 'WiFi-Manager' to enter the WiFi- and Azure-credentials the code of the application needs not to be changed when the device is used from different users at different locations. Only for the use in different timezones adaptions have to be made in the code by modifying the file include/config.h. I think it’s straightforward. The appropriate settings for different regions can be found in the given links.
More information about possible adaptions can be found in this project:
Wio Terminal App Sending Sensor Data to Azure Storage Tables - Hackster.io
Now have fun !!
Let me know if you got it working, and don’t hesitate to make suggestions or ask questions.


Comments