Evgeny Shemanuev
Published © GPL3+

Robotcar Controlled Using G-Sensor Smartphone

Create a robot car, which will be controlled from a smartphone using the G-Sensor. Use the RemoteXY service to create GUI and source code!

BeginnerFull instructions provided1 hour38,947
Robotcar Controlled Using G-Sensor Smartphone

Things used in this project

Hardware components

Arduino UNO
Arduino UNO
×1
HC-06 Bluetooth Module
×1
Motor driver chip L298N
×1
Any robot car platform
×1

Software apps and online services
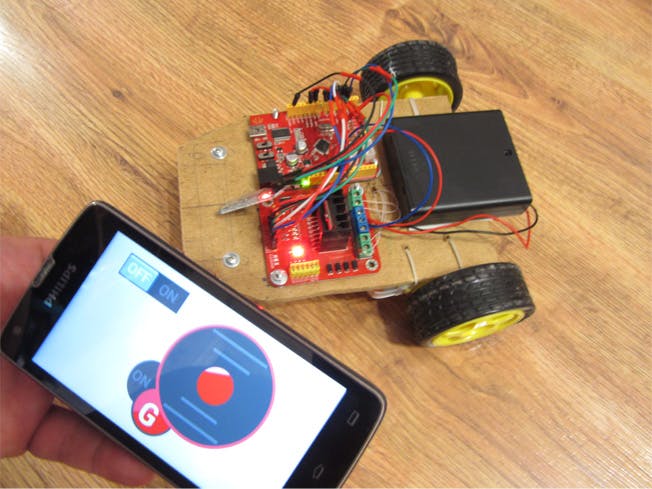
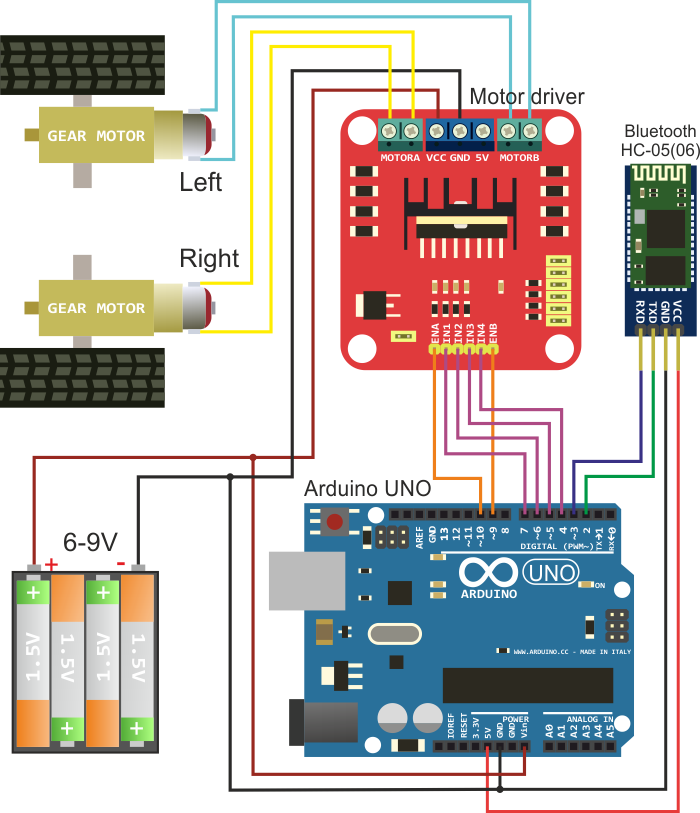
RemoteXY

Story

Read more

Schematics

Robot car scheme

Code

Remote control robot car via RemoteXY mobile app

C/C++
You can download the RemoteXY.h library by link http://remotexy.com/en/library/
/////////////////////////////////////////////  
//        RemoteXY include library         //  
/////////////////////////////////////////////  

/* RemoteXY select connection mode and include library */  
#define REMOTEXY_MODE__SOFTWARESERIAL  
#include <SoftwareSerial.h>  
#include <RemoteXY.h>  

/* RemoteXY connection settings */ 
#define REMOTEXY_SERIAL_RX 2  
#define REMOTEXY_SERIAL_TX 3  
#define REMOTEXY_SERIAL_SPEED 9600  

/* RemoteXY configurate  */   
unsigned char RemoteXY_CONF[] =  
  { 3,0,23,0,1,5,5,15,41,11 
  ,43,43,1,2,0,6,5,27,11,5 
  ,79,78,0,79,70,70,0 };  
    
/* this structure defines all the variables of your control interface */   
struct {  

    /* input variable */ 
  signed char joystick_1_x; /* =-100..100 x-coordinate joystick position */ 
  signed char joystick_1_y; /* =-100..100 y-coordinate joystick position */ 
  unsigned char switch_1; /* =1 if switch ON and =0 if OFF */ 

    /* other variable */ 
  unsigned char connect_flag;  /* =1 if wire connected, else =0 */ 

} RemoteXY;  

/////////////////////////////////////////////  
//           END RemoteXY include          //  
/////////////////////////////////////////////  
/* defined the right motor control pins */ 
#define PIN_MOTOR_RIGHT_UP 7 
#define PIN_MOTOR_RIGHT_DN 6 
#define PIN_MOTOR_RIGHT_SPEED 10 

/* defined the left motor control pins */ 
#define PIN_MOTOR_LEFT_UP 5 
#define PIN_MOTOR_LEFT_DN 4 
#define PIN_MOTOR_LEFT_SPEED 9 

/* defined the LED pin */ 
#define PIN_LED 13 


/* defined two arrays with a list of pins for each motor */ 
unsigned char RightMotor[3] =  
  {PIN_MOTOR_RIGHT_UP, PIN_MOTOR_RIGHT_DN, PIN_MOTOR_RIGHT_SPEED}; 
unsigned char LeftMotor[3] =  
  {PIN_MOTOR_LEFT_UP, PIN_MOTOR_LEFT_DN, PIN_MOTOR_LEFT_SPEED}; 

/* 
   speed control of the motor 
   motor - pointer to an array of pins 
   v - motor speed can be set from -100 to 100 
*/ 
void Wheel (unsigned char * motor, int v) 
{ 
  if (v>100) v=100; 
  if (v<-100) v=-100; 
  if (v>0) { 
    digitalWrite(motor[0], HIGH); 
    digitalWrite(motor[1], LOW); 
    analogWrite(motor[2], v*2.55); 
  } 
  else if (v<0) { 
    digitalWrite(motor[0], LOW); 
    digitalWrite(motor[1], HIGH); 
    analogWrite(motor[2], (-v)*2.55); 
  } 
  else { 
    digitalWrite(motor[0], LOW); 
    digitalWrite(motor[1], LOW); 
    analogWrite(motor[2], 0); 
  } 
} 

void setup() 
{ 
  /* initialization pins */ 
  pinMode (PIN_MOTOR_RIGHT_UP, OUTPUT); 
  pinMode (PIN_MOTOR_RIGHT_DN, OUTPUT); 
  pinMode (PIN_MOTOR_LEFT_UP, OUTPUT); 
  pinMode (PIN_MOTOR_LEFT_DN, OUTPUT); 
  pinMode (PIN_LED, OUTPUT); 

  /* initialization module RemoteXY */ 
  RemoteXY_Init (); 

} 

void loop() 
{ 
  /* event handler module RemoteXY */ 
  RemoteXY_Handler (); 

  /* manage LED pin */ 
  digitalWrite (PIN_LED, (RemoteXY.switch_1==0)?LOW:HIGH); 

  /* manage the right motor */ 
  Wheel (RightMotor, RemoteXY.joystick_1_y - RemoteXY.joystick_1_x); 
  /* manage the left motor */ 
  Wheel (LeftMotor, RemoteXY.joystick_1_y + RemoteXY.joystick_1_x); 
} 

Credits

Evgeny Shemanuev

Evgeny Shemanuev

1 project • 14 followers

Comments