

Hardware components | ||||||
 |
| × | 1 | |||
| × | 1 | ||||
| × | 1 | ||||
| × | 1 | ||||
 |
| × | 1 | |||
| × | 1 | ||||
| × | 2 | ||||
| × | 1 | ||||
 |
| × | 1 | |||
 |
| × | 1 | |||
| × | 1 | ||||
| × | 1 | ||||
Software apps and online services | ||||||
 |
| |||||
 |
| |||||
| ||||||
| ||||||
_4YUDWziWQ8.png?auto=compress%2Cformat&w=48&h=48&fit=fill&bg=ffffff) |
| |||||
I wanted to have an autonomous watering system for outdoor watering on a roof terrasse with the following main requirements:
High "Wife Acceptance Factor" and easy installation:
- No wires or cabling.
- Low pressure, thin water tube to each water station.
Easy daily use:
- No maintenance or battery exchange.
- Monitoring and control from app.
- Must run autonomously for at least 3 weeks (during a holiday), but preferably all summer.
Easy scale (many devices):
- Low price per unit
- Easy assembly
- Reproducible
NOTE: The Word document located hereatGitHub (link)gives better details than the "story" here.ThisProjectHubdoesnotallowalotofformatting.
Based on the key use case, the following was decided up front as system components:
Solar panel to power a Li-Ion battery cell.
Low water pressure to enable:
- Thin water hoses (prettier, easy installation, less risk of high water spillage if hose breaks).
- Solenoid valve with low power consumption.
Arduino WeMos D1 Mini
- Wifi enabled
- Low power
- Just enough I/O
- Cheap
- Small
- Large community knowledge
- Had already experience with these
Cloud based + App
- No need for device to be constant online (saves power, gives autonomy)
- Collect of telemetry when system online
- Enables monitoring and control of device (via app) via internet without device being online (commands stored in Cloud)
Own 3D printed case
- Smallest and cheapest solution…and most fun. I need to use my printer.
Android app
- I have an Android phone + tablet
- Probably easiest to integrate with a Google Cloud
5.1 Tools
All hardware and PCB is designed using KiCAD. Files are found in the GIT file.
Project file: “irrigation v5.3.pro”
NOTE: At the time of writing, I have made a version 6.0 which has not yet been PCB printed and tested. That can be found in appendix.
Version 5.3 has been in “production” for one summer and works fine. Version 6.0 is optimizing the power conversions, which was a bit cumbersome in 5.3. There are no changes affecting software.
5.2 Overview
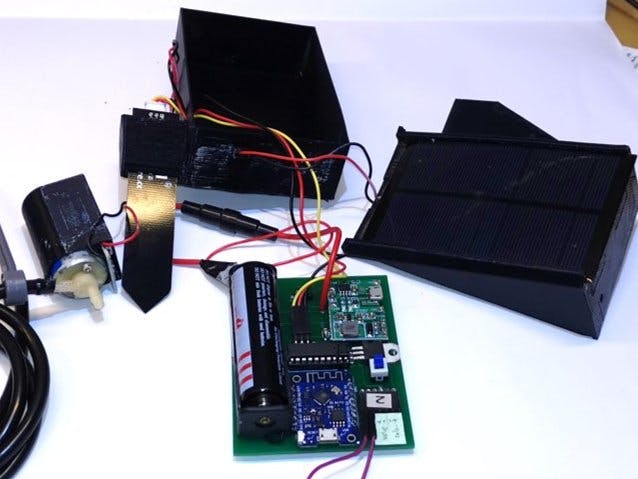
The hardware modules are all on same PCB, except:
- Solar panel
- Soil moisture probe
- The valve and valve driver (which is a 5V => 12V converter). Valve + driver has it’s own 3D printed case to facilitate that it’s stuck in the soil a bit away from the probe.
- The Lithium battery and the solar panel are both attached to the charge unit, which then makes sure to charge the battery whenever possible + provides 5V output power for the device.
5.3 Components
Found in file: irrigation v5.3.html (edited)
5.4 Schematics
Found in file: irrigation v5.3.sch
5.5 PCB layout
Supplier: https://firstpcb.com/
Found in file: irrigation v5.3.kicad_pcb
5.6 Considerations & Notes
If this should be made significantly smaller, the way is first to get rid of all the boards, and use only the components. This is however a “fair” amount of work, and deemed not worth the effort.
5.7 Export PCB for print
5.7.1 Export to Gerber files
Result should be the following set of files:
File -> Plot
Note: It may not be the exact correct values set below.
Drill holes:
Note: Firebase is a JSON database, meaning that it’s NOT structured in tables (like a relational database is).
6.1 System Data Flow
6.2 Data structure
We use a Google Firebase Realtime database as cloud.
7.1 Configuration
1. https://console.firebase.google.com/
2. Sign up, if needed.
3. Create a project: Create project
- Name: irrigation
- i. Note that this name is used in noth Arduino (FIREBASE_HOST)
- ii. Android code (FB_PROJECT_ID) + in app/google-services.json
- ID: irrigation-XXXXXXX
4. Activate the free trial, if needed
5. Select Develop => Database
6. Choose to create a new Realtime Database (NOT a Cloud Firestore). Start in test mode, but be aware to change later.
6.1.1 Auth tokens (Database secrets)
Go to Project overview -> Settings -> Service accounts
Show and Copy the “secret” and insert into Arduino code (typically called FIREBASE_AUTH)
7.2 Links
https://github.com/GoogleCloudPlatform/google-cloud-iot-arduino
https://console.cloud.google.com/home/dashboard?project=cohesive-photon-227011
8 Arduino control software8.1 Features
The Arduino software has the following features:
Wifi handling
- The device will look up a number of predefined hotspots and hook up to the first with signal strength above a threshold (to save power, we won’t hook up to a very weak hotspot).
- It will remember the last good hotspot, which allows that the device can be moved between e.g. the office and the garden.
Deep sleep handling using
- Timed wakeup (there are 3 timers per day)
- Periodic wake-up: set the time until next wake-up
Persistent memory handling
- Maintains a mirror of the settings in the cloud. When waking, it reads setting, if they have been altered by the user. During runtime, some settings may be changed and uploaded to the cloud.
- Settings only used internally by device, e.g. last used wifi password that worked
Multiplexing of analogue input signals
- The device can control a multiplexer, allowing to read from several sensors. The D1 mini only has one analog port.
- This feature also controls the power supply to the sensors (so they only use power when measuring).
Secure Cloud communication.
- There are functions to communicate with Firebase, Azure and Google Cloud. Each cloud has it’s drawbacks and advantages. This is compile time controlled.
8.2 Software Components
Globals (globals, firebasemodel)
- Global types and structures
- Global names and constants
Configuration and main control (autoirrigation.ino)
- Compile time configuration
- Runtime configuration
- Debug configuration
- Authentication info
- Operating modes (test modes)
- Type of device (I’m also developing a CO gas sensor; not yet finished)
- All communication to cloud (note: there is working software for using both Azure and Google Cloud)
Power & Sleep (deepsleephandler)
- Deep Sleep management
Persistent storage (persistentmemory)
- Control of the internal persistent memory in the D1. Essentially maintaining a mirror of the settings in Firebase.
Sensors (analogmux, sensorhandler, soilhumiditysensor, watersensor, voltmeter, gassensor)
- Multiplexer control
- Configuration (different sensors can be used in different ways)
- initialization
- monitoring
Actuators (watervalve, LEDhandler)
- Configuration & link to sensors
- Initialization
- Controlling
Wifi mgt (wifi_nnr, wifihandler)
- Initialization
- connectivity
Cloud comm (incl in autoirrigation.ino)
- connection
- reporting
8.3 Tools & setup
- Visual Studio Community 2019
- vMicro extension
8.3.1 vMicro extension setup
8.3.2 Uploading to board – and problems/tips
Note that when uploading there are two things that can tease a bit:
- Remember to push the small “flash” button before flashing. “Unpush” the button when flashed – otherwise the board won’t reset.get if you forget is something like “The uploader process failed”.
- If the board is in a long series of sleeps, it will wake up, and immediately go back to sleep each time it’s reset – until the sleep counter reach it’s target (zero). You can follow that in the serial output window. Disable this by disabling UseSleepMode.
- If the battery voltage is too low, the board will enter sleep immediately. This may provoke a crash dump somehow. Not sure why, but it looks like this. If it happens – charge the battery.
8.4 Future features:
OTA update. That would really be nice – in particular because the devices are placed outdoor in soil.
9 Android AppI may use wrong terminology here – I am not very familiar with Android. But the simple app works.
9.1 Features
- Hooks up to Firebase and reads + writes data
- Presents a graph of the data
9.2 Overview
Main layout:
- List of all devices in Firebase with most important data + color code for status.
Single device layout
- Zoom to all relevant settings (yellow) and telemetry of a single device.
- Options for purging both telemetry and log data (if there is a lot of data, I have not found a way to purge from the WEB interface to Firebase).
Background service
- Maintaining the interface to Firebase + the data
9.3 configuration
Get the google-services.json configuration file from: https://support.google.com/firebase/answer/7015592?hl=en
9.4 Tools
Android Studio used
10 Cross-platform: Adding new fields in database10.1 Arduino
Data structure is defined in source code files:
- Globals.h
- Persistentmemory.cpp
- AutoIrrigation.ino
- Function CreateTelemetryJson() defines the data transmitted.
10.2 Android
- Source files defining the data structure is under com.vanding.datamodel/
- FirebaseObject.java encapsulate this data
- res/layout/content_main.xml and content_single_device.xml contains the visual implementation.
11.1 Order of design
1. Model each hardware component. Placed in separate proejcts.
2. Import needed
3. Place them physically as wished
4. Create base floor. Project spefici markers from the needed components – nothing else.
11.2 Main components
- F3d files: 3D models of hardware components. This makes it way easier to try out different layouts.
- F3z files: Design of the casing for the irrigation unit. These are importing the hardware models.
11.2.1 Main Box for PCB
File: Irrigation unit – Main box (side mounted)
11.2.2 Top box with solar panel
File: Irrigation unit – Main box (side mounted)
11.2.3 Box for valve and valve driver
File: Irrigation unit – valve box
11.3 Considerations and notes
The principles has been to make it rain resistant by using the fact that “water don’t run upwards” ??. So it’s not water or dust tight, but it can withstand heavy rain, as long as the device is properly put in the ground.
11.4 Tools
- AutoDesk’s Fusion360
- XYZWare Da Vinci Mini w 3D printer
A regular water outlet produce way too much pressure, so reducing the pressure is essential. It’s the basis for:
- reducing risk of water spill in case of malfunctions somewhere
- reducing power consumption. A higher pressure requires a stronger valve, requiring much more power.
- Having a visually lighter installation, i.e. thinner hoses.
12.1 Hardware
DN15 Adjustable Brass Water Pressure Reducing Regulator Valve Internal and outer thread PN 1.6 and Pressure Gauge.
- Material: Brass
- Connector Size: DN15(G1/2")
- Connection Type: Internal /outer Thread
- Package Contents:
- 1 x Water Pressure Reducing Valve+Wrench+raw material belt
12.2 Adjustment
From my memory, water pressure is around 0, 1 bar. If it’s too high, the valve won’t operate. If too low then it takes too long to water => higher power consumption. An open valve uses ~10W (12V, 1A).
13 Daily use, installation, tuning13.1 Installation
The hard work pays off with an easy installation:
- Install the water tubes
- Install each device. Give each device a good name – and maybe a sticker on the outside, so you can recognize it visually.
- Make sure the wifi works, check the strength.
- Check via the app
Version 6.0 is optimizing the power conversions, which was a bit cumbersome in 5.2. There are no changes affecting software.
15 Log History15-dec-2019
- Initial public version

_t9PF3orMPd.png?auto=compress%2Cformat&w=40&h=40&fit=fillmax&bg=fff&dpr=2)


_Ujn5WoVOOu.png?auto=compress%2Cformat&w=40&h=40&fit=fillmax&bg=fff&dpr=2)

Comments