

Hardware components | ||||||
 |
| × | 1 | |||
 |
| × | 1 | |||
 |
| × | 1 | |||
 |
| × | 1 | |||
 |
| × | 1 | |||
 |
| × | 1 | |||
 |
| × | 1 | |||
 |
| × | 1 | |||
| × | 1 | ||||
 |
| × | 1 | |||
Software apps and online services | ||||||
 |
| |||||
HI! myself Ramji Patel .I am a Student of an Engineering College (Government Polytechnic Jhansi) and project Designer. I like To build awesome Electronic projects. Arduino helped me in designing awesome digital projects based on Microcontrollers because Arduino's Hardware and Software Are so simple that an student of class 8 can make his own projects. So I would Thank to Arduino and Arduino community for helping me.
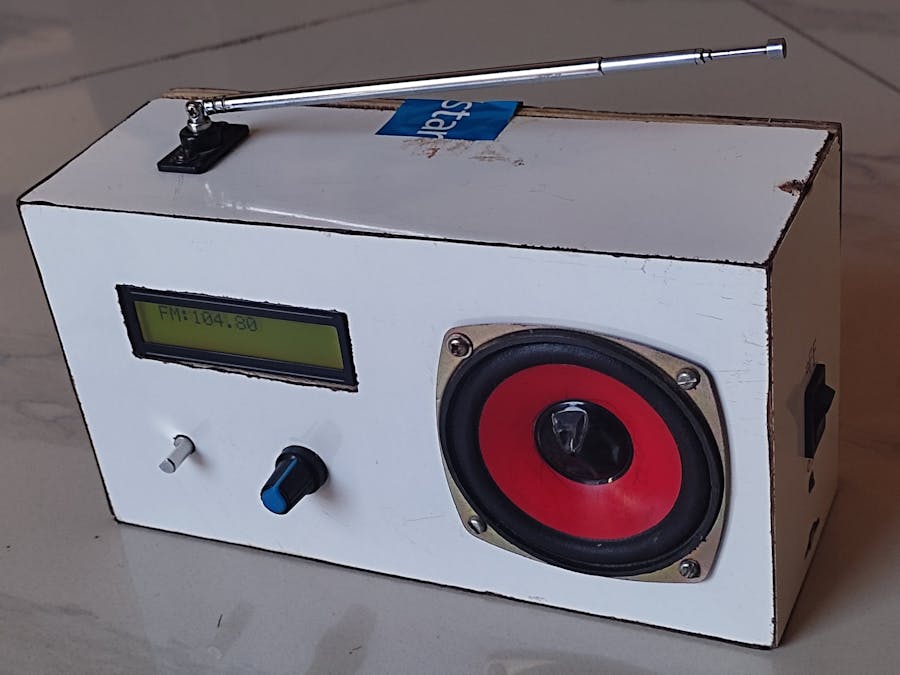
About the project:In this project I combined an Arduino (pro mini) with TEA5767HN which is a Superhetrodyne Radio receiver chip. This chip exists RF Amp, Mixer, Local oscillator, If amplifier, Limiter and Demodulator to recover the original audio signal from Radio Waves Received(detected)by the antenna .This chip uses i2C Serial communication protocol To communicate with microcontrollers(like Arduino pro mini ) . By choosing the appropriate values of 14 PLL Bits, we can tune any radio station on Japanese and US/UROPE FM Band.
Hardware Requirements to create this project:- Arduino Pro Mini
- TEA5767HN breakout board
- Rotary encoder
- HD44780 Liquid Crystal Display
- MT3608 Boost converter
- Tp4056 Li-ion Battery charging and protection circuit
- Li-ion Battery
- Jumper Wires
- 5mm LED
- Speaker
- Potentiometer
- Yagi antenna
- EFTDI Programmer
- Ply wood housing
- PCB
- switch
- PAM8403 amplifier
TEA5767 is a Superhetrodyne radio receiver chip and uses I2c Serial communication protocol to communicate with Arduino. I created a breakout board of TEA5767 so it can be used on breadboards or PCBs without any difficulty.
HD44780 16*2 LCD Display:I have used a 16 By 2 LCD to display the frequency of the tuned station .we can also see tuned frequency at night because the lcd uses backlight. We can set the contrast of the characters by adjusting the potentiometer.
Rotary Encoder:I am using a rotary encoder to change the tuned frequency of station or channel. if we rotate the knob of the encoder clockwise, frequency increases and if we rotate it anticlockwise, frequency decreases.
PAM8403 Class D Amplifier:the audio output of TEA5767 is Quite low to drive a loudspeaker directly. so we require an audio power amplifier to provide the appropriate power to drive the loudspeaker. I am using the PAM8403 Class-D audio power amplifier because its output power is 3W and it operates on 5V DC supply. Sound quality of this IC is really very good.
TP4056 Charging and Protection Circuit:This circuit is required because we are going to use a li-ion batter to power the different electronics devices but It is not easy to handle li-ion battery because they requires special circuitry to provide it different features like constant charging voltage, over charging protection, over discharge protection and short circuit protection and over temperature charging control.
MT3608 Boost converter:I have used the boost converter to step up the voltage of battery to 5V level. we can set it with the help of the given potentiometer on the MT3608 module.
Potentiometer:I am using a 10K Potentiometer to control the volume of the radio.
switch:I am using an ON-OFF switch to turn ON or OFF the radio.
Antenna:I have used an Yagi antenna to receive the radio signals without any problem
Guide:connect the hardware to one another with the help of given Schematic designed in EasyEda circuit designer software. If you wants to design your own schematics or circuit boards then you can download the software EASY EDA for this.
UPLOAD THE CODE:
Upload the given code on to Arduino pro mini using an EFTDI Breakout Board .
Pictures of my Work:AUTHOR & Designer:- Ramji Patel376


Comments