

Hardware components | ||||||
 |
| × | 1 | |||
 |
| × | 1 | |||
 |
| × | 1 | |||
Hand tools and fabrication machines | ||||||
 |
| |||||
 |
| |||||
To make this project you need the following components:
ESP8266 Development Board
- ESP8266 Development Board
HC-SR04 Ultrasonic sensor
- HC-SR04 Ultrasonic sensor
5V 1 Channel Relay Module
- 5V 1 Channel Relay Module
Breadboard
- Breadboard
Jumper wires
- Jumper wires
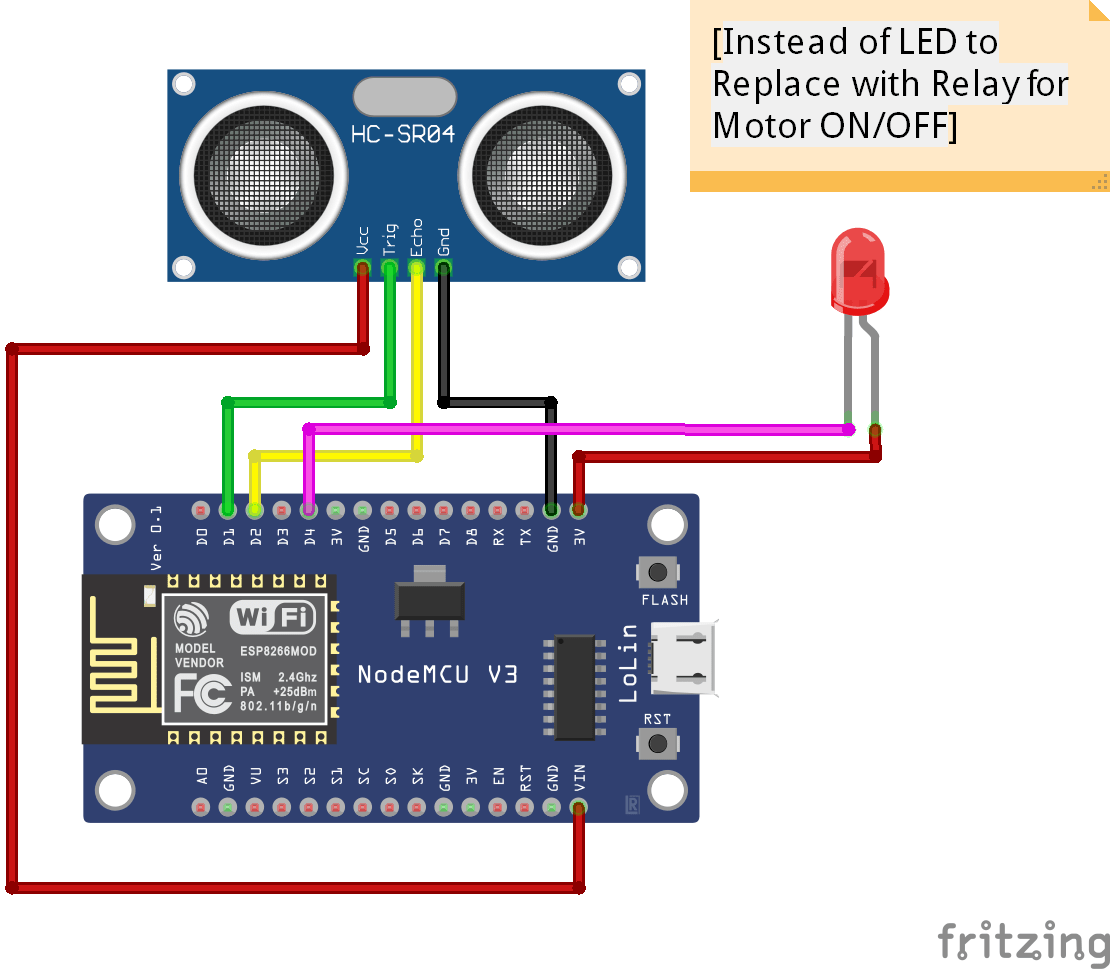
The HC-SR04 ultrasonic module is a module that can provide non-contact measurement within the range of 2cm to 400cm with ranging accuracy that can reach 3mm. It works on the principle of echolocation.
The ultrasonic sensor as a trigger and an echo pin. The arduino provides a high signal of 10microseconds to this pin. After the HC-SR04 is triggered, it sends out eight 40Khz sound waves to the surface of the water. On getting to the surface of the water, the wave is echoed back to the sensor and the ESP8266 reads the echo pin to determine time spent between triggering and receiving of the echo. Since we know that the speed of sound is around 340m/s then we can calculate the distance using;
Distance = (time/2)*speed of sound
Ultrasonic HC-SR04 wiring to ESP8266
Ultrasonic HC-SR04 ESP8266
Vcc Pin Vin Pin
Trig Pin D1 (GPIO 5)
Echo Pin D2 (GPIO 4)
GND Pin GND
NodeMCU:NodeMCU ESP8266-12E MCU is a development board with one analogue and many general-purpose input output (GPIO) pins. It has 4MB flash memory, and can operate at a default clock frequency of 80MHz. In this project, digital pin D4 of NodeMCU is used to control of Water Pump ON/OFF. And digital pin D1 &D2 of NodeMCU is used to read data of distance sensor HC-SR04.
Flat SliderHere's a nice example of a modern, flat style slider using pips. There are no labels so this kind of slider would be purely visual without much help to the user for knowing their real chosen value. In this example we make use of the.ui-slider-pip-inrange class to create the nice "filled in" effect on the pips.
The default way to use the plugin is to call the pips method on an initialized slider. This will add the markers along the slider, and place the min/max values to the beginning/end of the slider:
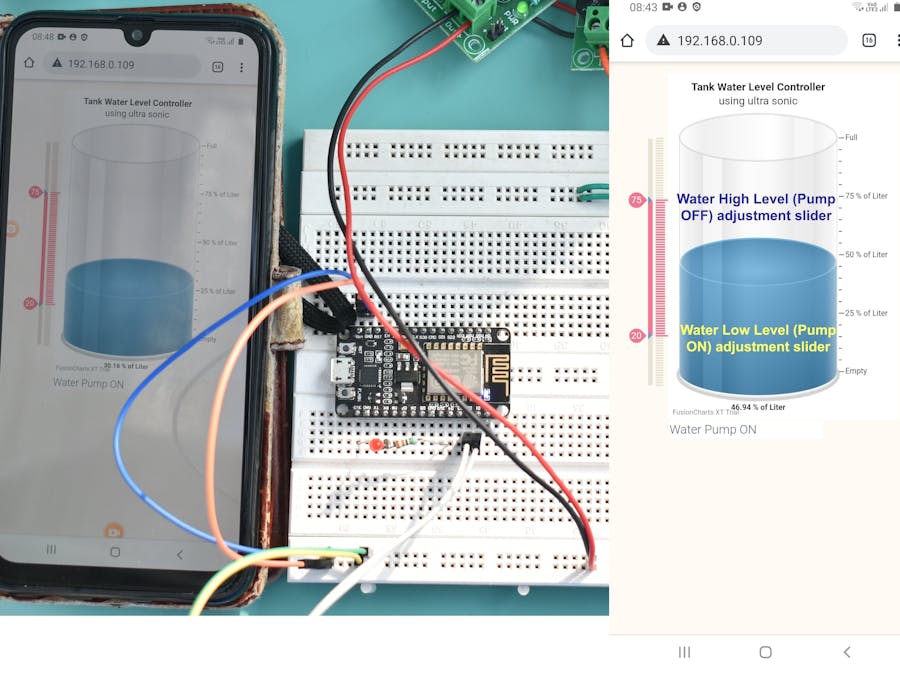
In this Project jQuery UI Slider Pips added in the Web page to adjust the Value between two points 0 to 100.
1st Point for water Level Lower Threshold value adjustment slider to Control Motor ON.
- 1st Point for water Level Lower Threshold value adjustment slider to Control Motor ON.
2nd Point for water Level Higher Threshold value adjustment slider to Control Motor OFF.
- 2nd Point for water Level Higher Threshold value adjustment slider to Control Motor OFF.
The cylinder is the main component in a cylinder chart. You can understand the value being illustrated by looking at the percentage of cylinder filled.
The cylinder gauge is a real-time chart, which can update its data after specified intervals, without requiring any page refreshes. In this section, you will be shown how you can create a simple cylinder gauge.
Create a Cylinder Gauge
Use the following attributes to create a simple cylinder gauge:
Specify the type using the type attribute. To render Cylinder gauge, set cylinder.
- Specify the type using the type attribute. To render Cylinder gauge, set cylinder.
Set the container object using renderAt attribute.
- Set the container object using renderAt attribute.
Specify the dimension of the chart using width and height attributes.
- Specify the dimension of the chart using width and height attributes.
Set the type of data (JSON/XML) you want to pass to the chart object using dataFormat attribute.
- Set the type of data (JSON/XML) you want to pass to the chart object using dataFormat attribute.
Use the lowerLimit attribute to specify the lower limit, or the minimum value, of the gauge scale.
- Use the lowerLimit attribute to specify the lower limit, or the minimum value, of the gauge scale.
Use the upperLimit attribute to specify the upper limit, or the maximum value, of the gauge scale.
- Use the upperLimit attribute to specify the upper limit, or the maximum value, of the gauge scale.
Use the lowerLimitDisplay attribute to specify the label to be displayed with the lower limit value on the gauge scale.
- Use the lowerLimitDisplay attribute to specify the label to be displayed with the lower limit value on the gauge scale.
Use the upperLimitDisplay attribute to specify the label to be displayed with the upper limit value on the gauge scale.
- Use the upperLimitDisplay attribute to specify the label to be displayed with the upper limit value on the gauge scale.
Use the numberSuffix attribute to specify the character(s) to be appended to the end of a number.
- Use the numberSuffix attribute to specify the character(s) to be appended to the end of a number.
https://www.fusioncharts.com/dev/chart-guide/gauges-and-widgets/cylinder-gauge
ESP 8266 code: https://www.dofbot.com/post/iot-water-level-controller-using-ultrasonic


Comments