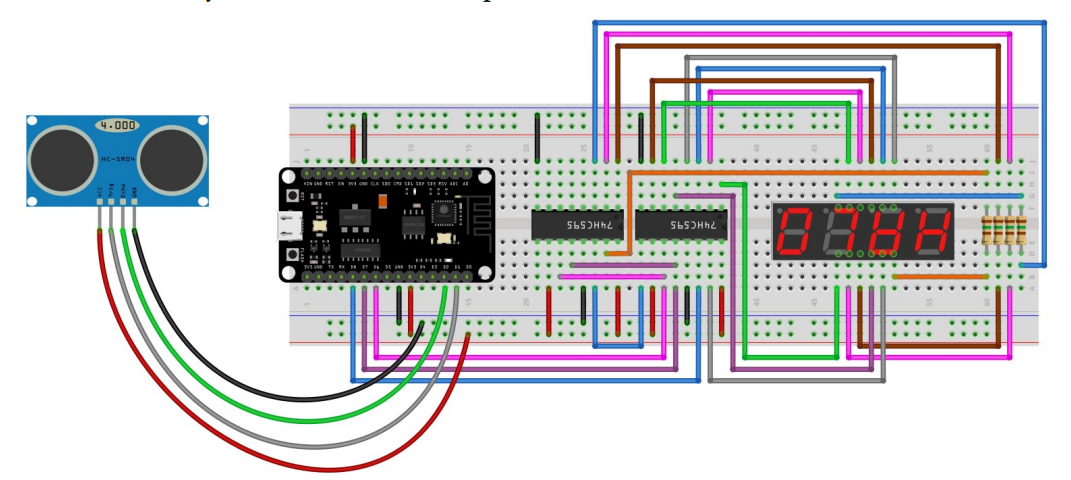
//declare the pins used by the shift registers
const int dataPin = D8;
const int latchPin = D7;
const int clockPin = D6;

//declare the pins used by the ultrasonic module
const int echoPin = D2;
const int trigPin = D1;

//declare a byte variable to store the current digit active
byte digit;

//the next byte variable will tell us when the third digit
//is active, so the dot next to it will turn on
byte dot;

//declare an array of 4 int elements in which we will be
//storing the figures that are going to be displayed on each
//digit of the display
int digits[4];

//this variable will tells us which is the current digit
int currentDigit = 0;

//declare the exponential moving average
double ema = 0;

//function that will trigger every
//move the function to RAM using ICACHE_RAM_ATTR
void ICACHE_RAM_ATTR timer_function()
{
  //select the digit
  Digit(currentDigit);

  //if we are at the third digit, then modify the bit
  //for the dor from 0 to 1
  if(currentDigit == 2)
      dot = 0b10000000;

  //display the number on the selected digit
  Number(digits[currentDigit]);

  //go to the next digit
  currentDigit++;

  //if we are at the last digit, then go to the first one
  if(currentDigit > 3)
     currentDigit = 0;

  //initialize this function again after 4 ms
  timer1_write(20000);
}

void setup()
{
  //set the pins used by the shift registers to output
  pinMode(latchPin, OUTPUT);
  pinMode(clockPin, OUTPUT);
  pinMode(dataPin, OUTPUT);

  //the trigger pin (transmitter) must be set as OUTPUT
  pinMode(trigPin, OUTPUT);

  //the echo pin (receiver) must be set as INPUT
  pinMode(echoPin, INPUT);

  //initialize the timer every 4 ms
  //enable the timer with the divider TIM_DIV16 which
  //has a value of 5 ticks/microsecond
  timer1_attachInterrupt(timer_function);
  timer1_enable(TIM_DIV16, 0, 0);

  //divide the ticks by 5 and that is the value in microseconds
  timer1_write(20000);
}

void loop()
{
  //calculate the distance
  calculate_distance();
}

void calculate_distance()
{
  //set the trigPin LOW in order to prepare for the next reading
  digitalWrite(trigPin, LOW);

  //delay for 2 microseconds
  delayMicroseconds(2);

  //generate a ultrasound for 10 microseconds then turn off the transmitter
  digitalWrite(trigPin, HIGH);
  delayMicroseconds(10);
  digitalWrite(trigPin, LOW);

  //reads the echoPin, returns the sound wave travel time in microseconds
  long duration = pulseIn(echoPin, HIGH, 400*2/0.034);

  //using the formula shown in the guide, calculate the distance
  double distance = duration*0.034/2;

  //calculate the Exponential Moving Average
  double k = 2.0/(10+1);
  ema = distance*k + ema*(1-k);

  //multiply the ema by 10 to get also the first decimal
  int dist = (int)(ema*10);

  //if the modified distance is greater than 0, then extract the figures
  if(dist > 0)
  {
    digits[3] = dist%10;
    digits[2] = (dist/10)%10;
    digits[1] = (dist/100)%10;
    digits[0] = dist/1000;
  }

  //wait 50 ms before next reading
  delay(100);
}

//this function is used to select the digit to be turned on
void Digit(int x)
{
  //turn off all the digits and segments
  //because we use a common cathode display, to turn off the digits
  //we have to set them to HIGH
  //15 written as 8 bits is B00001111
  digitalWrite(latchPin, 0);
  shiftOut(dataPin, clockPin, MSBFIRST, 15);
  shiftOut(dataPin, clockPin, MSBFIRST, 0);
  digitalWrite(latchPin, 1);

  //reset the dot variable
  dot = 0;

  //the switch statement is used to select the right digit
  switch(x)
  {
  case 0:
    //prepare to turn on only the first digit
    digit = 14; //B00001110
    //break is used to get out from the switch function
    break;
  case 1:
    //prepare to turn on only the second digit
    digit = 13; //B00001101
    break;
  case 2:
    //prepare to turn on only the third digit
    digit = 11; //B00001011
    break;
  default:
    //prepare to turn on only the fourth digit
    digit = 7; //B00000111
    break;
  }
}

//this function is used to select a number to display
void Number(int x)
{
    //deppending on the value of x, using the switch statement
    //we are calling a specific function to display on the selected
    //digit a number indicated by the name of the function
    switch(x)
    {
      default:
        zero();
        break;
      case 1:
        one();
        break;
      case 2:
        two();
        break;
      case 3:
        three();
        break;
      case 4:
        four();
        break;
      case 5:
        five();
        break;
      case 6:
        six();
        break;
      case 7:
        seven();
        break;
      case 8:
        eight();
        break;
      case 9:
        nine();
        break;
    }
}

//to make our code shorter and to have only one function for
//zero, one etc., we are going to use the bitwise OR operator
//to change the bit for the dot before sending it to the
//shift register
void zero()
{
  //display on the selected digit a "0"
  digitalWrite(latchPin, 0);
  shiftOut(dataPin, clockPin, MSBFIRST, digit);
  shiftOut(dataPin, clockPin, MSBFIRST, 0b00111111 | dot);
  digitalWrite(latchPin, 1);
}

void one()
{
  //display on the selected digit a "1"
  digitalWrite(latchPin, 0);
  shiftOut(dataPin, clockPin, MSBFIRST, digit);
  shiftOut(dataPin, clockPin, MSBFIRST, 0b00000110 | dot);
  digitalWrite(latchPin, 1);
}

void two()
{
  //display on the selected digit a "2"
  digitalWrite(latchPin, 0);
  shiftOut(dataPin, clockPin, MSBFIRST, digit);
  shiftOut(dataPin, clockPin, MSBFIRST, 0b01011011 | dot);
  digitalWrite(latchPin, 1);
}

void three()
{
  //display on the selected digit a "3"
  digitalWrite(latchPin, 0);
  shiftOut(dataPin, clockPin, MSBFIRST, digit);
  shiftOut(dataPin, clockPin, MSBFIRST, 0b01001111 | dot);
  digitalWrite(latchPin, 1);
}

void four()
{
  //display on the selected digit a "4"
  digitalWrite(latchPin, 0);
  shiftOut(dataPin, clockPin, MSBFIRST, digit);
  shiftOut(dataPin, clockPin, MSBFIRST, 0b01100110 | dot);
  digitalWrite(latchPin, 1);
}

void five()
{
  //display on the selected digit a "5"
  digitalWrite(latchPin, 0);
  shiftOut(dataPin, clockPin, MSBFIRST, digit);
  shiftOut(dataPin, clockPin, MSBFIRST, 0b01101101 | dot);
  digitalWrite(latchPin, 1);
}

void six()
{
  //display on the selected digit a "6"
  digitalWrite(latchPin, 0);
  shiftOut(dataPin, clockPin, MSBFIRST, digit);
  shiftOut(dataPin, clockPin, MSBFIRST, 0b01111101 | dot);
  digitalWrite(latchPin, 1);
}

void seven()
{
  //display on the selected digit a "7"
  digitalWrite(latchPin, 0);
  shiftOut(dataPin, clockPin, MSBFIRST, digit);
  shiftOut(dataPin, clockPin, MSBFIRST, 0b00000111 | dot);
  digitalWrite(latchPin, 1);
}

void eight()
{
  //display on the selected digit a "8"
  digitalWrite(latchPin, 0);
  shiftOut(dataPin, clockPin, MSBFIRST, digit);
  shiftOut(dataPin, clockPin, MSBFIRST, 0b01111111 | dot);
  digitalWrite(latchPin, 1);
}

void nine()
{
  //display on the selected digit a "9"
  digitalWrite(latchPin, 0);
  shiftOut(dataPin, clockPin, MSBFIRST, digit);
  shiftOut(dataPin, clockPin, MSBFIRST, 0b01101111 | dot);
  digitalWrite(latchPin, 1);
}


Comments