

Hardware components | ||||||
 |
| × | 1 | |||
| × | 1 | ||||
 |
| × | 1 | |||
| × | 1 | ||||
 |
| × | 1 | |||
Ever wonder how much trash you produce in a week? Want to know how fast you fill up your recycling bin? Kids telling you they've taken out the trash when they really haven't? Can't remember if you put the bag in the bin and it's trash day?
There's a cheap and easy way for you to track your trash (or any other sort of receptacle for that matter).
In this step-by-step tutorial, you will:
- Wire up an ultrasonic ranger to measure distance to the nearest obstacle
- Use an Arduino Yun (http://www.arduino.org/products/boards/4-arduino-boards/arduino-yun) to stream this captured information to a cloud service (https://www.initialstate.com)
- Learn how to program the Yun over WiFi without using a USB cable
- Turn captured information into your personal trash dashboard that you can access on your laptop or mobile device
A major requirement of this project is that a WiFi connection is established automatically so that the sensor data can be sent to a remotely accessible visualization. The script that collects and sends sensor data should also start automatically in case it loses power.
An Arduino is perfect for this because it will run whatever sketch was last uploaded onto it when it is powered on. There are WiFi modules that you can add onto smaller Arduinos, but the Yun has an onboard WiFi module that makes establishing an internet connection easy. The Yun can even run Linux, though we don't take advantage of that in this project. The Arduino board also gives us a solder-free way to hook up both analog and digital sensors.
A lot of sensors can be difficult to hook up without a large breadboard, and many of them require extra resistors or capacitors. Grove sensors don't have these issues because they have an easy breakout connector, and any required resistors and capacitors are already attached to the sensor board.
That being said, there are many different ways that you could implement this project, but I'm going to walk through how I set up my sensor box using a Yun and Grove sensors.
SD Card SetupThe Yun is unique from many other Arduino boards because it uses an SD card to boot from. The Yun uses OpenWRT to run it's Linux side and manage WiFi.
Plug your micro SD card into the SD card adapter and plug it into your computer. Make sure that your card is formatted to a FAT (not FAT 32) file system. This can be done from Disk Utility in Mac OSX or from the Computer window on Windows.
While your card is reformatting, you can download the latest OpenWRT image for the Yun on the Arduino Software page. Towards the bottom of the page, under "Other Software", you will see the latest OpenWRT image. Click on it and follow the prompts to download it.
Once your SD card is done formatting and OpenWRT has downloaded, copy the OpenWRT zip file to your SD card and eject the card. Now place the card in the Yun's micro SD slot and plug the Yun into your computer's USB port using the micro USB to USB cord.
Wait for the Yun to boot - it takes about a minute. You'll know it's finished when the white LED on the board comes on. Now check your available WiFi networks (the Yun creates it's own when it boots without a WiFi configuration) and connect to the one that says "Arduino Yun-90**********".
While connected to the Yun's Wifi, go to 192.168.240.1 into your browser address bar. You should see a page that looks like this:
The password is "Arduino". On the following page, look for an orange RESET button - click it and wait for the Yun to reboot.
Connecting to WiFiOnce your Yun reboots with the updated OpenWRT, you can configure its WiFi settings. Make sure you're still connected to the Yun's WiFi and visit 192.168.240.1 again. In the top right corner you'll see a "Configure" button:
The following page allows you to change your Arduino's name (this will change the name of its default WiFi network too), change the password, and change the Yun's timezone.
WIRELESS PARAMETERS is the section we're most concerned with. This is where you can find the wireless network you want your Yun to automatically connect to on boot. Carefully enter the network's password and click "Configure & Restart".
NOTE: Once the Yun is connected to a wireless network, you can obtain its IP address by entering 192.168.240.1 in your browser address bar or by entering arduino.local, but you must be connected to the same wireless network. This will allow you to SSH into the Linux part of the Yun. We are not going to do that in this tutorial, but you can read more on it here: https://www.arduino.cc/en/Tutorial/LinuxCLI
If you ever need to change the Yun's WiFi settings but don't have access to the wireless network it automatically connects to, you can press the WiFi reset button. You need to hold the button for somewhere between 5-30 seconds and no longer or it will be reset to factory settings.
Communicating with your Arduino is mostly done through the Arduino IDE. This is how we upload sketches to the board that execute every time the board is powered on. The awesome thing about the Yun is that we can upload sketches without being connected to your computer via USB cable.
Visit the Arduino Software page and find your computer type in the list to the right of the current version of the IDE that is available. Download the zip file and unzip it to install if you haven't already.
Open the IDE with your Yun powered on. Click on Tools and go to Board. Select "Arduino Yun" from the list. Still under Tools, go to Port and select either "Arduino at (IP address)" or the "/dev/tty.usbmodem****" that reads "Arduino Yun" after it.
Now that you have the IDE setup to interact with the Yun, we need to install a library to go with the Grove Ultrasonic ranger.
This particular project only requires you to install one library, but there are all sorts out there that can make your life easier and your code shorter. They are also very easy to install.
This library is called "Grove_Ultrasonic_Ranger". Go here and download the zip by clicking the button in the bottom of the right column. Then go back to the IDE and select Sketch -> Include Library ->Add .ZIP Library....
Select the zip file you just downloaded and then click "Choose". All done!
It's time to hook up the ultrasonic ranger to our Yun. The Yun's female headers make plugging sensors in a breeze, and since we're only attaching one, no breadboard is needed. We'll wire everything up and then test our sensor to make sure it's working.
Making the ConnectionsUnplug power from your Yun before wiring up any circuit!
Since we're only attaching one sensor, the connections are very straightforward.
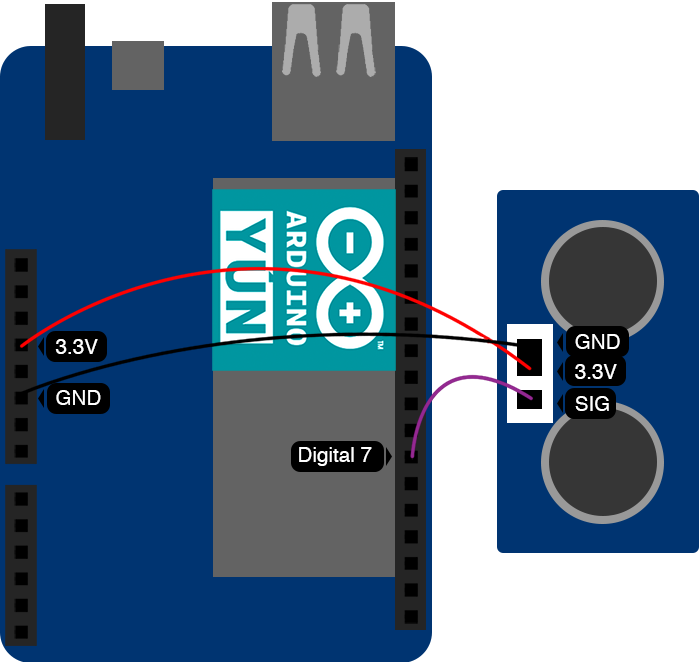
Connect the SIG line of the Ultrasonic Ranger to one of the digital inputs (I used 7) using a female-male tie line. Make sure that VCC is connected to the 3.3V Power output on the Yun and GND is connected to one of the two GND connections (it doesn't matter which). The NC pin on the sensor means "No Connection" and does not need to be plugged into anything.
Power on your Yun once the ranger is wired up.
Ultrasonic RangerWe already installed the ultrasonic ranger library. To test the ultrasonic ranger we are going to run a script that prints its measurements to the Arduino IDE's Serial Monitor. Because we can communicate with the Yun over USB or WiFi, there is a different test script for each.
If using WiFi connectionYou can copy the sketch here: https://github.com/InitialState/arduinotrashsensor/blob/master/ultrasonictest_console.ino
This sketch uses Console.print to communicate through the Yun's Bridge.
Just open the sketch and upload it to your Yun. When uploading over a WiFi connection, the IDE will prompt you for the Yun's password (which is "arduino" unless you changed it on the Configuration page). Click on the Serial Monitor (magnifying glass icon) once it's finished uploading to see the distance in inches and centimeters to the nearest obstacle.
The ultrasonic ranger library contains a test script called UltrasonicDisplayOnTerm that you can find under File -> Examples -> Grove_Ultrasonic_Ranger-master in the IDE. Or you can copy it from here: https://github.com/InitialState/arduinotrashsensor/blob/master/ultrasonictest.ino
This sketch uses Serial.print to print using the serial connection established through the USB connector. Just open the sketch and upload it to your Yun. Click on the Serial Monitor (magnifying glass icon) once it's finished uploading to see the distance in inches and centimeters to the nearest obstacle.
Try moving your hand closer to and farther away from the sensor to see if it is working. Then we can move on!
Putting it all TogetherNow that we've got the hardware working, it's time to actually figure out how to get data out of our trash can! It is time to put everything together. We want an easy way to get our measurements into an easy-to-access dashboard.
Initial StateWe want to stream our distance data to a cloud service and have that service turn our data into a nice dashboard that we can access from our laptop or mobile device. Our data needs a destination. We will use Initial State as that destination.
Step 1: Register for Initial State Account
Go to https://www.initialstate.com/app#/register/ and create a new account.
Step 2: Access Keys
We need a way to associate the data we're going to send with your account. Initial State does this with access keys.
Go to your Initial State account in your web browser, click on your username in the top right, then go to “my account”, you will find your access key at the bottom of the page under “Streaming Access Keys”.
Every time you create a data stream, that access key will direct that data stream to your account (so don’t share your key with anyone).
Copy this key because we need it for our test and our final script.
Step 3: Run the Example
Run the test sketch to make sure we can create a data stream to your Initial State account. Replace Your_Access_Key on line 14 with your access key and run the following: https://github.com/InitialState/arduino_streamers/blob/master/arduinoyunstream.ino
Step 4: Profit
Go back to your Initial State account in your web browser. A new data bucket called “Arduino Stream” should have shown up on the left in your log shelf (you may have to refresh the page). Click on this bucket and then click on the Waves icon to view the test data.
You will want to step through the Waves tutorial to familiarize yourself with how to use this data visualization tool. Next, view the data in Tiles to see this same data in dashboard form.
You are now ready to start streaming real data from your trash sensor.
The Final SketchThe final sketch that puts everything together is called yuntrashsensor.ino and can be found here: https://github.com/InitialState/arduinotrashsensor/blob/master/yuntrashsensor.ino
If you are uploading over WiFi use this version of the sketch that prints with Console instead: https://github.com/InitialState/arduinotrashsensor/blob/master/yuntrashsensor_console.ino
Make sure to replace Your_Access_Key on line 21 with your specific access key.
Everything that you might need to change can be found in lines 7-31.
If you're not using Digital Pin 7, be sure to change it to whichever pin on the Yun you are using. You can also specify how full you want your trash to get before indicating that it needs to be taken out.
In the Initial State Streamer section the only thing you immediately need to change is accessKey. If you want to stream more or less information or change signal names/emojis, you can set that here too.
Before we run the sketch, let's go through what it is going to do.
- At the beginning of the sketch we are going to create a data bucket for our event streams. We will see "Posting Bucket!" printed to the serial monitor.
- The sketch will wait 2 seconds and take the range. It will then post that data. It should post twice rapidly in the beginning before waiting 15 minutes between measurements.
- Each event stream will be posted one at a time (because of length cap issues over WiFi). You will see "Sending event stream #" followed by the event stream number and data printed to the serial monitor.
- A new batch of 2 events will be sent every 15 minutes to your Initial State account
Note: For initial testing purposes you may want to decrease the delay interval from 894000 to something more like 2-3000 on line 75.
Upload the sketch to start your stream!
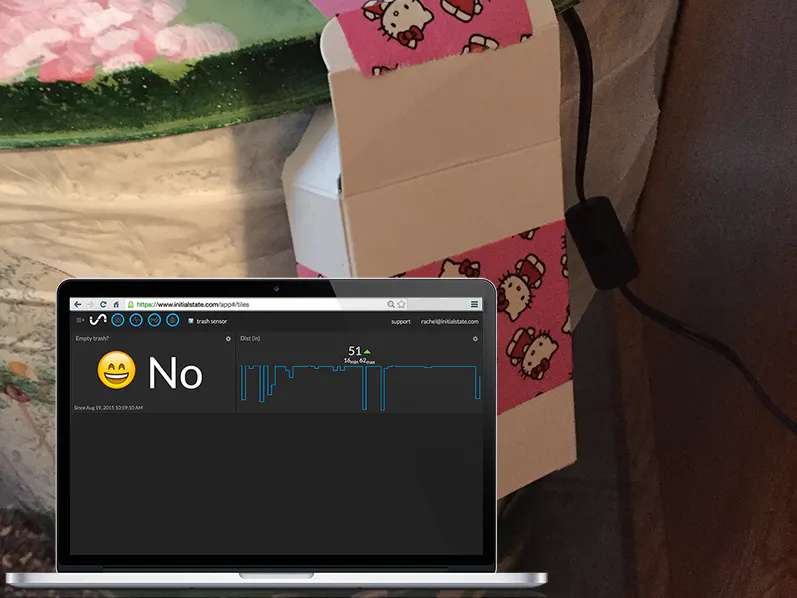
Your Personal DashboardGo to your Initial State account and click on the new data bucket with the name corresponding to the BUCKET_NAME parameter (i.e. Trash Sensor). Click on Tiles to view your sensor dashboard. You should see two tiles once you have let your sketch take measurements at least once - Dist (in) and Empty Trash. Place your hand within your designated distance and watch "Empty Trash?" go from ":smile: No" to ":weary: Yes". This dashboard lets you see the effect those weekend parties have on your trash bag or if your child took out the trash when they were supposed to.
Every now and then a noisy spike appears in the distance measurement, but it's very easy to spot the anomalies.
Switch to the Waves visualization to better see the history of your sensor data. With Waves you can take measurements and dig through your data to see when things happened. This is the best way to see that your child waited an hour and a half before taking out the trash.
Now wouldn't it be nice if we could get alerted when the trash is too full? Turns out, you can!
Trigger AlertsWe can create an SMS or email alert whenever our dashboard tells us to empty the trash using Initial State's trigger feature.
*Trigger notifications are currently in Alpha. Email contact@initialstate.com for an invitation to be a part of the Trigger development experience.
We are going to follow the Trigger notification setup process outlined at http://support.initialstate.com/knowledgebase/articles/834354-triggers-adding-a-trigger
- Make sure your trash sensor data bucket is loaded.
- Click on the bucket's settings in the data shelf (under its name).
- Click on the Triggers tab.
- Select the data stream to trigger on (you can use the drop-down list to select from existing streams once a data bucket has loaded or you can type in the stream name/key manually; *note Safari does not support HTML5 dropdown lists). In my example screenshot above, I selected "Empty trash?".
- Select the conditional operator, in this case 'match'.
- Select the Trigger value that will trigger an action (manually type in the desired value). Type in "Yes". Whenever the stream, Empty trash?, contains "Yes", you will get a text message notification.
- Click the '+' button to add the Trigger condition.
- Select the action (select notify by SMS).
- Click the '+' button to add the action.
- Input any verification code if adding a new phone number to complete setup.
Your trigger is now live and will fire when the condition is met. Click done to save and return to the main screen. Once setup is complete, you will get an SMS every time the trash is full enough for your script to tell you to empty it.
Put it in a BoxI needed a way to attach the ultrasonic ranger to my trash can lid while keeping the Yun on the outside of my metal can. It seemed like the perfect time for my handy-dandy Hello Kitty duct tape and my superhero sound effects washi tape.
I used the washi tape to cover the back of the sensor so that none of the solder points would touch my metal trash can lid. I then used generous amounts of tape to attach it to the lid.
The Yun went inside of an extra box that could hang over the side of the trash can.
There are all sorts of trash cans out there. I personally wish that I had one of those pull-out drawer cans because the Yun and sensor could be taped to the roof of the drawer and not be attached to the trash can at all.


Comments