


For this project, I designed a custom PCB to make the circuit neater, stronger, and reliable for real-world use. Instead of messy jumper wires, using a PCB ensures better durability and a professional finish.
✅ Why I Chose PCBWay?
- High-precision manufacturing
- Fast delivery with worldwide shipping
- Low cost (great for students, makers, and pros)
- PCB Assembly service available
- Excellent support and instant online quoting
🧾 Simple Ordering Steps:
- Design your PCB in software (like KiCad, EasyEDA, or Eagle)
- Export your Gerber files
- Go to PCBWay.com
- Upload your Gerber files
- Get an instant quote and place your order
🚀 With PCBWay, your DIY project becomes more professional and reliable!
👉 Order your PCB now at PCBWay.com
📂 (Circuit Diagram and Gerber Files are attached below for easy ordering.)
Step 2: Insert All Components on the PCBAfter receiving your PCB from PCBWay, start inserting the components into their respective positions as marked on the PCB.
🔧 Tips for Assembly:
- Begin with small parts first, then move to larger ones.
- Follow the silkscreen labels to avoid mistakes.
- Double-check polarity for parts like capacitors, diodes, and regulator.
- Once all components are placed, solder them securely.
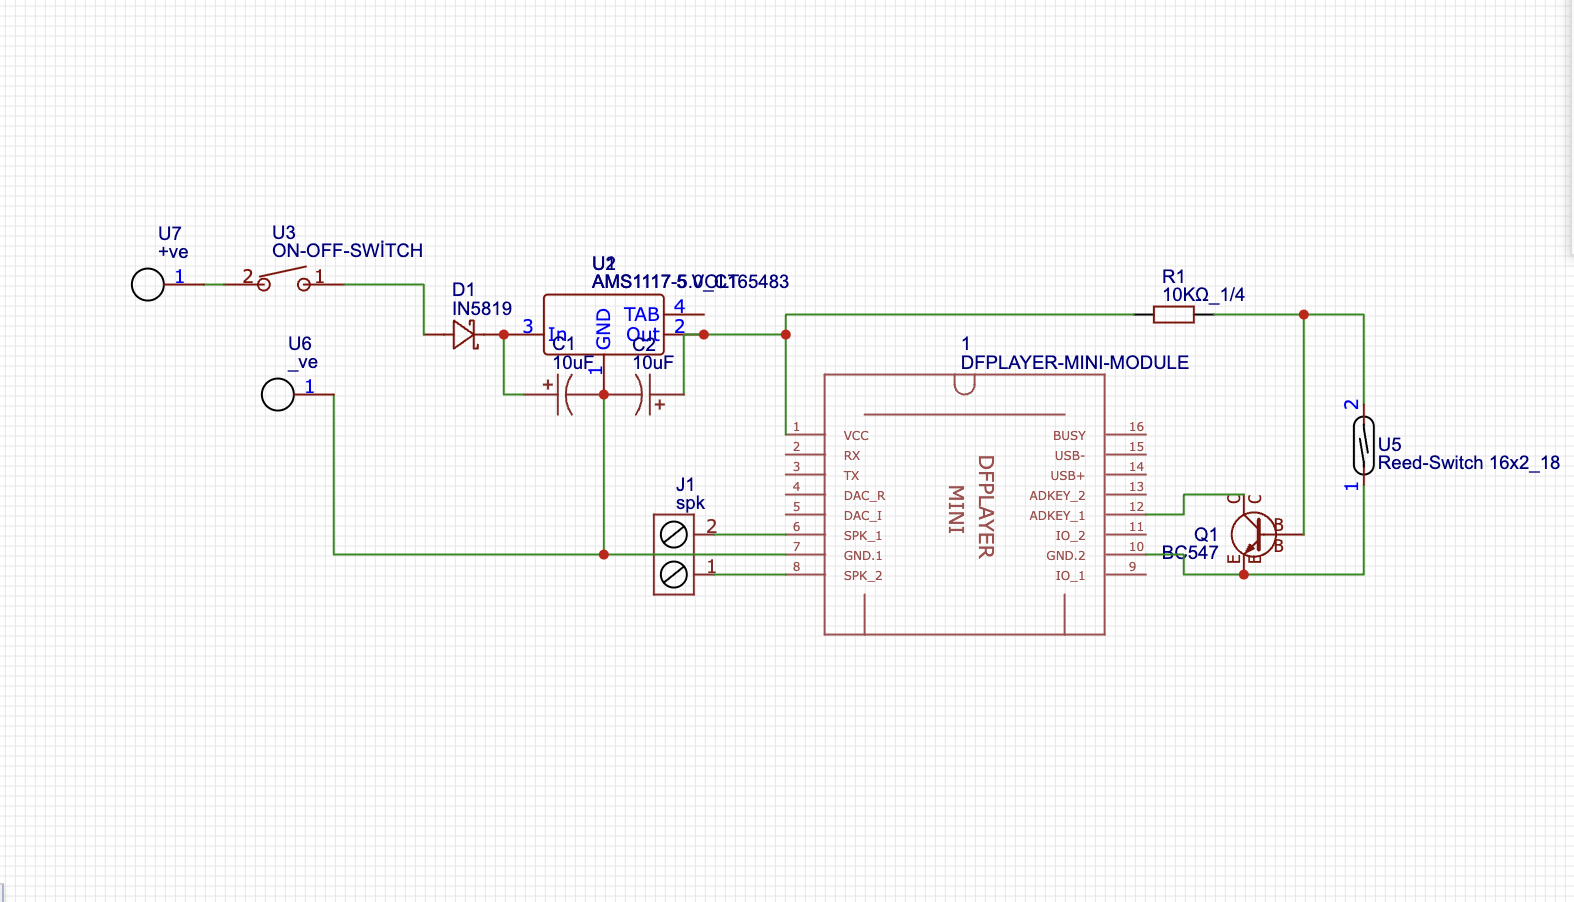
The DFPlayer Mini is the core of this project — it plays the alarm or voice files when triggered. To use it properly, make sure it is inserted in the correct orientation on the PCB.
📌 DFPlayer Mini Pinout (commonly used pins):- VCC → +5V power
- GND → Ground
- TX/RX → Serial communication (if using Arduino)
- SPK_1 & SPK_2 → Speaker connection
- DAC_R & DAC_L → Audio out (for amplifier)
- IO1 & IO2 → Standalone trigger pins
👉 For this project, we use SPK_1 & SPK_2 to directly connect the speaker.
Step 4: Soldering & Finishing the PCBAfter placing all the components correctly on the PCB:
- Solder Joints – Heat each pad and apply solder so it flows smoothly and makes a shiny joint.
- Cut Excess Leads – Trim the extra legs of components using a cutter. This keeps the PCB flat and neat.
- Clean the PCB – Use a PCB cleaning liquid (IPA – isopropyl alcohol) or flux remover with a small brush/cotton to clean off any flux residue. This prevents corrosion and ensures a professional finish.
⚡ A clean PCB not only looks good but also improves long-term reliability.
Step 5: Add 9V Battery Connector- Cut two short pieces of thick copper wire.
- Insert them into the marked battery input holes on the PCB (+ and –).
- Solder them firmly from the backside.
- Bend them slightly so the 9V battery clips on tightly.
- Place the PCB on the acrylic sheet and mark its outline.
- Cut the acrylic sheet to the exact PCB size (use a cutter, hacksaw, or laser cutting if available).
- Make 4 pieces – one for the bottom, one for the top, and strips for the sides.
- Apply super glue/Fevikwik around the edges and fix the acrylic pieces together.
- Ensure all sides are sealed properly so the PCB stays secure inside.
✨ The acrylic cover not only protects the circuit from dust and damage but also gives it a professional and transparent look.
Step 7: Make Holes in Acrylic for Connections- Mark the positions on the acrylic sheet where the speaker wires, power wires, and switch will come out.
- Use a 3mm–5mm drill bit (or a soldering iron tip carefully, if no drill is available) to make neat holes.
- Pass the speaker wires, 9V battery wires, and On/Off switch leads through these holes.
- After inserting the wires, fix the top acrylic sheet with glue.
⚡ This ensures your project is enclosed safely, while still allowing easy access to connections.
Step 8: Prepare the Memory Card- Insert the microSD card into a card reader and plug it into your PC.
- Format the card as FAT32 (quick format is fine).
- Choose any song, music, or alarm sound you want to play.
- Rename the file to 001.mp3 (the DFPlayer plays files in order).
- Copy and paste the file into the root directory of the memory card (not inside any folder).
- Safely eject the card and insert it into the DFPlayer Mini slot.
- connect speaker wire
⚡ Now, when the reed switch triggers, the DFPlayer will play your custom sound. You can change it anytime by replacing the file.
Step 9: Power Up With 9V Battery- Connect a 9V battery to the copper wire terminals (or connector) provided on the PCB.
- Use a good quality 9V rechargeable or branded battery – cheap ones get weak very quickly and won’t give proper backup.
- Turn the On/Off switch ON to power the circuit.
- The DFPlayer Mini will now be ready to play the audio whenever the reed switch is triggered.
⚡ Using a strong battery ensures longer backup and reliable performance for your alarm device.
Step 10: Installation & Testing- Fix the PCB (inside acrylic case) on the door frame using screws.
- On the opposite side of the door, fix a small magnet aligned with the reed switch.
- When the door is closed, the reed switch stays OFF.
- When the door is opened, the reed switch activates and the DFPlayer Mini plays the alarm sound stored on the memory card.
Switch ON the power and open the door to test — you’ll hear your custom voice or alarm sound (001.mp3) play instantly.
Step 11:👉 Watch the full working video on YouTube for the demo and sound output!


Comments