


Hardware components | ||||||
| × | 1 | ||||
| × | 1 | ||||
| × | 1 | ||||
 |
| × | 1 | |||
| × | 1 | ||||
| × | 1 | ||||
| × | 1 | ||||
| × | 1 | ||||
I designed the circuit PCB using EasyEDA and ordered the final board from PCBWay for a professional finish.
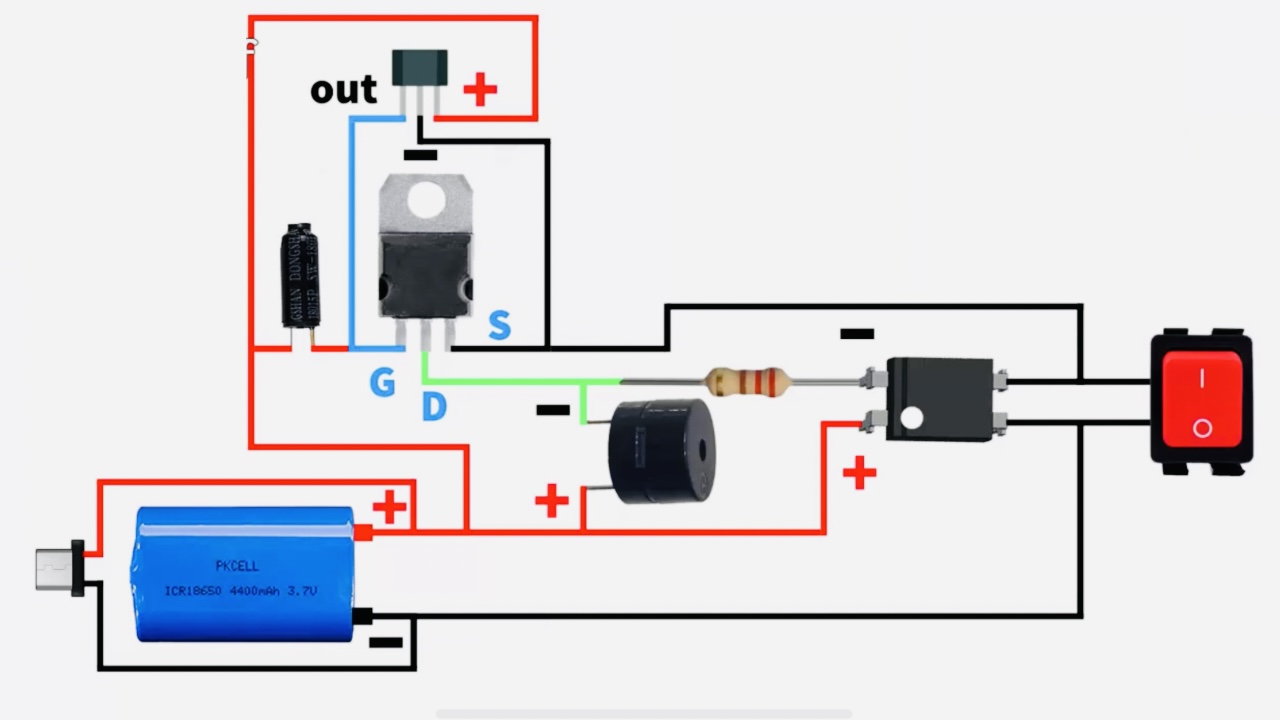
After receiving the PCB, I placed and soldered the IRLB4132 MOSFET and the PC817 optocoupler in their respective positions as shown in the attached circuit diagram/photo.
This ensures a compact, reliable, and durable build compared to breadboard wiring.
Step 2: Adding Switch, Buzzer, Hall Sensor & Vibration SensorNext, I connected the ON/OFF switch, buzzer, Hall-effect sensor, and vibration switch to the PCB:
- ON/OFF Switch: Controls power to the circuit.
- Buzzer: Connect to the MOSFET output so it sounds when the vibration switch is triggered.
- Vibration Switch: Detects any shake or tampering of the bike and triggers the alarm.
- Hall-effect Sensor: Acts as a secure reset — the alarm can only be turned off by placing a magnet near the sensor.
All components are carefully soldered to the PCB, keeping wires short for a compact, tidy setup.
📷 (Insert photo showing all components fixed to PCB and wiring)
Step 3: Trimming, Soldering & CleaningAfter placing all components on the PCB:
- Trim excess legs of all components with side cutters.
- Solder all connections properly, ensuring no cold joints.
- Clean the PCB using liquid flux cleaner or isopropyl alcohol to remove solder residue and flux for a neat finish.
- I used a small 3.7V Li-ion battery
- Fixed the battery in place using a small amount of gum or double-sided tape to secure it.
- Soldered the +ve and -ve terminals to the PCB carefully, ensuring correct polarity.
- Measure the length and width of your PCB carefully.
- Cut a 3mm acrylic sheet to size — I used a laser cutter for precise edges.
- Assemble the acrylic pieces into a box shape to house the PCB and components.
- Use gum or strong adhesive to fix the sides together securely.
This creates a compact and protective enclosure for your bike alarm.
Step 6: Join the First-Ever PCBWay 3D Printing Design Contest!Unleash your creativity and bring your 3D ideas to life! PCBWay invites all makers and designers to participate in two exciting categories:
- Eon-Themed Designs: Give PCBWay’s mascot, Eon, a fresh new look with your imagination — new outfits, poses, or expressions!
- Open Creative Designs: Design your own original 3D character, figurine, or collectible — from fantasy creatures to action figures.
Why participate?
- Win up to $500 cash, coupons, and certificates
- Have your design professionally 3D printed
- Get featured on PCBWay’s platform and show your talent to the community
How to enter:
Submit your 3D files (STL, STEP, or similar) through the PCBWay Open Source Community. You can enter one or both categories!
Deadline: November 10, 2025 — Don’t miss your chance to turn imagination into reality!
Click here to enter the contest!
Step 7: Installing the PCB and Adding TP4056 Charging Module- Insert the PCB into the acrylic box and secure it using gum/adhesive.
- Connect the TP4056 charging module:
- Solder wires to B+ and B- terminals of the module (red = +, black = -).
- At the other end, solder a 2-pin female header for easy connection.
- Insulate all exposed wires and solder joints using heat shrink tubing to prevent shorts.
The TP4056 module is now ready and can be used to charge your 3.7V battery safely.
- Simply connect the female 2-pin header from the TP4056 to the male header on the PCB.
- This allows easy plug-in charging without opening the enclosure.
- Turn ON the switch and mount the completed alarm box securely on your bike.
- Test the alarm: shake or tap the bike — the vibration switch triggers the buzzer.
- Reset the alarm: place a magnet near the Hall-effect sensor to turn it off.
- Once everything works perfectly, close the acrylic box to protect the circuit.
The DIY bike alarm is now fully functional:
- The vibration switch detects any shake or tampering.
- The buzzer sounds instantly when the bike is disturbed.
- The Hall-effect sensor ensures the alarm can only be turned off using a magnet, keeping your bike secure.
📹 Watch the full working demo on YouTube:https://youtu.be/uCkH_dk6y90?si=77p7BOPlh4xo_rIQ

Comments