

Hardware components | ||||||
 |
| × | 1 | |||
 |
| × | 1 | |||
 |
| × | 1 | |||
 |
| × | 1 | |||
Software apps and online services | ||||||
 |
| |||||
| ||||||
| ||||||
This project is about Automation of a Led Light and a Buzzer which are connected to a cloud(Bolt cloud server) with the help of Bolt WiFi Module. This is again integrated with Google Assistant with the help of a platform called IFTTT.
Automation has fascinated me since childhood. It was at the age of 12 when I experienced Automation for the 1st time and it had higher level automation like motorized curtains, doors etc that was controlled with an iPad. Automation is exciting, easy to understand and also is really worth your time. Due to the above reasons I decided to do a project on Automation after completing a course on Internet of Things and Machine Learning
This project is purely based on basics of Automation which is sending of data from an input to a cloud based server and again the server sends data to the receiver and passes on the command to the device which has to be run.
Okay so lets start with the working and steps of this project !
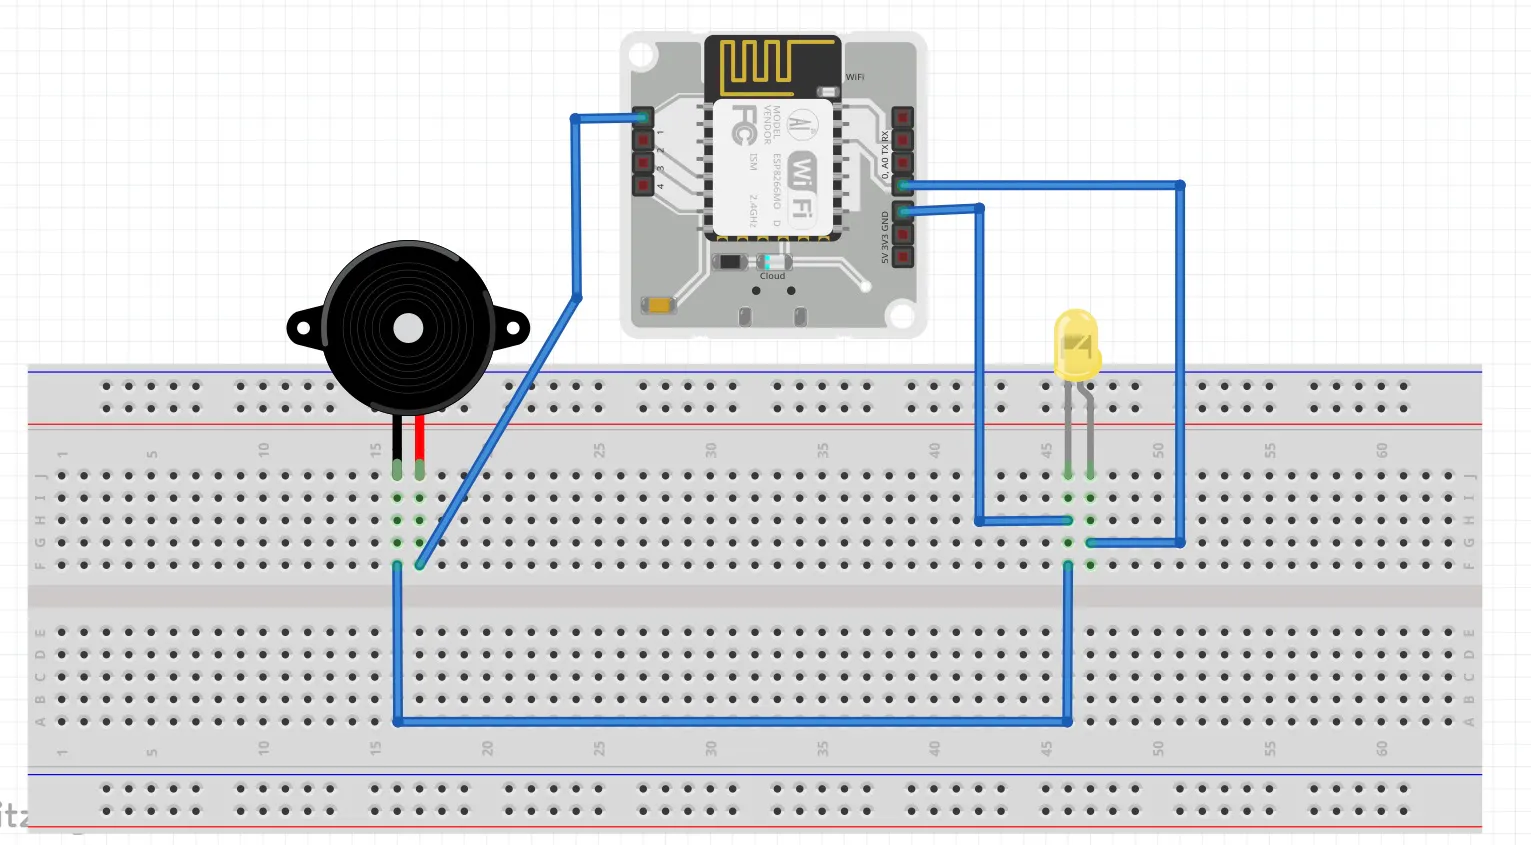
STEP 1: Setup the required circuit as shown in the fig.1.) The positive of the buzzer is connected to Digital pin 1 (0, 2, 3, 4 are also fine) of the Bolt Module
2.)The negative of the buzzer is connected to the negative of the Led
3.)The negative of the Led is connected to the GND pin of the module
4.) The positive of the Led is connected to Digital pin 0 (1, 2, 3, 4 are also fine) of the Bolt Module
STEP 2: Getting Details of your Bolt DeviceLogin to cloud.boltiot.com and note the Bolt Device ID and the API Key
Go to the following tab to get API key
The Led and the Buzzer are Output devices, we need to write few commands in form of URLs to send the instruction to the Cloud
Hence to just switch on and off the Led and Buzzer we will use the following commandhttps://cloud.boltiot.com/remote/API_KEY/digitalWrite?pin=PIN_NUMBER&state=HIGH/LOW&deviceName=DEVICE_ID
To control the intensity of the Led and Buzzer we will use the following commandhttps://cloud.boltiot.com/remote/API_KEY/analogWrite?pin=PIN_NUMBER&value={{NumberField}}&deviceName=DEVICE_ID
To simultaneously switch on Led and Buzzer we will use the following commandhttps://cloud.boltiot.com/remote/API_KEY/digitalMultiWrite?pins=PIN_NUMBER, PIN_NUMBER&states=HIGH/LOW, HIGH/LOW&deviceName=DEVICE_ID
The parameters that you need to replace are:API_KEY: You can get it from API tab on cloud dashboard.PIN_NUMBER: Pin to which you have connected the LED. Values can be either 0, 1, 2, 3 or 4HIGH/LOW: This value indicates if you want to turn on/off the LED. HIGH will turn it on, LOW will turn it off.DEVICE_ID: The id of your device. You can get it from cloud dashboard.
{{NumberField}}: Intensity value which will be taken from your speech command and will be auto filled
The sample command to turn the led ON connected to device having ID BOLT11111111 to PIN 0 is:
https://cloud.boltiot.com/remote/f1f918e9-d9c2-4e5b-aed0-b7cb743f74cf/digitalWrite?pin=0&state=HIGH&deviceName=BOLT11111111
Make sure that you change the API Key to your own API Key and device ID which you got in the previous step.If you have connected the LED to any other pin other then Pin 0 then make a suitable change in the pin no in your code.
STEP 4: Integration of Google Assistant and Bolt with help of IFTTTLogin to ifttt.com with your Google account.
NOTE: This account should be same as your Google Assistant account
Go to the menu and click Create
Now click on IF THIS to create a Trigger
Now, under choose service search for Google Assistant and click it
Now in this project we have to make a total of 7 applets. For 5 of them we will use option "Say a simple phase" and for 2 of them we will use "Say a phase with a number."
Now lets create our 1st applet.Choose the 1st option from the above image and fill in the details as per requirement as shown in the image below.
After this click Create Trigger
Now click the Then that button and search for Webhooks. Then click make a web request and fill in the details as shown below
NOTE: Make sure you enter the right API key and Device ID
Click create action. Now your applet is ready to use!
You can run the applet by saying "Lights on " on Google assistant and see what happens !
Now we have to similarly create 3 more applets for Lights off, Sound on/off
Now, once the three other applets are created, we have to create 2 applets using the "Say a phase with a number." option and use the command given for this case in Step 3
Your input in this case should be like Light intensity # where u can say a number after the # symbol. The numbers can vary from 0 to 255 as that is the range accepted for the given voltage in the Bolt Module
Once this is done we will now create the last applet which has the simultaneous automation of both light and sound. For this we will use the 3rd command that is given in Step 3.Here also we will use "Say a simple phase" option
Tip: You can change the title of your applets if you want
Once done your IFTTT My Applets page should look something like the image shown
Thank you.
You guys can Ping me anytime if you have any questions or doubts!


Comments