


Hardware components | ||||||
 |
| × | 1 | |||
 |
| × | 1 | |||
 |
| × | 1 | |||
 |
| × | 1 | |||
 |
| × | 2 | |||
Software apps and online services | ||||||
 |
| |||||
This post builds on a recent how-to I wrote that shows the reader how to connect a micro:bit to the Ubidots IoT platform via Wi-fi and using the XinaBox IoT starter kit.
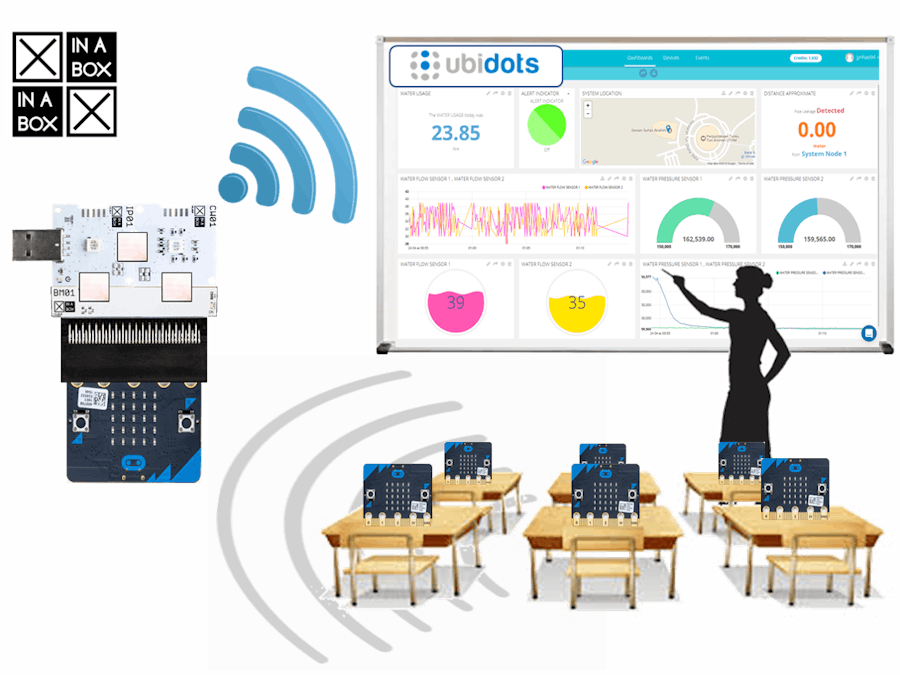
With the functioning kit and connection to Ubidots from that how-to we will connect a number of micro:bits to create our own little 'IoT network'. This is a very simple IoT based voting app - each micro:bit 'votes' with their A-button or B-button. We'll show the results in our Ubidots dashboard. The process is summarised in the following image:
So if you haven't yet, pop over to this blog first to get connected.
To successfully build this project you should have the following:
- An Ubidots account.
- An assembled XinaBox IoT Starter kit, including micro:bit, that is capable of communicating with your Ubidots account.
- At least 1 other micro:bit
Your assembled XinaBox IoT Starter kit will look something like the picture below. For the duration of this post I am going to refer to this as the MICROBIT GATEWAY:
We are going to enable the following process to unfold:
- Multiple micro:bits (e.g. in the same classroom, so I'll call them CLASSROOM MICRO:BITS) will send messages to the micro:bit gateway.
- The micro:bit gateway will collect these and send them on to Ubidots.
- Ubidots will collect and collate the data and present it back to us in a series of visualisations we will set up in the dashboard.
Whilst I will not go into any detail on this here, the code could be adapted quite easily to transfer other types of data, such readings from external sensors connected to the classrooom micro:bits or triggers that are coded onto the micro:bits.Step 1: General notes about the MicroPython code
Firstly, let me say to anyone not comfortable with MicroPython - there are only 4 edits in total that you need to make in the code to get it working and these are just entering things like Wi-fi password :)
When using radio on a micro:bit you will need to choose a few parameters. Feel free to change the ones I am using in the MicroPython code, but if you do just remember to change them in the code for both the classroom micro:bits and the gateway.
I've put a lot of comments in the code, most of which are just to explain what different bits of the code are responsible for. Comments are prefixed in one of 2 ways:
- "EDIT GUIDELINES: …" these include important notes about elements of the code that you will need to modify. Work through ALL these comments carefully. There are 3 of these in the gateway code and one in the classroom code.
- "NOTE: …" these comments are for information purposes only.
And please bear in mind the following:
- The code is meant to be as simple and basic as possible. There are tons of ways it can be improved.
- At XinaBox we are working on developing blocks for MakeCode, so in time you'll be able to replicate this program there.
This section relates to the Code for the Classroom Micro:bit that is appended to this post.
Each of our classroom micro:bits is going to use radio to send the following messages to the micro:bit gateway:
- … "My name is NAME and my A-button just got clicked";
- … "My name is NAME and my B-button just got clicked".
The NAME we give to each of the classroom micro:bits is important:
- It must be an integer value
- Your first classroom micro:bit must be 0 (zero). Then 1, then 2 etc
- It must be less than 100.
In the code it is called "thisMicrobitID". You must change it for each classroom micro:bit.
Edit the code as appropriate then flash onto the classroom micro:bit(s) you are using.
Step 3: MicroPython code for the micro:bit gatewayThis section relates to the Code for the Micro:bit Gateway that is appended to this post.
The micro:bit gateway has to do the following:
- establish a connection to Ubidots
- monitor the radio for incoming messages from classroom micro:bits
- check messages received and see if they are valid.
- convert valid messages into a format that can be sent over Wi-fi
- send messages to Ubidots.
There are a few edits you need to make in the micro:bit gateway code:
- To connect to Ubidots (as detailed here): ensure you update your wifi credentials and default token.
- Specify the number of classroom micro:bits in your network: update the line at the beginning of the code that reads numberOfClassroomMicrobits = 10. Ensure that the correct number is entered here.
- In the code provided the name of the gateway micro:bit is given as YOURMICROBIT. You can edit that if you like or leave it as is - just remember you need to use this name in Ubidots too.
Once you've edited these items flash the code onto your micro:bit gateway.
Step 4: powering up all the micro:bitsOnce you've flashed all the micro:bits with the appropriate code it is time to power them up and get started.
When you power up the micro:bit gateway this is what should happen:
Once the square disappears:
When the tick finishes flashing a sad face shows - this is OK. Its sad cos no one is sending it data. When the micro:bit gateway receives a radio signal from one of the classroom micro:bits and succesfully processes it we get another couple of ticks followed briefly by a happy face.
NB: click the A-button on the micro:bit gateway to initiate a new quiz. If you are not in test mode the gateway will not start processing messages until you click A. An up arrow appears briefly on the LEDs if all is well.
The classroom micro:bits display the following:
- By default the ID of the classroom micro:bit is shown.
- When you click one of the buttons an 'a' or 'b' is shown on the LEDs for a short period, then the ID again.
In addition:
- when you click the A-button or B-button on a classroom micro:bit you should see a few ticks flash onto the LEDs on the micro:bit gateway.
This confirms your message has been received and sent over to the CW01. If you don't see the ticks it may be for one of the following reasons:
- You haven't pushed A on the micro:bit gateway to initiate the quiz. Press A and try again.
- You are not in test mode and the classroom micro:bit has already 'voted'. Check this in the code for the gateway.
If neither of these work, reboot the micro:bit gateway and try again.
I found that if I had my micro:bit gateway plugged in to a USB port on my laptop, and if I then plugged a classroom micro:bit into a different USB port on the same machine, my gateway would not work. Rebooting the gateway sorted it out for me, but be aware of this.Step 5: Checking the data is received in Ubidots
Make sure your 'network' is powered up and running and click a few buttons on the classroom micro:bits to ensure some data is being send to Ubidots.
We need to confirm that it is being received there. Open up your Ubidots dashboard then wait 10 seconds or so - give Ubidots time to receive some data and process it. Then:
- Click on Devices and select YOURMICROBIT
If everything is working properly, you should see each of the variables you are sending from your micro:bit listed here! You should also see the values change as new data is sent from the micro:bit gateway to Ubidots.
If you left the gateway code as is, the following variables should be listed:
- buttona. Is set to 1 when the A-button is clicked on a classroom micro:bit
- buttonb. Is set to 1 when the B-button is clicked on a classroom micro:bit
- countof_a. The total number of clicks of A for the current vote
- countof_b. The total number of clicks of B for the current vote
- resetvote. Records when a new vote is initialised
- voterID. Records the ID of classroom micro:bits that have voted.
- summaryOfVote. % of votes cast for A-button - used in our trigger later.
My view looks like this:
If you do not see your variables listed then check the following:
- Have you given Ubidots enough time? Try sending more data, waiting a bit longer and refreshing the browser view.
- Are you definitely sending data? Look for the ticks on the micro:bit gateway that confirm it has received the messages. In addition, a green light should flash briefly on the CW01 when it transmits data.
- Ensure your Wi-Fi credentials are correct in the gateway micro:bit's code.
- Check you are using the correct Default Token in the gateway micro:bit's code.
- Check the name you used for the gateway micro:bit - ensure it is the same name used in Ubidots for the device.
- If all else fails reboot the gateway.
If all these items check out and still the variables are not showing, please get in touch with me and I will try to help.
Step 6: Using the data in UbidotsWe are going to set up a few different visualisations in our dashboard:
1: showing the totals of A-button and B-button votes:
We will use a temperature gauges to show the total number of votes for the A-button and the B-button:
- Click Data / Dashboards.
- Click on the blue + sign on the top right to add a new widget
- Select thermometer
- Click Add Variable then select Devices / YOUR MICROBIT / countof_a. Click the green tick to confirm.
- Set the max range value to the total number of classroom micro:bits. Change the Color setting to make both gauges look different. Then click the green tick sign to complete.
- Repeat this process to create a thermometer for countof_b.
Your gauges should show up in your dashboard and should look something like mine below:
You might be wondering why I didn't make a pie-chart? It is the obvious choice, so lets make one quickly:
- Click Data / Dashboards then click on the blue + sign
- Select pie, click Add Variable then select Devices / YOUR MICROBIT / countof_a and countof_b. Click the green tick to confirm.
That should do the trick!
Bear in mind - the more data points there are (i.e. the more classroom micro:bits) the richer the visualisation will look. In the MicroPython code we flashed onto the micro:bit gateway you will notice that there is a variable called testMode. When you are using the code for a real quiz this should be set to False. By setting it to True we allow classroom micro:bits to vote many times on the same quiz. This ensures we have a wealth of data points to build our dashboard with.
2: Show the total number of votes
It is useful to know how many people have voted - especially if you know the total who are eligible to. For this section we will calculate this and then show it in a visualisation.
Although its easy to see how we can calculate total votes (countof_a + countof_b), we don't have a total number of votes variable that we can use. We'll have to create a new variable:
We've already used raw variables in Ubidots. Synthetic variables are ones that you create yourself in the dashboard. They are based on the raw variables from your micro:bit. We want a synthetic variable that is the sum of the number of people voting for A and the number voting for B
- Click Devices / Devices and select YOURMICROBIT
- In the data view click on the Add New Variable. Watch out for a small drop down with 2 options (raw and synthetic). Select Synthetic (see image below):
We now need to create an expression to calculate the sum. Type the following in the area on the left:
fill_missing( {var1} + {var2} )- replace {var1} by highlighting
{var1}then clicking YOURMICROBIT then selecting countof_a. Similarly replace{var2}with countof_b - Your screen should look like this:
- Click accept.
Why did we have to use fill_missing above? Variables work a bit differently here than in MicroPython (or most programming languages). All raw data sent to Ubidots is time stamped, which means a variable is a named array of values & time stamped pairs. The time stamps for the values of countof_a and countof_b that we want to use here are different. So, when we try to add the variables, the system does not really know which values we want to add. By telling Ubidots to fill_missing we are effectively telling it to ignore the time stamps and just add the most recent values. My thanks again to S, the Ubidots support operator who helped me with this.
A gauge is a nice way to visualise this:
- In Data / Dashboard click the blue + sign and select gauge
- Click to Add variable then select YOURMICROBIT / Total Votes.
- Change the range value so the higher value is the total number of classroom micro:bits. Edit the other bits as you see fit. Click the green arrow to finish.
My dashboard now looks like this:
3: Have the results of a vote emailed to you
Once a vote is completed you press the A-button on the micro:bit gateway to start a new quiz. What we will do here is trigger an email to get sent when the A-button is pressed, and we will include the results of the vote in the email.
We use the event functionality in Ubidots. An event has 2 parts:
- A trigger. Our trigger will be somone pressing the A-button on the gateway.
- An action. Our action is an email is sent with info on results in the body.
We have some challenges to overcome:
- When we set up a trigger the variable(s) that we use in the trigger are the ones we have access to in the event. So, to include (say) % of votes for A in the email we need to use it somehow in the trigger.
- We can't just expect to be able to access values, such as TotalVotes wherever we want to use them (see my note in the previous section). Variables do not work the same as they would in a programming language, and I found accessing their values to be challenging.
- So, after much testing I was unable to use the values of countof_a or countof_b in the body of the email I was sending.
I came up with a work-around that is a bit hacky - I am sure there are better ways! My solution is based on the following observation:
Events have a trigger and an action. In events it is easy to use the last value of the variable used in the trigger. We therefore need to ensure that the last value we send is useful in this context.
So, in the MicroPython code for the micro:bit gateway, we do the following:
- when the A-button is pressed we validate that a vote has occurred (by checking that at least 1 vote has been cast)
- We then calculate the % of votes cast for the A-button
- We pass this value to Ubidots as our summaryOfVote variable.
- NB:summaryOfVote = -1 at all times EXCEPT when the A-button has been pressed after a valid vote. Then it takes on a value from 0 - 100.
Hence, in Ubidots we can use summaryOfVote in 2 ways:
- When the value is 0 or greater we know that the A-button has been pressed on the micro:bit gateway and that a valid vote has been completed. We use this to trigger the email
- The last value sent for summaryOfVote is the result of the vote, which we include in the text of the email.
We now have what we need, so lets set up our event:
- Click on Data / Events
- Click on the blue + sign on the right
We now set our 'if' trigger. If something happens it will trigger Ubidots to react in a certain way...
- Click to select variables then click on YOURMICROBIT and select summaryOfVote
- Edit the rest of the line to read: value is greater than or equal to 0 for 0 minutes
- Click the blue forward icon lower down on the screen.
So, this trigger is set off when the A-button is pressed on the micro:bit gateway and a previous vote has been conducted where 1 or more votes were recorded. We now need to specify the action that this trigger will initiate:
- Click on the yellow plus sign to create a new action type
- Click send email
- Enter your email address. In the message field type in the following:
Percentage of votes for A = {{last_value}}
- Click the green tick button to save your event.
- Make sure you remember to click the blue forward icon lower down on the screen to finalise your event.
- In the final screen you can specify when the event is active. Leave this as is for now and finalise your event by clicking on the green arrow.
This should work... it was a serious Eureka moment for me when the email came through - I hope you feel a similar excitement!
In conclusion:You will probably have noticed that we are sending some variables I haven't used anywhere in the dashboard. I had plans for them, still do, but this is already quite long. Please have a play with them yourself and I'd love to hear about anything interesting you might come up with.
Also, where I've encountered issues relating to my lack of knowledge of how Ubidots works I've solved them in the micro:bit gateway MicroPython code. I think someone who knows the workings of their IoT platform more intimately then I do would be able to do a lot of the work I've done in Python on that platform.
Although I am quite pleased with the way this works the point of this project was not the quiz - it was to show how an entire classroom of micro:bits can be networked with a single XinaBox Wi-fi gateway. The underlying code proves that ANY data collection activity that you might use in a classroom could quite easily include an IoT element. Conversely, I think that if you are conducting a data gathering exercise using micro:bit it can be enriched greatly, and with little hassle / expense, by getting the data onto an IoT platform.
Thank you
@PragmaticPhil :)

Comments