

Hardware components | ||||||
_ztBMuBhMHo.jpg?auto=compress%2Cformat&w=48&h=48&fit=fill&bg=ffffff) |
| × | 1 | |||
 |
| × | 1 | |||
| × | 1 | ||||
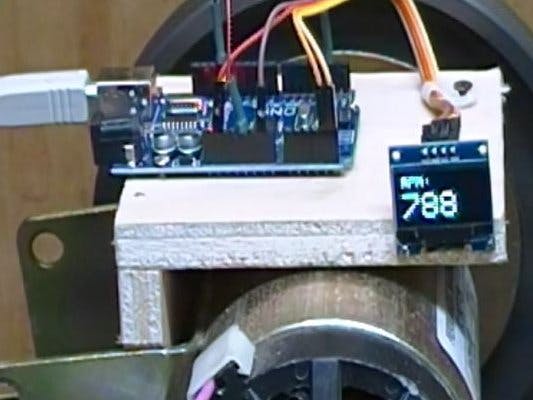
My project is a home made reliable tachometer that is easy to make. I needed to build a tachometer to measure the speed of a DC motor, I could not find a reliable way of building a tachometer. I tried many ways to build a reliable tachometer until I succeeded.
Easy Peasy Tachometer
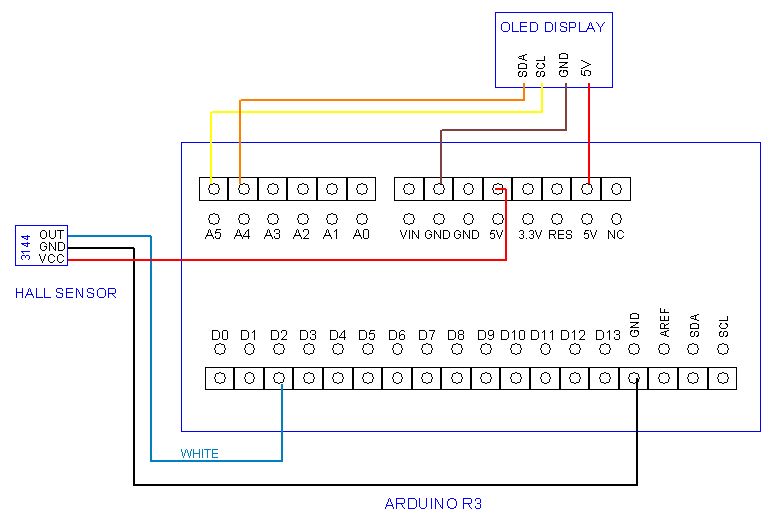
ArduinoIt is a home made reliable tachometer, that can be used with an Arduino Uno or Nano that you can make to measure the speed of rotating objects on tools, bicycles, and robotics.
// Easy Peasy Tachometer
//James Rovere 2020
#include <Wire.h>
#include <Adafruit_SSD1306.h>// You may have to edit library for 128x64, //default is 128 x 32.

#define OLED_WIDTH 128
#define OLED_HEIGHT 64

#define OLED_ADDR   0x3C // A very common address for these displays.

Adafruit_SSD1306 display(OLED_WIDTH, OLED_HEIGHT);


float value=0;
float rev=0;
int rpm;
int oldtime=0;
int time;

void isr()          //interrupt service routine
{
rev++;
}

void setup()
{
 display.begin(SSD1306_SWITCHCAPVCC, OLED_ADDR);
 display.clearDisplay();

digitalWrite(2 ,HIGH);// Instead of using a pull up resistor
attachInterrupt(0,isr,RISING);  //attaching the interrupt

}

void loop()
{
delay(2000);// 2 second delay
detachInterrupt(0);           //detaches the interrupt while calculating
time=millis()-oldtime;        //finds the time
rpm=(rev/time)*60000;         //calculates rpm
oldtime=millis();             //saves the current time
rev=0;

  display.clearDisplay();
  display.setTextSize(2);
  display.setTextColor(WHITE);
  display.setCursor(0, 0);// Vertical, Horizontal.
  display.println("RPM:");
  display.setTextSize(5);
  display.setTextColor(WHITE);
  display.setCursor(0,25);
  display.println(rpm);
  display.display();


  attachInterrupt(0,isr,RISING);


}
Easy Peasy Tachometer
ArduinoIt is a home made reliable tachometer, that can be used with an Arduino UNO or NANO that you can use to measure the speed of rotating objects on tools, bicycles, and robotics. For a complete tutorial follow this link https://youtu.be/2-J4f8-RX90
// Easy Peasy Tachometer
//James Rovere 2020
#include <Wire.h>
#include <Adafruit_SSD1306.h>// You may have to edit library for 128x64,
//  default is 128 x 32.

#define OLED_WIDTH 128
#define OLED_HEIGHT 64

#define OLED_ADDR   0x3C // A very common address for these displays.

Adafruit_SSD1306 display(OLED_WIDTH, OLED_HEIGHT);


float value=0;
float rev=0;
int rpm;
int oldtime=0;
int time;

void isr()          //interrupt service routine
{
rev++;
}

void setup()
{
 display.begin(SSD1306_SWITCHCAPVCC, OLED_ADDR);
 display.clearDisplay();

digitalWrite(2 ,HIGH);// Instead of using a pull up resistor
attachInterrupt(0,isr,RISING);  //attaching the interrupt

}

void loop()
{
delay(2000);// 2 second delay
detachInterrupt(0);           //detaches the interrupt while calculating
time=millis()-oldtime;        //finds the time
rpm=(rev/time)*60000;         //calculates rpm
oldtime=millis();             //saves the current time
rev=0;

  display.clearDisplay();
  display.setTextSize(2);
  display.setTextColor(WHITE);
  display.setCursor(0, 0);// Vertical, Horizontal.
  display.println("RPM:");
  display.setTextSize(5);
  display.setTextColor(WHITE);
  display.setCursor(0,25);
  display.println(rpm);
  display.display();


  attachInterrupt(0,isr,RISING);


}


Comments