


Hardware components | ||||||
 |
| × | 1 | |||
Software apps and online services | ||||||
 |
| |||||
Hand tools and fabrication machines | ||||||
 |
| |||||
 |
| |||||
 |
| |||||
 |
| |||||
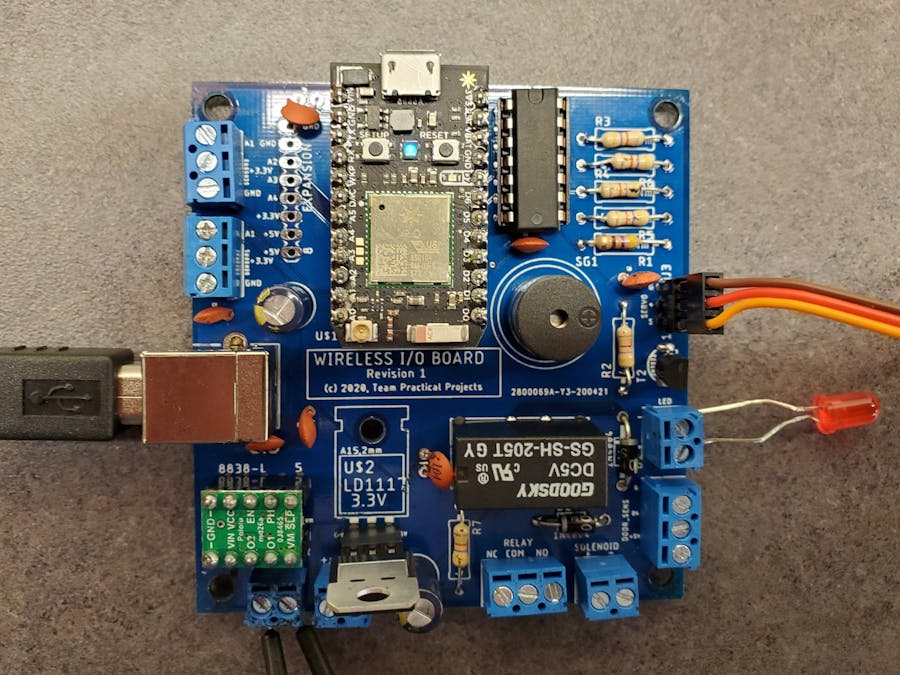
A general purpose WiFi-enabled I/O board based upon the Particle Photon.
This is a small printed circuit board that provides a variety of input/output capabilities:
Controls:
Small motor controller.
Bi-directional control of a small DC motor. The on-board H-bridge motor controller can drive motors up to 11 volts DC at up to 1 amp. An on-board LD1117 voltage regulator can supply motor power for a small, 3.3 volt motor. Alternatively, the voltage regulator can be left off of the board and external motor power can be supplied via an on-board terminal block. Photon pin D2 controls the motor direction, while PWM on Photon pin D3 controls the motor speed.
Solenoid controller.
One pole of an on-board relay provides power to a solenoid or other external device (e.g. DC motor, lamp, etc.). An on-board flyback diode protects inductive loads. An on-board LD1117 voltage regulator can supply 3.3 volt power for the external load. Alternatively, the voltage regulator can be left off of the board and an external DC power source for the load can be supplied via an on-board terminal block. Photon pin D0 controls the relay.
Double throw relay contacts.
The second pole of the on-board relay is brought out to a 3 terminal block on the board. DC and AC loads can be connected through the common, normally open (NO) and normally closed (NC) contacts. Photon pin D0 controls the relay. The relay contacts are rated at 120 volts AC or 24 volts DC at 2 amps max.
Servo motor.
Photon pin D1 controls a standard, 5 volt hobby servo using the Particle servo library. A 3 pin male header allows hobby servos to be connected directly to the board. Alternatively, this header connector may be used as a general purpose 5 volt digital output (8 ma max).
Buzzer/LED.
An on-board piezo buzzer is provided. Photon pin D6 activates the buzzer. A 2-position terminal block provides
power to light an external LED through an on-board current limiting resistor. Photon pin D5 activates the LED.
The buzzer and LED connection provide visual and audible indicators under Photon firmware control.
Sensors.
Analog sensors.
Two, 3-position terminal blocks are provided for analog or digital sensor inputs to Photon pins A0 and A1. The Photon's 3.3 volt power and ground are provided on each terminal block so that sensors may be powered from the board and/or voltage dividers created for sensor inputs to the Photon (e.g. LDR, resistive force sensor, resistive water level sensor, etc.). Photon firmware controls the function of each of these pins: digital output, analog input, digital input. The pins provide 3.3 volt I/O, referenced to the Photon's 3.3 volt regulator.
Digital sensor.
A 3-position terminal block provides access to Photon pin D4. The terminal block also provides 5 volt power and ground for powering sensors, external pullups, etc. D4 is a 5 volt tolerant pin that can accept an input signal up to the 5 volt supply reference on the terminal strip. The signal can also be used as a general purpose 3.3 volt digital output control.
Expansion.
A pin header field is provided on the board for expansion purposes. This header provides connections for ground, +5 volt supply, +3.3 volt supply (Photon regulator), and I/O connection to Photon pins A2, A3, and A4.
Power.
The circuit board requires +5 volt power which is input to the board via a USB female Type-B connector.


Comments