


Hardware components | ||||||
 |
| × | 1 | |||
 |
| × | 1 | |||
| × | 1 | ||||
| × | 1 | ||||
 |
| × | 1 | |||
| × | 1 | ||||
| × | 1 | ||||
Software apps and online services | ||||||
 |
| |||||
Hand tools and fabrication machines | ||||||
 |
| |||||
 |
| |||||
 |
| |||||
Hi, My name is Piyush!
I have always had the Love to make Small and Compact projects because of how Slik and Cool it is. So I imagined what a Mini Mouse would look like but did I know I had a Very Exciting Journey Ahead of Me!
I really wanted to use it like a real mouse while being miniature size so other DIY mouses like the Accelerometer Mouse was not the way to go, But there is 1 Major Problem with this, Mainly Finding a way to control the mouse cursor, so I needed to find a way to control the Mouse Cursor while keeping itself Compact. I tried looking up the Internet with no Luck. So I had to Think Outside The Box until I got the idea of using the joystick Upside Down!
I also created an Instructables guide, making it as clear and detailed as possible so you can make this yourself!
SuppliesI made this design so it contains very few components with full function a mouse and for it to be user-friendly and Easy to Make while it being compact.
Materials:
- Joystick Module
- 1 Pcs Mini 3-pin RGB Led
- 2 Tactile buttons
- Arduino Pro Micro
- Cut Female Jumper Wires
- Normal (I used 28 gauge)
- Black Pen
- Super Glue
- Wooden Sticks
- Double Sided Tape
- Sand Paper (Optional)
- Pencil - Ruler
Tools:
- Hot Glue Gun
- Soldering Iron + Solder Wire
- Wire Splitter
Firstly, Take your SandPaper if you have one, and smooth the bottom of the JoyStick Module (Optional).
Next, Apply the double-sided tape beneath the JoyStick Module and stick the Arduino Pro Micro on it as shown in the Picture.
Then, Take 5 Female Jumper Wires and Attach them to the JoyStick Module as shown in the Picture.
Step 2: Attach Components to BodyNow, Take your Push Buttons and Solder them Together as shown in the Picture.
Do the same for the RGB LED piece.
Finally, Attach them with a Hot Glue Gun to the Female Wires As Shown in the Picture.
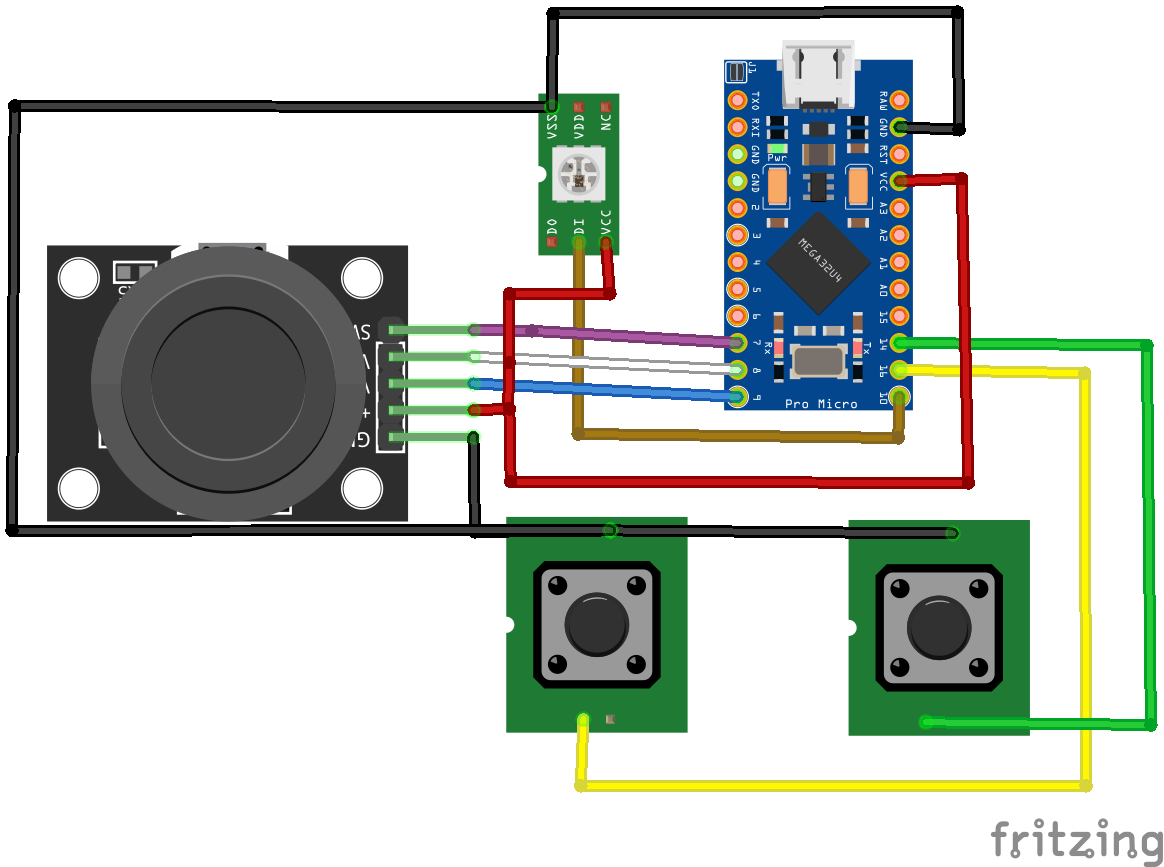
Step 3: Solder All ConnectionsFollow The Schematic Above and Solder all your Connections.
*At First I made Mistakes in My Connections so please only follow the Schematic.
Step 4: Frame DesignNow Take your Wooden Sticks and Cut them and Glue them Together into the Following shapes and Colour them Either with Paint or a Black Pen as shown in the Picture.
After That, Stick them to the Sides of the Buttons as Shown in the Picture.
Do, the Same Process but for a 1x1 cm Square and Attach it to the Button Side of the JoyStick as Shown in the Picture.
Finally, Cut out the last 2 Pcs from the Wooden Stick 1.5 cm away from the Tips of the Slim Wooden Sticks as Shown In the Picture, Colour it Black, and Stick it on the Buttons with Hot Glue.
*Side Note: If the button surface is too Soft and the Glue keeps Coming off, then take like Sand Paper or a blade and Scratch a little of the Surface of the Button, and try Sticking it again.
Step 5: CodeThe Last step of this Project is to Upload the Code by Arduino And Have fun!
#include "Mouse.h"
#include "Keyboard.h"
#include <FastLED.h>
FASTLED_USING_NAMESPACE
#define Xpin A8
#define Ypin A9
#define Spin 7
#define LButton 16
#define RButton 14
#define LedPin 10
#define NUM_LEDS 1
#define LED_TYPE WS2811
#define COLOR_ORDER GRB
CRGB leds[NUM_LEDS];
#define BRIGHTNESS 100
#define FRAMES_PER_SECOND 120
int Hue;
int LeftButton;
int RightButton;
int JoyX;
int JoyY;
void setup() {
FastLED.addLeds<LED_TYPE, LedPin, COLOR_ORDER>(leds, NUM_LEDS).setCorrection(TypicalLEDStrip);
// set master brightness control
FastLED.setBrightness(BRIGHTNESS);
pinMode(Xpin, INPUT);
pinMode(Ypin, INPUT);
pinMode(LButton, INPUT_PULLUP);
pinMode(RButton, INPUT_PULLUP);
pinMode(Spin, INPUT_PULLUP);
Serial.begin(9600);
Mouse.begin();
Keyboard.begin();
delay(1000);
}
void loop() {
// put your main code here, to run repeatedly:
LeftButton = digitalRead(LButton);
RightButton = digitalRead(RButton);
JoyX = map(analogRead(Xpin), 0, 1023, 3, -4);
JoyY = map(analogRead(Ypin), 0, 1023, 4, -4);
fill_rainbow(leds, NUM_LEDS, Hue, 7);
EVERY_N_MILLISECONDS(15) {
Hue++;
}
FastLED.show();
Serial.print("X:");
Serial.print(JoyX);
Serial.print("  Y:");
Serial.print(JoyY);
Serial.print("  S:");
Serial.print(digitalRead(Spin));
Serial.print("  LeftButton:");
Serial.print(LeftButton);
Serial.print("  RightButton:");
Serial.println(RightButton);
if (LeftButton == 0 && digitalRead(Spin) == 1) {
Mouse.press(MOUSE_LEFT);
} else if (LeftButton == 0 && digitalRead(Spin) == 0) {
Keyboard.press(218);
delay(10);
} else {
Mouse.release(MOUSE_LEFT);
Keyboard.releaseAll();
}
if (RightButton == 0 && digitalRead(Spin) == 1) {
Mouse.press(MOUSE_RIGHT);
} else if (RightButton == 0 && digitalRead(Spin) == 0) {
Keyboard.press(217);
delay(10);
} else {
Mouse.release(MOUSE_RIGHT);
Keyboard.releaseAll();
}
Mouse.move(JoyX, JoyY);
}
Too See it Work, Watch my video on Youtube!
Thank you for following along with this project, I would still like to improve this project and I am planning for a Mini keyboard hopefully to complete the setup, there is still room for improvement for this project and if you have any ideas, let me know your suggestion :)


Comments