

Hardware components | ||||||
| × | 1 | ||||
| × | 1 | ||||
| × | 1 | ||||
 |
| × | 1 | |||
 |
| × | 1 | |||
 |
| × | 1 | |||
 |
| × | 1 | |||
 |
| × | 1 | |||
| × | 1 | ||||
Software apps and online services | ||||||
 |
| |||||
Hand tools and fabrication machines | ||||||
| ||||||
 |
| |||||
With the aim of building a system for watering a significant number of plants that are stored in a shed during the winter season, I searched the www to see what moisture sensors are available in the market. You will find many solutions. Most helpful was the publication from Andreas Spiess (I like his Swiss accent) on YouTube:
After seeing this, my conclusion was to make a sensor myself, because for my plant watering project (upcoming), I will need a few sensors for several plants.
I selected the ESP 32 as microcontroller, because of its multiple 12bits ADC inputs and the capability to generate PWM signals at higher frequencies than e.g. an Arduino Uno can do. In this project a 600 kHz signal will be generated for each sensor.
The Sensor is made of simple low cost materials that are widely available and it will be functioning as a capacitive moisture sensor.
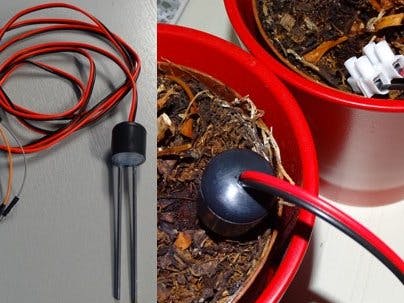
Here you see the result:
The DIY Sensor is made with simple materials:
- some audio cable
- two fondue forks
- a terminal block
- a plastic seat leg cover
- silicone paste
The pins are cut from fondue forks, that are chromium plated which will help to avoid corrosion. The construction with a terminal block enables easy connection of the copper cable wires to the chromium plated pins. The pins (that do not bend), facilitate easy insertion into the soil of the plant.
How simple can it be!
As an indicator for the measured moisture levels, I am reusing the water level indicator developed for my previous project :
For making this indicator, see my previous project: https://create.arduino.cc/projecthub/Pedro52/arduino-esp32-diy-water-level-sensor-and-diy-level-indicator-3d513d?ref=user&ref_id=328463&offset=0
Step 4: The Electronic set upIn the breadboard set up, I used an ESP 32s (Node MCU). The reasons for this choice are as stated in the introduction.
My plan is to expand this set up with functionality for making a complete plant watering system with on-line monitoring and warnings. (the ESP 32 has WiFi and Bluetooth on board).
The circuit diagram (made with Fritzing) is as follows:
The circuit diagram for the sensor is as follows:
The practical setup on the breadboard looks as follows:
The ESP 32 is powered with 5 V from the USB port and has a 3, 3V regulator on board. One output GPIO pin is connected via a 10KOhm resistor to one side of the Moisture Sensor and sends a 600 kHz signal to the sensor during the 5 measurements (for a period of 5 seconds). One input pin of the ESP32 (12 bits ADC) is connected via a diode and an R/C network (1MOhm and 1 uF). The other leg of the sensor is connected to GND.
The sensor is only powered for the duration of the measurements to avoid electrolysis effects on the chromium plated pens.
During my experiments, I established the minimum and maximum values of the sensor by putting the sensor in water (lowest measurement) and in open air (highest value). Putting the sensor in the plant pot results in intermediate values between the minimum and maximum, depending on the soil moisture level. The scale of the intermediate values appears to be quite linear.
Step 3: Making the SoftwareThe loop function in the Arduino Sketch is simple and consists only of the calling 2 functions:
void loop(){
  MEASUREMOISTURE1 ();         // measure moisture level1
  INDICATELEVEL ();
  delay(1000);
The 1 second delay between measurements are just for experimentation and demonstration purposes. In practical applications this will be far less frequent (normally a few times per day, depending on how thirsty your plants are)
The plot monitor of the ARDUINO IDE as well as the serial monitor have been very useful during experiments. A view of the plot monitor graph is given below:
The readings on the plotmonitor show values as measured by the 12 bits ADC. The complete 3.3V scale of the ESP 32 is devided by 4096, i.e.: 0.8 mV per step.
Measuring the moisture levels is done with the following code:
void MEASUREMOISTURE1 ()  {
 Moistlevel1 = 0;
 ledcWrite(Channel1, 128);                             // send a PWM signal of 600 kHz to pin 25 with a dutycycle of 50%
 delay(200);                                           // allow the circuit to stabilize
 for (int m = 1; m < 6 ; m++)                          // take 5 consecutive measurements in 5 seconds
   {
     Moistlevel1 = Moistlevel1 + analogRead(MoistSensor1Pin) ;    // Read data from analog pin 4 and add it to MoistLevel1 variable
     delay (1000);
   }
Moistlevel1 = Moistlevel1 / 5; // Determine the average of 5 measurementsHereafter the bracket in which the average value falls is determined in accordance with the above table and the moisture level is indicated on the Moisture Indicator with a color, which is very easy thanks to the <Adafruit_NeoPixel.h> library:
int redVal, greenVal, blueVal;                          // Set the Moist Level Indicator LED with a color defined in the Array color_scheme
   redVal = color_scheme[level*3];
   greenVal = color_scheme[level*3 + 1];
   blueVal = color_scheme[level*3 + 2];
   strip.setPixelColor(level-1, strip.Color(redVal, greenVal, blueVal) );
   strip.show();
For downloading the sketch through the USB port onto the ESP 32, it is required to hold down the Boot button.
NOTES:
I am interested to hear if someone is actually going to reproduce this project.
Developed and produced by Pierre Pennings (December 2018).


Comments