


Hardware components | ||||||
 |
| × | 1 | |||
| × | 1 | ||||
 |
| × | 1 | |||
| × | 1 | ||||
 |
| × | 1 | |||
| × | 1 | ||||
Software apps and online services | ||||||
| ||||||
What're we building?
In a previous tutorial, I went over how you can connect an ESP8266 to the Gemini API. While that's fine and all as a start, the Gemini API can do so much more than be a simple text-based chat system. In this tutorial I want to go over how I connect an IoT device to Gemini to transcribe short speech audio clips, which will be the basis for custom spoken commands on an IoT device in a later project.
You can see the final device in this video. Note the serial monitor output at the top where the text from the command is shown ("Good morning, happy birthday.")
While my last tutorial used an ESP8266, this tutorial will use an ESP32 dev board. The primary reason for this has to do with device RAM - the ESP8266 I have has 64kb of usable heap memory, which is not enough for recording audio and saving it as a base64 string to send to the Gemini API (despite a lot of time and effort to try and make it work!), whereas the ESP32 has about 160kb of easily usable memory.
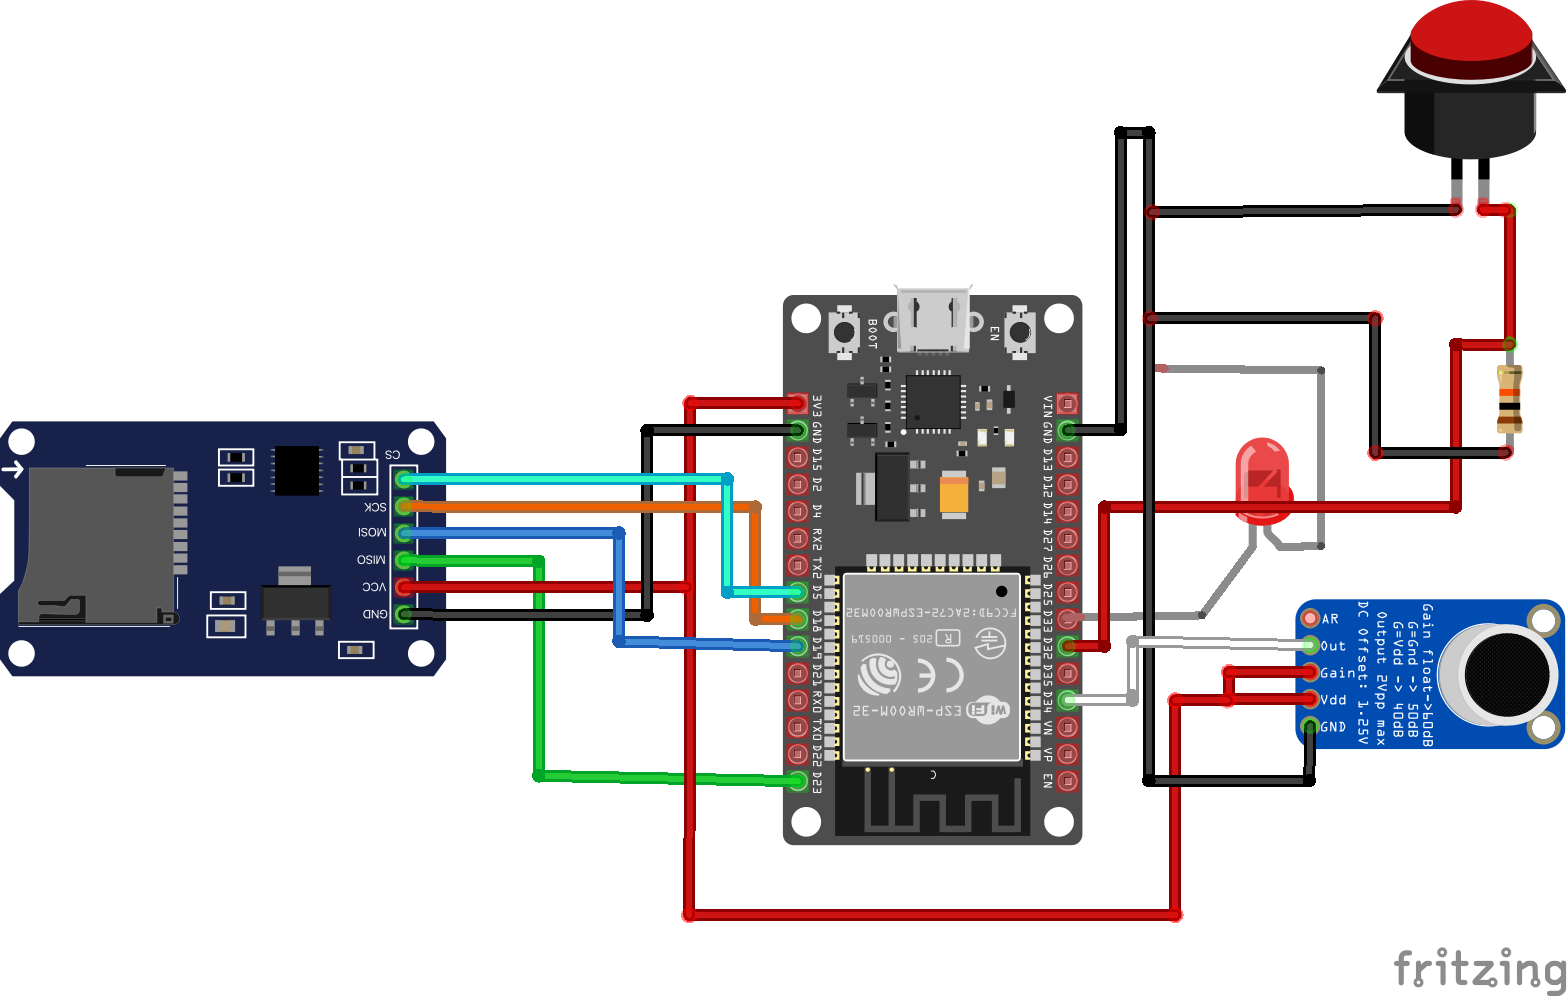
As far as hardware and steps, I'm recording two seconds of audio kicked off by a button press using a MAX9814 microphone/amplifier, saving it to an SD card, taking the wav file after saving it and converting it to a base64 string, and then using that string to make a request to the Gemini API asking it to transcribe what was said. You can follow the attached wiring diagram for connecting everything.
MAX9814 -> ESP32
GND -> GND
VDD+GAIN connected together, attached to 3.3v
OUT -> IO34

---

SD card adapter -> ESP32
CS -> IO5
SCK -> IO18
MOSI -> IO23
MISO -> IO19
VCC -> 3.3v
GND -> GND

---

Button -> ESP32
One end to GND
One end split with 10k resistor to 3.3V and IO32

---
LED

Connect to GND and IO33
With that, let's get into some code!
Setup
As with any project, there's some boiler plate, so let's get that out of the way. This is my list of dependencies, as well as the pin numbers I'm using (see the wiring diagram for more info), some values relevant to audio recording, and a place where you will need to add your own wireless name, password, and Gemini API key. If you don't already have an API key for Gemini, you can go to Google AI Studio and easily generate one by pressing on the Get API key button.
#include <Arduino.h>
#include <WiFi.h>
#include <FS.h>
#include <SD.h>
#include <HTTPClient.h>
#include <WiFiClientSecure.h>
#include <ArduinoJson.h>
#include "soc/soc.h"
#include "soc/rtc_cntl_reg.h"

const int SD_CS = 5;
const int AUDIO_PIN = 34;
const int BUTTON_PIN = 32;
const int LED_PIN = 33;

const int SAMPLE_RATE = 8000;
const int BIT_DEPTH = 16;
const int RECORD_DURATION = 2;

String SSID = "";
String PASSWORD = "";

String API_KEY = "";
From here I simply use the setup() function to initialize the board, button, LED, serial output, SD card, and wifi.
void setup() {
    WRITE_PERI_REG(RTC_CNTL_BROWN_OUT_REG, 0);
    WRITE_PERI_REG(RTC_CNTL_WDTCONFIG0_REG, 0);

    pinMode(BUTTON_PIN, INPUT_PULLUP);
    pinMode(LED_PIN, OUTPUT);

    Serial.begin(115200);

    WiFi.mode(WIFI_STA);
    WiFi.disconnect();

    while (!Serial);

    setupWifi();

    if (!SD.begin(SD_CS, SPI, 1000000)) {
        Serial.println("SD card initialization failed!");
        while (1);
    } else {
        Serial.println("SD card initialized!");
    }
}

void setupWifi() {
    WiFi.begin(SSID, PASSWORD);

    while (WiFi.status()!= WL_CONNECTED) {
        delay(1000);
        Serial.print("...");
    }

    Serial.print("IP address: ");
    Serial.println(WiFi.localIP());
}
Recording Audio
Great, so at this point it's time to get the code together to record audio. I have a new function called recordAudio() (which I'm sure you can guess what that does :)). The first thing I do in this function is delete any old data that I have on the SD card since I'm saving everything as tmp.wav.
void recordAudio() {
    if (!SD.begin(SD_CS, SPI, 1000000)) {
        Serial.println("SD card initialization failed!");
        while (1);
    } else {
        Serial.println("SD card initialized!");
    }
    if (SD.exists("/tmp.wav")) {
        if (SD.remove("/tmp.wav")) {
            Serial.println("Previous audio file deleted.");
        } else {
            Serial.println("Failed to delete previous audio file.");
            return;
        }
    } else {
        Serial.println("No previous audio file detected, starting new");
    }
After that I create a new writable tmp.wav file on the SD card
File audioFile = SD.open("/tmp.wav", FILE_WRITE);
if (!audioFile) {
    Serial.println("Failed to create audio file.");
    return;
}
and then I write a bit of header information for the wav file format
Serial.println("Start recording");
writeWavHeader(audioFile, SAMPLE_RATE, BIT_DEPTH, 1);
where the writeWavHeader() function is defined as so:
void writeWavHeader(File& file, int sampleRate, int bitDepth, int channels) {
    uint32_t byteRate = sampleRate * channels * bitDepth / 8;
    uint16_t blockAlign = channels * bitDepth / 8;

    file.write((const uint8_t*)"RIFF", 4);
    uint32_t fileSize = 36 + RECORD_DURATION * byteRate;
    file.write((uint8_t*)&fileSize, 4);
    file.write((const uint8_t*)"WAVE", 4);
    file.write((const uint8_t*)"fmt ", 4);
    uint32_t subchunk1Size = 16;
    file.write((uint8_t*)&subchunk1Size, 4);
    uint16_t audioFormat = 1;
    file.write((uint8_t*)&audioFormat, 2);
    file.write((uint8_t*)&channels, 2);
    file.write((uint8_t*)&sampleRate, 4);
    file.write((uint8_t*)&byteRate, 4);
    file.write((uint8_t*)&blockAlign, 2);
    file.write((uint8_t*)&bitDepth, 2);
    file.write((const uint8_t*)"data", 4);
    uint32_t subchunk2Size = RECORD_DURATION * byteRate;
    file.write((uint8_t*)&subchunk2Size, 4);
}
There's a lot going on there, but the summary is that the function is saving important information about the audio file that is being created, such as the sample rate and bit depth that were defined at the top of the program, file size, chunk size, PCM audio format, number of channels, and other things that an audio player would use to know how to play back the file.
Back to the recordAudio() function, it's time to do the actual recording. The rest of this code will figure out how many samples to take, read that much data off of the analog pin being used by audio, then write it to the new tmp.wav file.
int numSamples = SAMPLE_RATE * RECORD_DURATION;

    for (int i = 0; i < numSamples; i++) {
        int rawValue = analogRead(AUDIO_PIN);
        int16_t sample = map(rawValue, 0, 4095, -32768, 32767);
        audioFile.write((uint8_t*)&sample, 2);
        delayMicroseconds(1000000 / SAMPLE_RATE);
    }

    audioFile.close();
    Serial.println("Audio recorded to /tmp.wav");
}
At this point you should have a two second wav file saved on the SD card. If you're following along, you can pop the SD card out of your device and plug it into a computer to listen to the file. You'll notice it sounds very high pitched and faster than the full recorded 2 seconds, but that has to do with some messing around with sample rate and other configurations to try and keep the file as small as possible - for example, the audio file that I recorded comes out to about 33KB.
Converting the Audio Recording to a Base64 String
The next step is to turn this new wav file into a base64 string that can be sent as an item to the Gemini API. Because of memory limitations, I am reopening the recorded audio file, converting it, and saving the base64 string into a new txt file independently of other steps. It's a little more 'hacky' than I'd like, but when you're working with small devices, sometimes stuff just gets messy and that's OK!
This section will start with a new function called saveAudioString(). Similar to recordAudio(), I like to delete any old files that I'm going to be rewriting. After deleting any leftovers, I open the previously saved audio file, allocate more memory for the conversion, and call a new function called base64Encode to convert that audio file into a base64 string.
void saveAudioString() {
    File audioFile = SD.open("/tmp.wav", FILE_READ);
    if (!audioFile) {
        Serial.println("Failed to open audio file for reading");
        return;
    }

    size_t fileSize = audioFile.size();
    uint8_t* audioData = (uint8_t*)malloc(fileSize);
    if (audioData == NULL) {
        Serial.println("Failed to allocate memory for audio data");
        audioFile.close();
        return;
    }

    audioFile.read(audioData, fileSize);
    audioFile.close();

    String base64AudioData = base64Encode(audioData, fileSize);
    free(audioData);
As for my base64 encoding function, I tried a couple libraries and, honestly, got frustrated with trying to get them to work, so I ended up pasting my code into Google AI Studio and asking it to write a quick function to convert my audio file to a base64 string. After a few seconds it popped out this function that works like a charm and I didn't have to spend a ton of time trying to reinvent the wheel:
String base64Encode(const uint8_t* data, size_t length) {
    const char* b64_alphabet = "ABCDEFGHIJKLMNOPQRSTUVWXYZabcdefghijklmnopqrstuvwxyz0123456789+/";
    String encodedString = "";
    uint32_t i = 0;
    uint8_t b1, b2, b3;

    while (i < length) {
        b1 = data[i++];
        encodedString += b64_alphabet[b1 >> 2];
        if (i < length) {
            b2 = data[i++];
            encodedString += b64_alphabet[((b1 & 0x03) << 4) | (b2 >> 4)];
        } else {
            encodedString += b64_alphabet[(b1 & 0x03) << 4];
            encodedString += "==";
            break;
        }

        if (i < length) {
            b3 = data[i++];
            encodedString += b64_alphabet[((b2 & 0x0F) << 2) | (b3 >> 6)];
            encodedString += b64_alphabet[b3 & 0x3F];
        } else {
            encodedString += b64_alphabet[(b2 & 0x0F) << 2];
            encodedString += '=';
            break;
        }
    }

    return encodedString;
}
Back to saveAudioString(), the last step is to write that new base64 encoded audio string to a file for referencing in the next step. If you take the SD card and insert it into a computer, you can see the actual string saved in this text file. It's worth noting that the base64 format string is larger than the actual audio file - around 45kb in my case for a 33kb audio file.
File stringFile = SD.open("/audiostring.txt", FILE_WRITE);

    if (!stringFile) {
        Serial.println("Failed to open audiostring.txt for writing");
        return;
    }

    stringFile.print(base64AudioData);
    stringFile.close();

    Serial.println("Audio base64 string saved to /audiostring.txt");
}
Creating an Audio JSON Request for Gemini
Alright, now that we have our audio file recorded and saved in text format, it's time to create a new Gemini request in JSON format. This is what the request will look like:
{
  "contents": [{
    "parts":[
      {"text": "Provide a transcript of this audio clip. Only include words said in the audio."},
      {"inline_data": {
        "mime_type": "audio/x-wav",
        "data": "Base64String"
      }}
    ]
  }]
}
While I'm leaving an instruction in the request ("Only include words said in the audio"), you can also update this to use a system_instruction node, but that's something I'll discuss in a later project.
Creating the request is pretty straightforward, with the only "difficult" part being opening the saved text file to extract the base64 string, then saving the whole request as JSON file on the SD card, so I'm just going to include the entire code block here. The most important part is the inline_data block, as this will be where your audio data lives and is what can be referenced by the text block when making requests from the Gemini API backend.
void createAudioJsonRequest() {
  if (SD.exists("/request-tmp.json")) {
    if (SD.remove("/request-tmp.json")) {
      Serial.println("Previous request file deleted.");
    } else {
      Serial.println("Failed to delete previous request file.");
      return;
    }
  } else {
    Serial.println("No previous request file detected, starting new");
  }

  File stringFile = SD.open("/audiostring.txt", FILE_READ);
  if (!stringFile) {
    Serial.println("Failed to open audiostring.txt for reading");
    return;
  }

  // Read the base64 encoded audio data from the file
  String base64EncodedData = stringFile.readString();
  stringFile.close();

  // Create the JSON document
  const size_t jsonBufferSize = 1024 * 48; // Adjust as needed
  DynamicJsonDocument doc(jsonBufferSize);
  JsonArray contents = doc.createNestedArray("contents");
  JsonObject content = contents.createNestedObject();
  JsonArray parts = content.createNestedArray("parts");

  JsonObject textPart = parts.createNestedObject();
  textPart["text"] = "Provide a transcript of this audio clip. Only include words said in the audio.";

  JsonObject audioPart = parts.createNestedObject();
  JsonObject inlineData = audioPart.createNestedObject("inline_data");
  inlineData["mime_type"] = "audio/x-wav";

  inlineData["data"] = base64EncodedData; // Use the data read from the file

  // Open a file on the SD card for writing the JSON request
  File jsonFile = SD.open("/request-tmp.json", FILE_WRITE);
  if (!jsonFile) {
    Serial.println("Failed to open JSON file for writing");
    return;
  }

  // Serialize the JSON document to the file
  serializeJson(doc, jsonFile);
  jsonFile.close();

  Serial.println("JSON request saved to /request-tmp.json");
}
Bringing it all together
Now that you've gone through multiple steps to save audio in the right spots and format, it's time to dosomething with all of it. I've created a new function called transcribeAudio() that will take the new JSON request and POST it to the Gemini API, then print out the response text to the serial monitor. If you want a more detailed description of this, please see the last tutorial I wrote that covers connecting an IoT board to the Gemini API.
void transcribeAudio() {
  WiFiClientSecure client;
  client.setInsecure();
  HTTPClient http;

  if (http.begin(client, "https://generativelanguage.googleapis.com/v1beta/models/gemini-2.0-flash:generateContent?key=" + API_KEY)) {
    http.addHeader("Content-Type", "application/json");

    File file = SD.open("/request-tmp.json", FILE_READ);
    if (!file) {
      Serial.println("Failed to open file for reading from SD card");
      return;
    }

    const int BUFFER_SIZE = 64;
    uint8_t fileBuffer[BUFFER_SIZE];

    const int JSON_STRING_SIZE = 65536; // Allocate 64kb for the audio file request. Likely smaller than this.
    char *jsonString = (char *)malloc(JSON_STRING_SIZE);
    if (jsonString == NULL) {
      Serial.println("Failed to allocate memory for JSON string");
      file.close();
      return;
    }
    int jsonStringIndex = 0;

    while (file.available()) {
      int bytesRead = file.read(fileBuffer, BUFFER_SIZE);
      for (int i = 0; i < bytesRead && jsonStringIndex < JSON_STRING_SIZE - 1; i++) {
        jsonString[jsonStringIndex++] = fileBuffer[i];
      }
    }
    jsonString[jsonStringIndex] = '\0';

    file.close();

    // Serial.println(jsonString);
    int httpCode = http.POST(jsonString);
    free(jsonString);
    Serial.print(F("Http code: "));
    Serial.println(httpCode);

    if (httpCode == HTTP_CODE_OK) {
      String payload = http.getString();

      DynamicJsonDocument doc(1024);
      deserializeJson(doc, payload);

      String responseText = doc["candidates"][0]["content"]["parts"][0]["text"];

      Serial.print("Response: ");
      Serial.println(responseText);
    }
  }
}
And for the last step you'll simply want to kick off each of these functions in order so that you can record audio, convert it to base64, create your request, and then transcribe whatever was said. I'm using a button to start it and lighting up an LED to indicate when recording is happening, but you can get creative here to add audio speech to text to your IoT devices.
void loop() {
  if (digitalRead(BUTTON_PIN) == LOW) {
    digitalWrite(LED_PIN, HIGH);

    delay(500);

    recordAudio();
    digitalWrite(LED_PIN, LOW);
    saveAudioString();
    createAudioJsonRequest();
    transcribeAudio();
  }
}
Conclusion
In this tutorial you learned how to use an ESP32 to record speech through a microphone, work with an SD card for writing and retrieving audio and text files, and send audio to the Google Gemini API to transcribe it, though you could also use the same techniques to translate between languages, classify sounds, or any number of other things using audio and AI.
If you expand on this project, please leave a comment around what you did, how it works, and help the community do even more cool things. Some quick suggestions from my side would be better memory management (something I'm admittedly not the most familiar with) and using on-device storage rather than bringing in an SD card.
In the next tutorial I will use everything discussed here to add in functioncalling with the Google Gemini API, that way a user could say something like "It's dark in here" to turn on lights, or "Open the pod bay doors, please" and, well, maybe have something actually happen this time :)
Update 2/28/25: Fixed bug where I forgot to call free on the jsonString that gets POSTed. Also realized I was closing the SD card any time I was done making a request, but not reopening it for subsequent audio recordings.


Comments