


Hardware components | ||||||
_ztBMuBhMHo.jpg?auto=compress%2Cformat&w=48&h=48&fit=fill&bg=ffffff) |
| × | 1 | |||
 |
| × | 1 | |||
 |
| × | 1 | |||
Software apps and online services | ||||||
 |
| |||||
Hand tools and fabrication machines | ||||||
 |
| |||||
In India, traffic is getting a higher and higher terribly. At peak hours you can't even think for a ride. The Commute Indicator presented here will monitor traffic and time distance between the destinations using Google API Integration. The Indication will be done on Sparkfun Neopixel LEDs. If LED is green, it means your are ready to go and the traffic will be displayed as Green>Yellow>Red. You can keep this device in your car and monitor traffic on the go as it has inbuilt wifi and it is also easy to power. You can also hang it on Home Wall to see traffic on your road. It can also keep you tracked on the go. It will be updated in certain time limit such as 5 minutes.
ESP8266 has inbuilt wifi so we can turn on router at home and get updates and in car we have to turn on our mobile hotspots.
To build a commute indicator we will run python program to integrate with the google maps matrix API and create an indication with the help of Sparkfun Niopixel Strip of LEDs.
If LEDs Go Green it means you are ready for smooth Ride. If it goes yellow, it means moderate traffic. If turns red it will be bad traffic outside. It will be updated in certain time limit.
ESP8266 will need Sparkfun Logic Level Converter. I will use Arduino Uno to talk with 3.3V Sparkfun ESP8266.
It will be enclosed in nice box and then you can hang it on wall of home to monitor your road traffic or hang it in car.
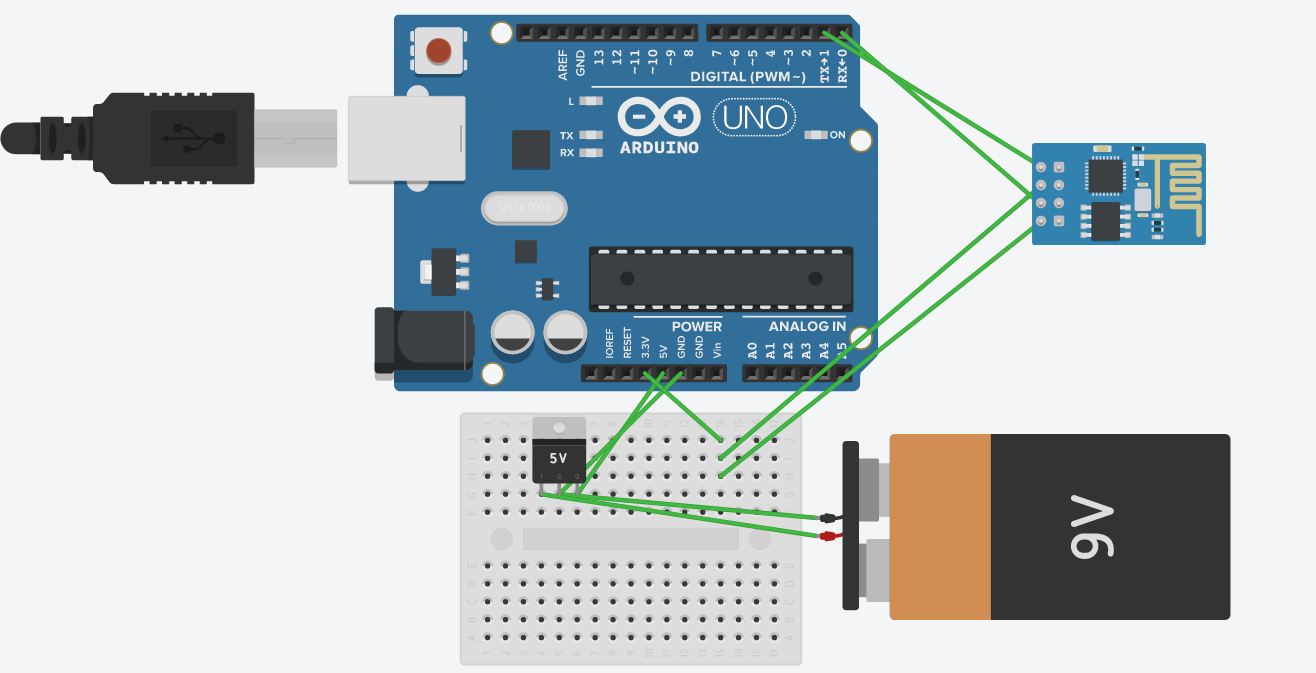
Step 1: Power SupplyHere we will use 9v Battery for power supply. We will need 7805 Voltage Regulator IC to get 9V. Then from 7805 IC, feed it to arduino.
Step 2: Connecting ESP266 and powering itConnect the Arduino’s 3v3 (3.3V) output to ESP8266. The ESP8266 works with 3.3V and not 5V, so this is necessary.
Step 3: Connect RX and TXConnect the RXD pin of the Arduino to the RX pin of the ESP8266.Connect the TXD pin of the Arduino to the TX pin of the ESP. When we want two things to talk to each other over serial, we connect the TX pin of one to the RX of the other (send goes to receive and the opposite). Here we do not have the Arduino talk to the ESP8266 though, our computer is talking to it via the Arduino.
Step 4: GND and RSTConnect the RES or RESET pin, When you ground the reset pin, the Arduino works as a dumb USB to serial connector, which is what we want to talk to the ESP8266.
Step 5: Setting Board
- Connect to that network.
- In your browser go to http://arduino.local or if that doesn't work try 192.168.240.1
- This should pull up the uno's setup page, the default password is "arduino"
- Click configure, set a new password.
- Under the wireless parameters find your home network and enter in the network details. Finally click "Configure and Restart"
- At this point if all goes well the Arduino will automatically switch to station mode and connect to your network. To make sure it is connected wait a couple minutes then go back to your browser and enter http://arduino.localand it should bring up the same login screen. If it doesn't then it most likely didn't connect correctly. If this happens press and hold the wifi rst button on the uno esp for over 5 sec and it will kick back into AP mode.
- Now you are connected to the internet and ready to start coding!
First you will need to get a key from Google in order to access their google maps API. In order to do this you will need to create a project, enable the API, and get a key. It is pretty straight forward once you are there and click around a bit:https://developers.google.com/maps/documentation/d...
We will specifically be using the Distance Matrix API to determine the current travel times. We are specifically going to be looking to capture the duration_in_traffic value. If you are unfamiliar with assembling the URL for the request I highly suggest downloading a software called Postmanhttps://www.getpostman.com/ with will allow you to copy over one the examples from this page: https://developers.google.com/maps/documentation/d... run it with your key, and change parameters until you get the correct response. This software also gives you a chance to quickly see what google returns.
Here is an example of the url I am using for my request (add your key to this):
<p><a href="https://maps.googleapis.com/m" rel="nofollow">https://maps.googleapis.com/m</a>aps/api/distancematrix/json?units=imperial&origins=10+1st+St+Austin+Texas+7874&destinations=20+University+Pkwy+Round+Rock+Texas+78681&traffic_model=best_guess&key="ADD YOUR KEY HERE, DELETE THE QUOTES"&departure_time=now</p>
So now we need to put this into a python function that we will run on the Linux portion of the UNO. This part is actually very simple because this type of API call requires no authorization.
import urllib2<br>import json import sys response = urllib2.urlopen('ADD THE URL FROM ABOVE HERE WITH YOUR PARAMETERS AND KEY') data = json.load(response) ttime = data['rows'][0]['elements'][0]['duration_in_traffic']['value'] print (ttime) sys.exit()
Now you need to get this python file uploaded into the UNO. The best way to do this on windows is using WinSCP. https://winscp.net/eng/download.php Once you have WinSCP installed, connect to the Yun with SCP protocol, host-name: arduino.local, and port 22. You should be prompted to log in using root and the password you setup prior.
Once logged in navigate to /mnt/sda1/arduino/www/python and then upload your python file to this folder. This assumes that you have an SD card mounted. If not, then you can put the file in a different folder (ex. root) and change the code in the next step to reflect that different path.


Comments