

Hardware components | ||||||
 |
| × | 1 | |||
_ztBMuBhMHo.jpg?auto=compress%2Cformat&w=48&h=48&fit=fill&bg=ffffff) |
| × | 1 | |||
Software apps and online services | ||||||
 |
| |||||
I got a Boltiot module as I was curious to work on cloud and Iot platforms.so did my new little Bolt guy.While checking my phone to see the updates on weather, I found little inconvenient to take out phone while half asleep.Now something reminded me of Bolt and its capabilities.I immediately got an an idea of building simple interactive weather monitor which use simple techniques.I researched and got some information on APIs for weather and other hardware integration services.Finally I made use of Boltiot along with Arduino and some resources extracted from BIN!That means fit for the pocket..
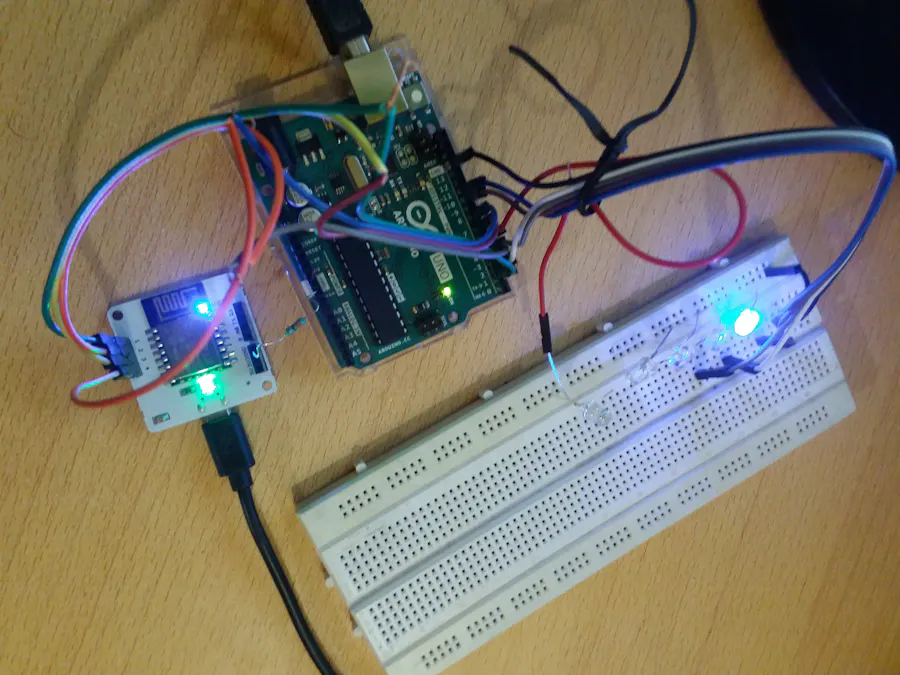
Here's the small glimpse of Smart Bolt Weather Monitor!
It's my first project on Bolt, So expecting a feedback of course!
So let's proceed to workout!
Steps to Build your "Boltduino" Application:
1. Get your Bolt Linked to your Bolt Cloud. and get started with basic usage of GPIO:
Check out Here!
Read the documentation on device carefully and acknowledge the GPIO specs.
Get your unique API key and Device ID.You may write a configuration file for the same to fetch details automatically when you invoke you BOLT device through applicatrions.
2.Get an API and start working on code for interfacing Arduino with Bolt:
I've used Openweather API to fetch Weather information for my Bolt.Register with the API provider and get an API key, Embed it into your Code.In my case I am using Python and Here's how it looks:
url='https://api.openweathermap.org/data/2.5/weather? q='+inputval+'&appid=YOUR APP ID HERE'
json_data=requests.get(url).json()
weather = json_data['weather'][0]['id']
mybolt=Bolt(conf.API_KEY, conf.DEVICE_ID)
The above code requests API provider for piece of information.this is received and processed in Python Code.The Code then produce guides Bolt to change states on GPIO piuns to generate signal for Arduino.
I've Used json format to fetch and process details.More details on using this library is available on python json documentation.
The API will send a json format text as code for each weather(for OpenWeather refer this link).Each unique code for weather condition will be fetched and processed to produce different signals at GPIO(s).
I've used 4 GPIO pins which are configured to send 16 different combinations of signal just like digital.
These signals are fed to Arduino board.Why Arduino?
We've many analog output pins available on Arduino and is best to interface with Bolt in various ways.
Make sure to interface the boards with right pin configurations(output on bolt and input on Arduino) with signal production for designated functions(LED output).
Here's small example how I've Done:
on Bolt:
PINs: STATE:
1 HIGH
2 LOW
3 LOW
4 LOW
This produces something Like signal: "1000" which can be used to identify code for weather by Arduino.In my case it's designed for displaying severe atmospheric weather which arduino recognises and displays fast blinking Amber LED.
You may also use Analog pin on Bolt to transmit signal with specific value to Arduino which could save lot of pins from being used for signal transmission.
ALWAYS MAKE SURE TO CONNECT GND(BOLT) TO GND(ARDUINO) possibly with resistor.
Now Code Arduino with desired code that initialise and reads Bolt Signals and displays the right information.You may also play with the code with different combinations as well.
My Project functioning:
LEDs (of various analogous colors and Pattern).Here's the pattern and color indicators for different weathers:
Rain:Blue LED of slowly varying brightness.
Light Showers with thunderstorms:Blue LED of Variable brightness(slow) and hard white flashes(analogous to lightning).
Clear weather: Green
Adverse Atmospheric weather(s):hard flash Amber.
Drizzle:slow blue variable brightness.
Thunderstorms with heavy rains:Fast Variable blue brightness with White Flashes
Thunderstorms:Only White Flashes.
Scattered Clouds:Variable White brightness.
Cloudy(others):Fast Variable White brightness.
Snow:White High Continuous
3. Wiring the system:
I've Selected Pins 1,2,3,4 on Bolt for signal output.
on Arduino the signals are received on PINS:
2,4,7,8[DIGITAL]
Output will be only on PWM pins for specific LED color:
PINS: LED :
3 WHITE
5 AMBER
10 GREEN
11 BLUE
The system Doesn't require any computer to control Boards and only works on conventional power supply(for Arduino and Bolt wifi module).It's Easy to build. and cost effective too.Best of Bolt and Arduino..
Hardware Used:
Arduino UNO R3, Bolt Wifi Module, Resistor, jumper wires(Mostly male to male if using breadboard kind), Breadboard(optional), LEDs of various Color.
Downloads Required:
Arduino IDE, Bolt App, Python and its libraries(PIP sometimes, Bolt)
Signals can also be handled with CAN-bus [ARDUINO LIBRARY] system which requires lot of research but innovative!
All the best!
Mean While Bolt is Excellent Device to learn and Implement!
Take a look at my Codes on this link: https://github.com/PannagSDesai/WeatherMonitoring


Comments