

Hardware components | ||||||
 |
| × | 3 | |||
 |
| × | 1 | |||
Software apps and online services | ||||||
 |
| |||||
Hand tools and fabrication machines | ||||||
 |
| |||||
| ||||||
 |
| |||||
 |
| |||||
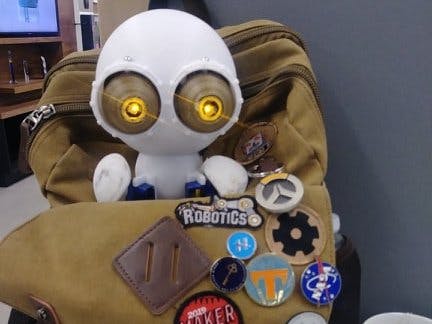
Hey, it's me again - your favorite Oddity Jay! As you know, I am constantly trying new designs out, making more robots is super fun. When I tried printing a face plate for a new robot design, the supports left these round support bases around the eyes. I thought they where cute so I re-printed it with a round structure around the eyes, thus began the journey of Prometheus. I had only one original goal with Prometheus and that were the eyes. I was so used to using LED matrices as eyes that I wanted to make some analog like eyes that showed expression and life just as the digital matrix eyes do. I think it was a success. (Note, this is MK2. The original, MK1, had a few design/wiring issues which led to it eventually breaking.)
AssemblyI tried to make the assembly as simple as possible. There are 8X printed parts in total. The biggest and longest is the front body (took me 13 hours on my Creality CR-10). I recommend having a print day, where you can wake up early and start the print and watch it to make sure it does not fail (babysitting). All in all, you should print the front plate and the eyes first and foremost, that way you can get to work as the back plate and they back head plate print.
The eyes are a simple. I printed them with the eye hole facing the build plate. Once it's printed, just clean off all supports and do a test fit inside the eye wholes of the face plate. I got some clear acrylic, glued the LED to the clear acrylic, and stuck it inside the eye whole to have a light up effect. I used sew-able LEDs from Adafruit, since that was all I had to spare. Once you have that set up, I recommend printing out the connector. It's a small piece that connect the eyes together with a small screw, as seen here. Keep them connected, you will need it for the next part.
Sorry, but this is the part where things become a bit prototypie (not a real word). Since this was my first time using such eyes, I was not 100% sure where to place them so I put them in the head while they where attached to see how far they needed to sit. Once you think they are in a perfect place, I used a Dremel to make a small whole in the eye plates, then using a long screw to keep them in place. Make sure they sit back enough and able to swivel back and forth mimicking looking back and forth.
I hot glue the first servo, on the inside of the front plate (I know hot glue is not preferred but hey I had limited resources. once the glue sets I used a servo round arm and a straight servo arm as seen here. Using a small screw to attach them, I recommend using a simple sweep servo code to test the eye movement. if it looks good.
The legs are simple. There are places on the front place, to hold the leg servos, just attach them using whatever you prefer I used the screws that came with the servos. I added the servo attachment to the leg prints, so they should fit without a problem. Of course, I recommend testing the servos using the sweep servo code just to make sure theye are moving in a way you like.
Print the last two parts the back of the head and the back of the body. I designed the back of the body to have a belt loop like attachment just because since promethous head is very large it makes him very top heavy so you more or less wear him in front of you, with a strap as seen here. (I also added a little armature wire to hold the head a bit better, made two little holes use a Dremel.)
The back of the head is HUGE, but useful I added extra space so you could add the circuit in wires back there.
I used a Trinket Pro to get this up and running with a simple random servo code to give it life.
And that's about it for now! This is just MK2. I do plan to get to MK3 eventually, adding sensors for the eyes, LEDs, and maybe a speaker! Who knows, perhaps the person reading this will make their own upgrades for Promethous? Anywho, hope you enjoyed this tutorial. This is jay saying, "How's that robot coming?"


Comments