Gabriele Scordamaglia
Published © GPL3+

Start/Stop Chronometer

That's a two-module chronometer for your MTB (or any others sports) to measure your time in a determined circuit!

IntermediateShowcase (no instructions)1 hour12,143
Start/Stop Chronometer

Things used in this project

Story

Read more

Schematics

Start/RX

Make sure to wire everything as you see, 'cause the nRF24L01 needs to be wired in a certain way! I recommend you to check the label with the appropriate wiring for your board and library that i uploaded in the photos, so you can enjoy your chronometer at its fullest.

Stop/TX

As i already said, make sure that you follow the wiring label so you won't have any errors.

Code

Code for the Start/RX

C/C++
This code will make the timer start when you pass in front of the UltraSonic Sensor.
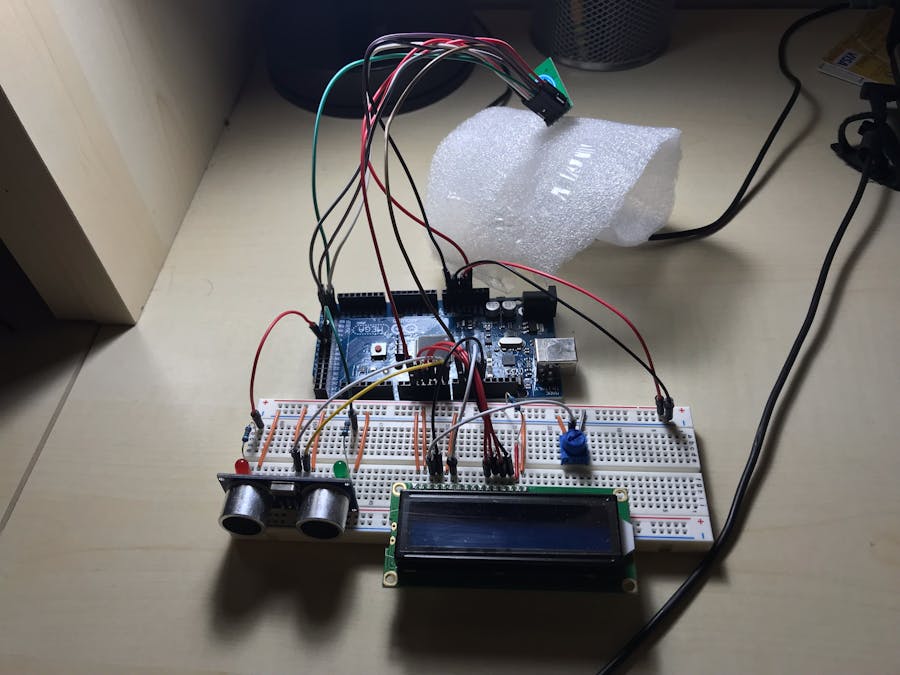
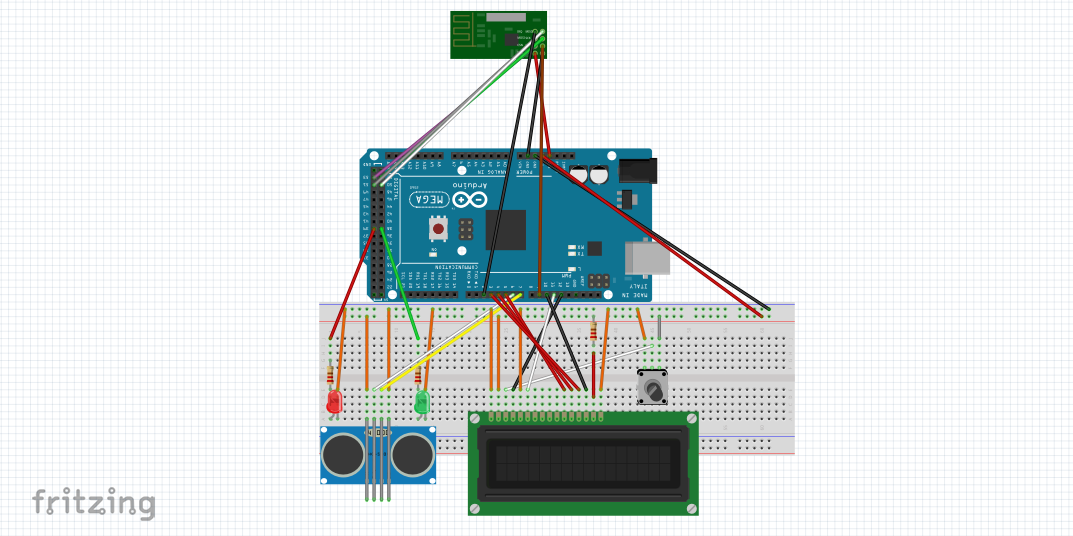
#include <LiquidCrystal.h>
#include <SPI.h>
#include <nRF24L01.h>
#include <RF24.h>

#define CE_PIN 9
#define CSN_PIN 53

LiquidCrystal lcd(12, 11, 5, 4, 3, 10);

int trigPin = 6;
int echoPin = 7;
int greenLed = 38;
int redLed = 39;
int m;
int s;
int dc;
const byte thisSlaveAddress[5] = {'R','x','A','A','A'};

RF24 radio(CE_PIN, CSN_PIN);

char dataReceived[10];
bool newData = false;

void setup() {
  lcd.begin(16, 2);
  pinMode(trigPin, OUTPUT); 
  pinMode(echoPin, INPUT); 
  pinMode(redLed, OUTPUT);
  pinMode(greenLed, OUTPUT);
  digitalWrite(greenLed, LOW);
  pinMode(53, OUTPUT);
  Serial.begin(9600);
  Serial.println("SimpleRx Starting");
  radio.begin();
  radio.setDataRate( RF24_250KBPS );
  radio.openReadingPipe(1, thisSlaveAddress);
  radio.startListening();
}

void loop() {
  int duration;
  int distance;
  digitalWrite(redLed, HIGH);
  digitalWrite(trigPin, HIGH);
  delay(1);
  digitalWrite(trigPin, LOW);
  duration = pulseIn(echoPin, HIGH);
  distance = (duration/2) / 29.1;
  if (distance <= 100 && distance >= 0) {
    digitalWrite(greenLed, HIGH);
    while (digitalRead(greenLed) == HIGH) {
    tempo();
    getData();
    showData();
  }
}
}

void tempo() {

  
  lcd.setCursor(0,1);
  dc = dc + 1;
  lcd.print(m);
  lcd.print(":");
  lcd.print(s);
  lcd.print(".");
  lcd.print(dc);
  delay(100);
  

  if (dc == 9) {
  dc = 0;
  s = s + 1;
  }
  
  if (s == 60) {
  s = 0;
  m = m + 1;
  }
}

void getData() {
    if ( radio.available() ) {
        radio.read( &dataReceived, sizeof(dataReceived) );
        newData = true;
    }
}

void showData() {
    if (newData == true) {
        Serial.print("Data received ");
        Serial.println(dataReceived);
        digitalWrite(ledVerde, LOW);
        newData = false;
    }
}

Code for the Stop/TX

C/C++
This code will make the green led on the arrive turn on, making the timer stop and the first green led turn off.
#include <SPI.h>
#include <nRF24L01.h>
#include <RF24.h>

#define CE_PIN 9
#define CSN_PIN 10

int trigPin = 3;
int echoPin = 4;
int ledVerde = 5;
char dataToSend[10] = "Message 0";
char txNum = '0';

RF24 radio(CE_PIN, CSN_PIN);

const byte slaveAddress[5] = {'R','x','A','A','A'};

void setup() {
  Serial.begin(9600);
  Serial.println("SimpleTx Starting");
  pinMode(trigPin, OUTPUT); 
  pinMode(echoPin, INPUT);
  pinMode(greenLed, OUTPUT);
  digitalWrite(greenLed, LOW);
  radio.begin();
  radio.setDataRate( RF24_250KBPS );
  radio.setRetries(3,5); // delay, count
  radio.openWritingPipe(slaveAddress);
}

void loop() {
  int duration;
  int distance;
  digitalWrite(greenLed, LOW);
  digitalWrite(trigPin, HIGH);
  delay(1);
  digitalWrite(trigPin, LOW);
  duration = pulseIn(echoPin, HIGH);
  distance = (duration/2) / 29.1;
  if (distance <= 100 && distance >= 0) {
    digitalWrite(greenLed, HIGH);
    while (digitalRead (greenLed == HIGH)) {
    send();
 }
}
}

void send() {

    bool rslt;
    rslt = radio.write( &dataToSend, sizeof(dataToSend) );
        // Always use sizeof() as it gives the size as the number of bytes.
        // For example if dataToSend was an int sizeof() would correctly return 2

    Serial.print("Data Sent ");
    Serial.print(dataToSend);
    if (rslt) {
        Serial.println("  Acknowledge received");
        updateMessage();
    }
    else {
        Serial.println("  Tx failed");
    }
}

void updateMessage() {
        // so you can see that new data is being sent
    txNum += 1;
    if (txNum > '9') {
        txNum = '0';
    }
    dataToSend[8] = txNum;
}

Credits

Gabriele Scordamaglia

Gabriele Scordamaglia

6 projects • 42 followers
23 YO, Automation Engineering student in Italy.

Comments