


Hardware components | ||||||
| × | 1 | ||||
| × | 1 | ||||
| × | 1 | ||||
| × | 1 | ||||
| × | 1 | ||||
Hand tools and fabrication machines | ||||||
 |
| |||||
I love tinkering with the Raspberry Pi Pico, since it is an easy starting point for anyone that wants to get into microcontrollers. I want to guide you how you can create your own MIDI controller or MacroPad. If you are a musician and in need of a cheap but awesome looking MIDI pad then this project for you, or if you are just someone who is in need of a new MacroPad but you don't want to buy the generic cherry mx keys kits but would prefer some classic arcade buttons then you are in luck, because we can set the Raspberry Pi Pico to do either of those two functions.
If you are not sure what a MIDI controller or MacroPad is, let me break it down for you:
MIDI controller:
A MIDI controller is a simple way to sequence music and play virtual instruments on your Mac or PC. It works by sending MIDI data (Musical Instrument Digital Interface) to a computer or synthesizer, which then interprets the signal and spits out a sound.
MacroPad:
A macro pad can give you plenty of buttons for your macros. And, with most pads coming with some form of software for recording macros, program-specific actions can also be performed, usually called “shortcuts.” Shortcuts can do a variety of power things like launch programs, turn on and off your microphone, and more.
Enclosure DesignThe enclosure was designed in Fusion360. The reason for choosing this software is that it is free to use with a hobbyist license. I have included all the files that you will need to cut. If not possible to cut the enclosure out of wood, alternatively 3D print or create your own enclosure from different materials.
The enclosure is very simple design which consist of the top base to house the buttons and spacers to bottom base where you will have your Raspberry Pi Pico secured.
I have included all the steps in GIFS for you to follow along but in short.
- Make a square 220*220 mm
- Create a 30 diameter circle 42.5mm from the bottom and corner.
- Now duplicate this circle using the Rectangular Pattern function, setting the Distance Type -> Spacing. Set the quantity to 4 and distance 45 do to for the +x and +y direction.
- Using the fillet tool round the edges with a 30mm radius.
- Final step is to create holes for spacers from the outer corner circle add a 3mm hole a distance of 30 mm away from the circle center.
Now all that is left to do is either extrude and 3D print the enclosure or save the file to.dxf and use a laser cutter. The alternative will be to print this and stick on wood and cut out using power tools.
To give the enclosure a great looking finish I used some black spray-paint and give it 1-2 coats.
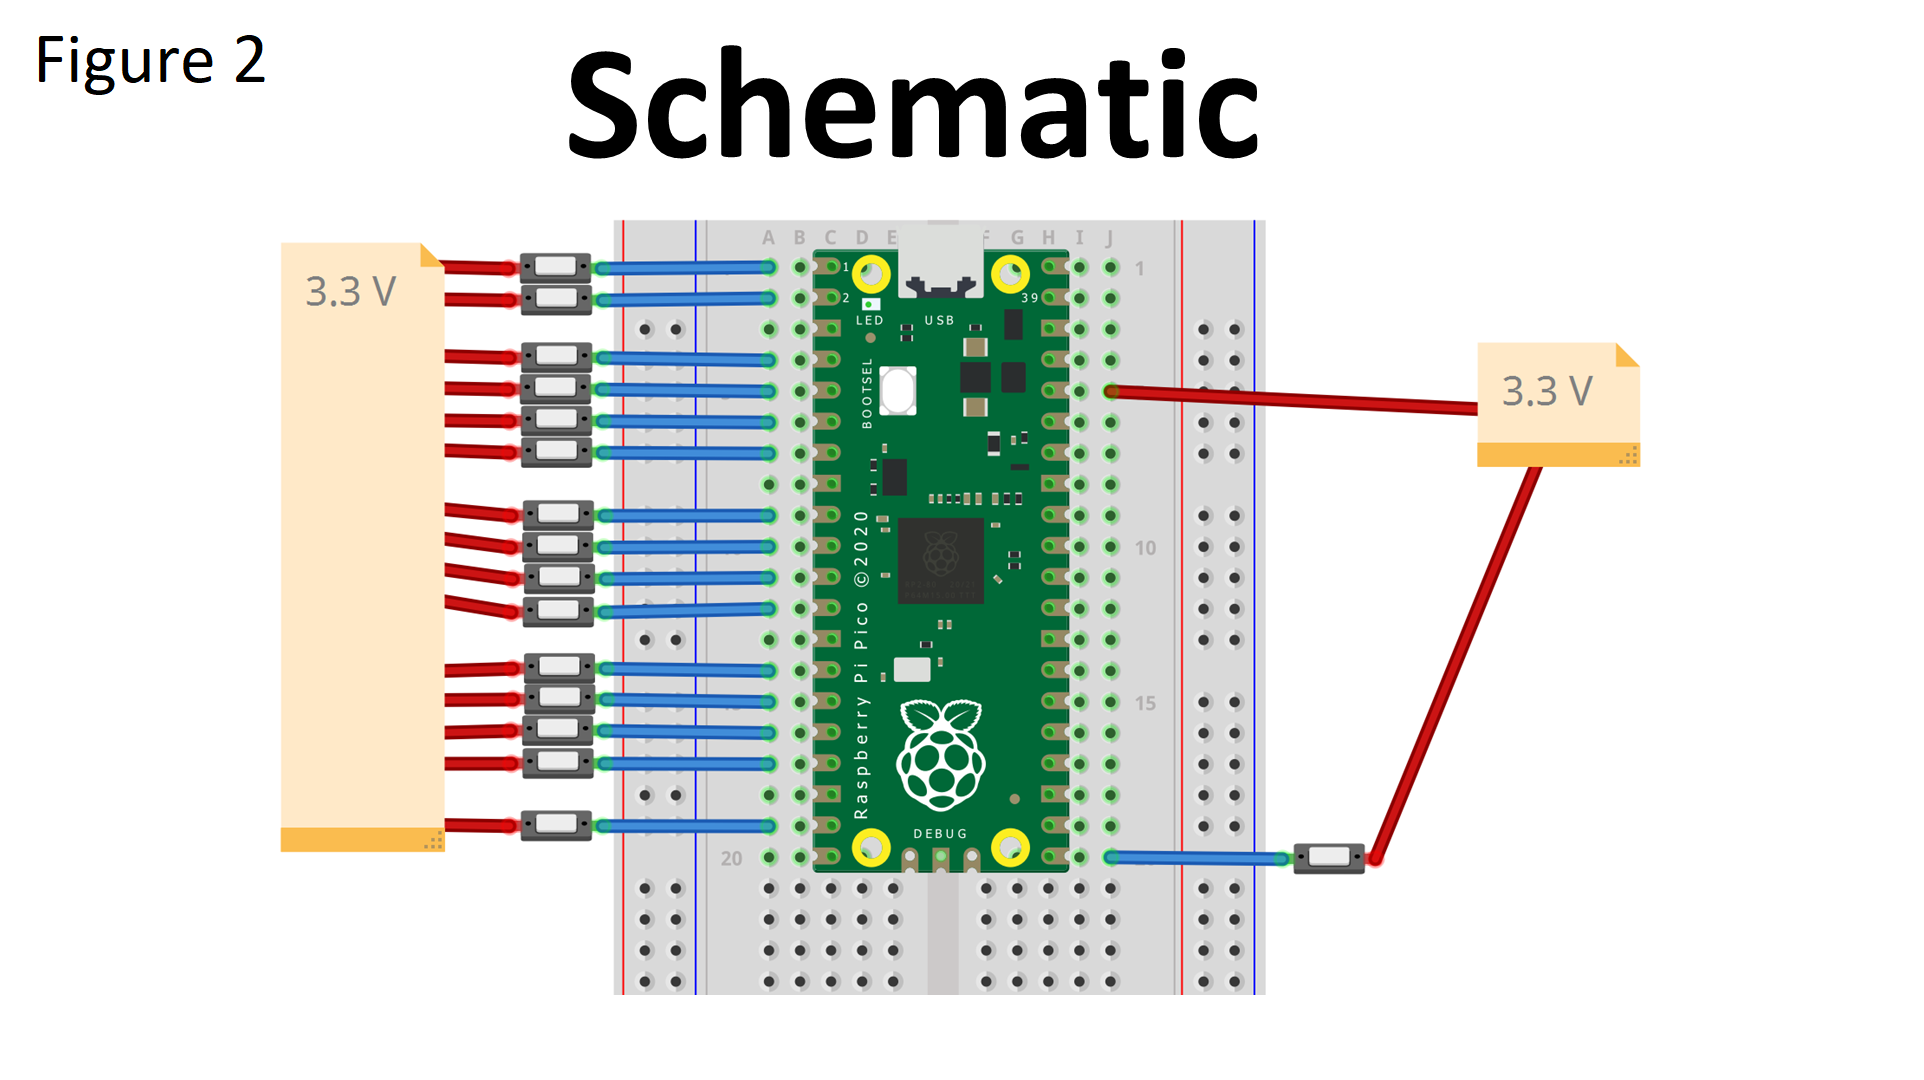
Step 2: Raspberry Pi Pico + WiringLet's first look at the Raspberry Pi Pico. The Pico has 26 are multipurpose GPIOs (general-purpose input/output) which for our application is perfect since we only need 16 inputs. The pinout of the Pico is given in Figure 1. We can use any GPIO pins to connect the arcade buttons, and I have included the connections I have made shown in the schematic diagram Figure 2. I decided to use the breadboard to make to process easier, and will on a later stage make a PCB to making things easier.
One side of the arcade buttons will be connected to the 3.3V power by the Pico's 3V3 output on pin 36. Using the 20 AWG wire it was stripped clean of insulation and then connected to one pin of the buttons where after the connections was made proper by soldering the wire to the pin to make good connection.
The rest of the arcade buttons we will use Male-Female jumper wires and cut of the plug end and solder them to the remaining pin for each of the 16 buttons. We now can connect it to the Pico as indicated in the schematic.
We will test for a HIGH input from our arcade buttons. The buttons will be pulled down to ground by internal pull-down resistors and be LOW, and when a button is pressed the 3V3 will be detected by the pin and set to HIGH and trigger an event.
FL StudioI decided to use FL studio to test the MIDI controller. There are many alternatives DAW's available that you can use. To setup the MIDI controller for a drum pad is straight forward. In FL Studio click on OPTIONS go to MIDI settings. CircuitPython will be shown as an Input and Output. Make all the necessary settings as indicated in the Figure above.
To setup the MIDI as a drum pad search FPC and click on the arrow pointing downwards. You will now have the option to Map notes for entire bank, where you can go from bottom left to right move a row upwards and go from right to left and repeat until you reach the first button.


Comments