


Hardware components | ||||||
| × | 1 | ||||
| × | 2 | ||||
| × | 1 | ||||
| × | 1 | ||||
| × | 1 | ||||
| × | 1 | ||||
| × | 1 | ||||
Software apps and online services | ||||||
| ||||||
| ||||||
Hand tools and fabrication machines | ||||||
| ||||||
 |
| |||||
The call of the wild is always exciting, but it also comes with challenges – like needing the right gear to make the outdoors more comfortable. That’s exactly why I built Pocket Glow, a cute, pocket-friendly gadget that fits right in your palm but delivers features you’d normally expect from something much bigger. Compact, stylish, and practical – it’s the perfect little companion for outdoor adventures and everyday life.
Pocket Glow offers three soothing light modes – Cool White, Warm White, and Natural White – using a clever combination of two 12V LED strips. With just one device, you can switch between a bright white for focus, a warm glow for comfort, or a natural tone for daily use.
Inside, it’s powered by a 2500mAh rechargeable battery paired with a 2A fast-charging power bank module. That means you can light up your surroundings and charge your devices on the go – whether you’re camping under the stars, traveling, or just relaxing at home.
But Pocket Glow isn’t only for the outdoors – it’s a multi-purpose tool. Use it while cooking, studying, shooting videos, or as a handy backup light for emergencies. Wherever you are, it’s always ready to shine.
SuppliesTo start this project, I designed the Pocket Glow CAD using Fusion 360. It’s a simple and compact design that’s easy to print and assemble.
For 3D Printing, You can directly download the required STL files below:
- Housing.stl
- Cover.stl
- Diffuser.stl
For 3D printing, I Recommend PCBWay, a professional 3D printing service known for its high precision, affordable pricing, and wide range of material choices. They support advanced technologies like SLA, SLS, MJF, and FDM, delivering smooth and durable parts that are ideal for both prototypes and final builds.
One of the best things about PCBWay 3D printing is their fast turnaround time and reliable worldwide shipping, making it super convenient for hobbyists, students, and professionals alike. Whether you’re just getting started or working on a serious engineering project, PCBWay is a great choice.
This September, PCBWay is offering TPU (FDM) 3D printing from just $7.96, up to 80% off! TPU is the perfect material for flexible yet durable parts. With PCBWay’s professional-grade 3D printing, high precision, smooth finish, and reliable global shipping, you can bring your flexible ideas to life at the best price. Bigger weight, bigger discount – limited time only, Sept 1–30!
👉 Use the link to get an exclusive discount on your first 3D printing order from PCBWay
Step 2: Strip Light AssemblyBegin by preparing the 3D-printed cover for the strip light installation. First, measure the length of the cover and cut both the cool white and warm white LED strips to the required size. Once the strips are ready, peel off the adhesive backing and carefully press them onto the cover. For a more balanced and natural lighting effect, I arranged the strips alternately—starting with cool white, then warm white, followed again by cool white and warm white. This alternating pattern helps create an even and pleasant color combination.
Step 3: Switch AssemblyOn the opposite side of the housing, you’ll notice two small holes designed for switches. I used two locking-type push switches here—one to control the cool white LED strip and the other to control the warm white LED strip. To assemble them, simply insert each switch into its slot and apply a very small amount of T-7000 glue to hold them in place. Be careful not to use too much glue, as excess adhesive could damage the switches or make them difficult to operate.
Step 4: Power Bank Module AssemblyThe power bank module I’m using comes with good features, but the module and the USB port are separate, which means they need to be soldered manually. To do this, I cut four short pieces of 28 AWG silicone wire and soldered them between the power bank module and the USB port. Once the soldering was complete, I placed both components into their respective cutouts inside the 3D-printed housing, making sure they were properly aligned for use. To secure them in place, I applied a small amount of T-7000 glue to fix the USB port. The power bank module can normally be fastened with two small screws, but since I didn’t have the right size available, I also used T-7000 glue for this part. After everything was set in position, I left it aside to dry completely.
Step 5: Battery AssemblySince there isn’t a dedicated compartment for the battery, I placed it neatly along the side of the housing. To secure it, I first used double-sided tape to hold the battery in position, then applied a thin layer of T-7000 glue for extra strength. After fixing it in place, I left it to dry completely for better results.
Step 6: Buck Booster Module AssemblyJust like the battery, there isn’t a dedicated compartment for the XL6009 step-up buck booster module. To assemble it, I placed the module in an empty space inside the housing and applied a small amount of T-7000 glue to secure it. This keeps the module firmly in place without taking up much space.
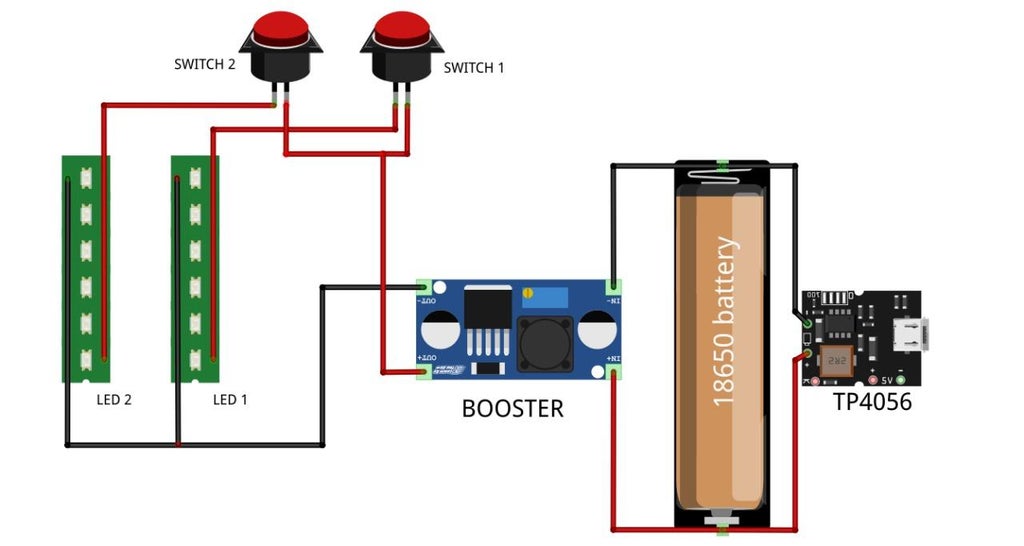
Step 7: ConnectionNow it’s time to wire everything together. The 18650 battery is first connected to the TP4056 charging module (stands for power bank module) —positive to B+ and negative to B-. From the TP4056, the battery also connects to the input of the XL6009 buck booster module, with the positive lead going to IN+ and the negative lead to IN-.
The output of the booster module (OUT+ and OUT-) is then used to power the LED strips. To control them individually, I added two locking-type push switches. Switch 1 is wired in series with the first LED strip, while Switch 2 is wired in series with the second LED strip. Both switches take their power from the booster’s positive output, and the negative lines of both LED strips are connected back to the booster’s negative output. The booster ensures they always receive a stable voltage from the 18650 battery.
Step 8: Cover AssemblyAfter completing all the connections, double-check everything carefully to make sure the wiring is correct and secure. Once you’re confident that everything is in place, position the cover over the housing. Normally, the cover can be fixed using four small screws, which ensures a solid and removable fit. However, since I didn’t have the screws available, I used T-7000 glue as an alternative to secure the cover firmly in place.
Step 9: Diffuser AssemblyWith the cover securely in place, the final step is to assemble the diffuser. The diffuser plays a very important role—it softens and evenly spreads the light from the LED strips, preventing harsh glare and creating a smooth, comfortable glow. Without it, the light would appear too sharp and uneven.
To attach the diffuser, apply a very small amount of super glue along its edges and carefully position it over the housing. Hold it gently for a moment to ensure it sets properly, and allow the glue to dry completely.
Step 10: Full ChargingBefore testing the Pocket Glow, make sure to fully charge the battery. A complete charge not only ensures maximum runtime but also helps maintain the health of the battery in the long run. Connect the charging cable to the USB port of the power bank module and wait until the indicator shows that charging is complete.
Once the battery is fully charged and everything is secured, your Pocket Glow is ready for its first test.
Step 11: TestingIt’s time to test the Pocket Glow. Start by switching on each button one at a time to make sure both the cool white and warm white LED strips are functioning properly. The alternating arrangement of the strips, combined with the diffuser, creates a soft, balanced, and pleasant glow.
Next, test the brightness under different conditions—indoors, outdoors, and in complete darkness—to see how well the light performs. I also checked the power bank module output to ensure it supplies stable power, and it worked exactly as expected. One of the best features of this module is that, in case of an emergency, it can double as a power bank to charge your smartphone quickly and reliably.
With everything working smoothly, your Pocket Glow is officially ready—a compact, versatile, and stylish lighting companion for camping, outdoor adventures, or even everyday use at home.
Conclusion
The Pocket Glow is more than just a small DIY build—it’s a practical and reliable piece of gear that makes outdoor adventures more enjoyable. With its compact design, balanced dual-color LED lighting, and rechargeable battery, it’s the perfect companion for camping, late-night walks, or simply creating a cozy atmosphere in your backyard. The addition of a diffuser ensures soft, glare-free illumination, making the light comfortable for both utility and relaxation.
The Pocket Glow has created with the same intention—to combine functionality with simplicity, and to offer a handmade tool that makes time spent outside more convenient and enjoyable.
Whether you’re packing for a camping trip or just adding a touch of warmth to your evening outdoors, the Pocket Glow shows how even a small DIY idea can light up big adventures.


_t9PF3orMPd.png?auto=compress%2Cformat&w=40&h=40&fit=fillmax&bg=fff&dpr=2)


Comments