

Hardware components | ||||||
| × | 1 | ||||
 |
| × | 2 | |||
| × | 1 | ||||
| × | 1 | ||||
| × | 1 | ||||
 |
| × | 6 | |||
 |
| × | 6 | |||
| × | 1 | ||||
| × | 1 | ||||
Hand tools and fabrication machines | ||||||
 |
| |||||
 |
| |||||
 |
| |||||
 |
| |||||
 |
| |||||
 |
| |||||
 |
| |||||
 |
| |||||
| ||||||
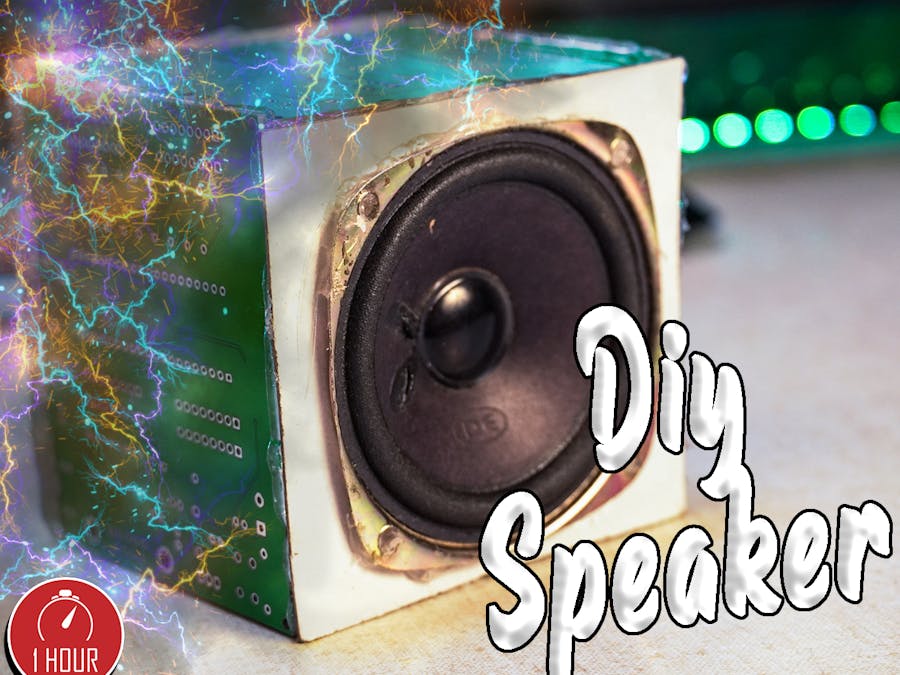
Recently, my friend and I went for a small trip, since it was vacation time for us. During that trip, we realized that none of us had a Bluetooth speaker, which was a huge mood spoiler for us, and it inspired me to make a powerful, compact and really unique speaker for myself, which resonates my love for electronics (since its made out of waste PCBs). So, let’s build this DIY Bluetooth speaker by following up this tutorial post!
Supplies:1. Electronics
- PAM8403 audio amplifier
- 2x 3W 4Ω speaker
- Bluetooth audio receiver
- Li-Ion charging module (TP4056)
- Lithium-ion battery
- Lithium-ion battery holder
- Switch
- Potentiometer knob (Optional)
- 4 x PCBs
2. Tools
- Soldering iron
- Soldering wire
- Hot glue gun
- Wire
3.Misc
- Cardboard
- Scissors
- Scale
- Pencil
- Rounder
- Eraser
- Clear tape
Let's get an overview of connections, which will make the further steps easier to understand and perform!
We need to get the audio signal from bluetooth via smart phone to audio receiver, but these signals are very small and cant be converted into sound wave if directly connected to speaker, so we need amplification which is provided by Class D amplifier with more than 90% efficiency by PAM8053 module, now this amplified signals are sent to right and left speakers via amplifier module, now this entire system is powered by 18650 (lithium-ion battery) which is charged using TP4056 module. To conclude the connections:
Bluetooth Receiver:
Lout to L of amp
Gnd to G of amp
Rout to R of amp
Vcc to + of amp
Gnd to - of amp
TP4056:
B+ to positive of battery
B - to negative of battery
out- to Gnd of Amp
out+ to Vcc of Amp via Switch
Step 3: Prepare the Power Amplifier ModuleIf you are new to soldering or electronics, I recommend you to go through this tutorial first, as it will help you go through the basics of soldering. Next thing, before soldering everything, it's a good idea to tin the connecting tips. (Tinning basically means applying soldering wire on surface of contact using soldering iron to ensure better soldering joint.)
Steps:
- Clean the surface before soldering using rubbing alcohol.
- Tin the tips of contact.
- Cut the wire to length of 60mm.
- Strip ends of wire exposing around 2mm of wire.
- Tin the stripped ends of wire.
- Solder the wire to contact points on amplifier.
We connect receiver and amplifier, so follow these steps.
Steps:
- Clean the contact surface using rubbing alcohol.
- Tin the contact points on Bluetooth receiver.
- Connect Rout of Receiver toR of amplifier.
- Connect Gnd of Receiver to G of amplifier.
- Connect Lout of Receiver to L of amplifier.
- Connect Vcc of Receiver to + of amplifier.
- Connect Gnd of Receiver to - of amplifier.
We are using a lithium-ion battery (18650) to power this system. It needs to be charged, but charging lithium-ion batteries is not as easy as it looks. It requires constant current method to charge efficiently, which can be provided by TP4056 module. Follow these steps to connect the charging module to our battery.
Steps:
- Clean the contact points with rubbing alcohol.
- Tin the solder pads on TP4056 module.
- Tin the wire of battery holder.
- Connect the B+ to positive of battery.
- Connect the B- to negative of battery.
- Connect Out- to the Gnd of receiver.
We need to switch ON or OFF the device when not in use to ideally save power, so we will add a switch in our system. Also, the thing to be noted here is the location of switch. We will connect switch between amplifier and battery, but the battery is always connected to our charging module, this is because one switch will be able to cut the power to circuit and also keep the battery from being used while charging.
Steps:
- Tin the solder pads of switch.
- Connect one end of switch to out+ of TP4056.
- Connect the second end of switch to + of receiver.
Since we are going to use waste PCBs for our build, it wasn't actually built to be an enclosed wall. It has lots of holes, which might invite dust, humidity or any may be become home for insects, so we would use some tape to pack these holes up.
Steps:
- Clean the surface of PCB using a tissue or cloth.
- Cut the tape to length more than PCB.
- Press down the tape properly (overlapping won't hurt).
- Use hot glue gun to join 4 faces of walls.
I only had access to four PCBs, but if you have more PCBs, you should do this step using that material. But since I didn't have more, I used cardboard to make remaining two faces of this cube. Follow these steps to complete this box walls.
Steps:
- Measure the size of wall
- Cut the cardboard face according to that dimension.
- Measure the diameter of speakers.
- Mark the circle using rounder tool.
- Cut the circular slot using blade ( PLEASE BE CAREFUL AND WONT HESITATE TO ASK FOR HELP).
Before we stick everything together, it's time to complete the soldering and then put everything together. Follow these steps and complete the circuit part.
Steps:
- Firstly tin the speaker pads.
- Solder the 4 speaker wires at amplifier side.
- Solder the wires on speaker.
We have to place the switch, volume knob, usb charger module in such a way that it can be accessed, which can be done by making slots for knob, switch and USB port. Follow these steps to complete this enclosure:
Steps:
- Glue the speaker on cardboard face using glue.
- Mark the position of knob on front face.
- Mark the position of switch on front face.
- Mark the position of USB port on front face.
- Cut all these slots using blade ( be careful with blade, don't be afraid to ask for little help).
- Connect all the faces on PCB cube, using hot glue.
To start streaming music on this device, we need to establish a Bluetooth connection between your smartphone and speaker, follow these steps to do so!
Steps:
- Unlock your phone.
- Open settings
- Under wireless and network settings, open bluetooth settings.
- Switch ON bluetooth.
- Search for available nearby devices.
- Since we are using a bluetooth receiver made by "VIRE" brand, device name shows up as "VIRE BT", select this " VIRE BT " device and pair it with your phone.
- Allow access to media for this device.
- Go to any of your favorite music source and stream right away!
For demo, refer this video!
Step 12: Follow Us on Social Media!Say hello to us or tag us if you make similar project, we would love to hear any suggestions/idea too!
Links:
This project is part of 1 hour challenge! If you enjoyed this tutorial or learnt something from it, please vote for it under 1 hour challenge!
Thank you!


Comments