Marcin Saj
Published © GPL3+

Flip-disc 1x3 Display - How to Control via Arduino

The project describes how to build a 1x3 flip-disc display and how to control it via Arduino.

IntermediateProtip1 hour349
Flip-disc 1x3 Display - How to Control via Arduino

Things used in this project

Hardware components

Flip-disc display
×1
Flip-disc Power Supply Module
×1
Arduino UNO
Arduino UNO
×1

Software apps and online services
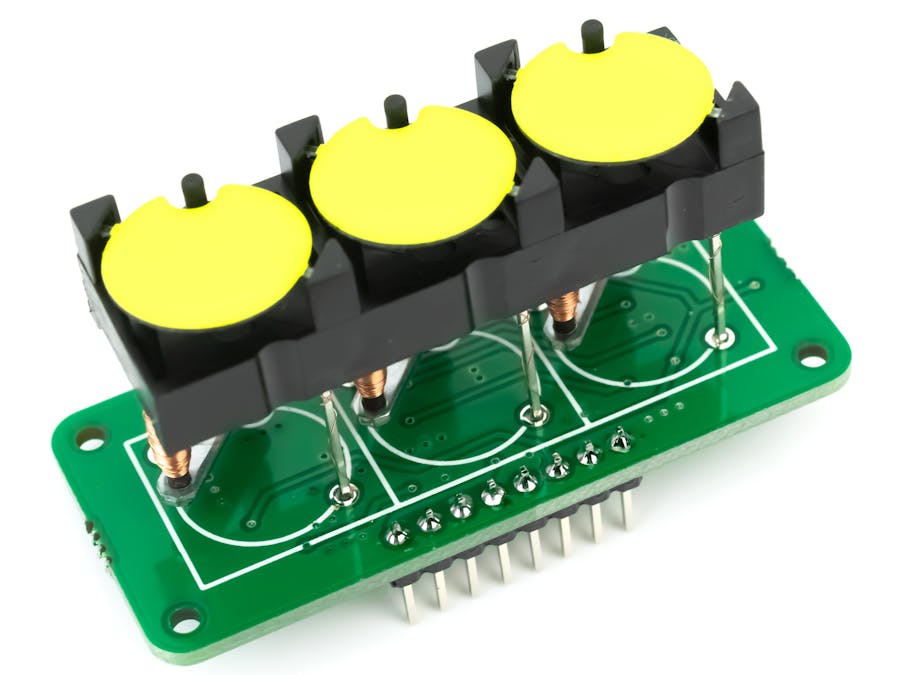
Arduino IDE
Arduino IDE

Story

Read more

Schematics

One Flip-disc 1x3 Display with Arduino - Example Connection 1

Schematic - 1x3 Flip-disc Display

Two Flip-disc 1x3 Displays with Arduino - Example Connection 2

Pinout - 1x3 Flip-disc Display

Dimensions - 1x3 Flip-disc Display

Code

A simple example of controlling one 1x3 flip-disc display

Arduino
/*----------------------------------------------------------------------------------*
 * A simple example of controlling one 1x3 flip-disc display                        *
 * Example connection diagram: https://bit.ly/1x1x3-ARD                             *
 *                                                                                  *
 * Project website: https://bit.ly/1x3-FD                                           *
 * Marcin Saj 30 Jan 2023                                                           *
 * https://www.Flipo.io                                                             *
 *                                                                                  *
 * Arduino board with a power module or dedicated controller is required to operate *
 * the displays:                                                                    *
 * 1. Arduino board + Pulse Shaper Power Supply - https://bit.ly/PSPS-FD            *
 * 2. Or dedicated controller - https://bit.ly/AC1-FD                               *
 *----------------------------------------------------------------------------------*/

/* The library <FlipDisc.h> uses SPI to control flip-disc displays. 
The user must remember to connect the display inputs marked: 
- DIN - data in - to the MOSI (SPI) output of the microcontroller, 
- CLK - clock - input of the display to the SCK (SPI).
The displays are connected in series through the built-in connectors, 
only the first display from the left is connected to the Arduino or a dedicated controller.
 
It is very important to connect and declare EN, CH, PL pins. 
The declaration of DIN (MOSI) and CLK (SCK) is not necessary, 
because the SPI.h library handles the SPI hardware pins. */

#include <FlipDisc.h>   // https://github.com/marcinsaj/FlipDisc 

// Pin declaration for Arduino Uno and PSPS module
#define EN_PIN  10      // Start & End SPI transfer data
#define CH_PIN  8       // Charging PSPS module - turn ON/OFF
#define PL_PIN  9       // Release the current pulse - turn ON/OFF

/*
// Pin declaration for a dedicated controller
#define EN_PIN  A7
#define CH_PIN  A2 
#define PL_PIN  A3
*/

void setup() 
{
  /* Flip.Pin(); it is the most important function and first to call before everything else. 
  The function is used to declare pin functions. Before starting the device, double check 
  that the declarations and connection are correct. If the connection of the control outputs 
  is incorrect, the display may be physically damaged. */
  Flip.Pin(EN_PIN, CH_PIN, PL_PIN);
  
  /* Flip.Init(display1, display2, ... display8); it is the second most important function. 
  Initialization function for a series of displays. Up to 8 displays can be connected in series 
  in any configuration. The function also prepares SPI. Correct initialization requires 
  code names of the serially connected displays:
  - D7SEG - 7-segment display
  - D2X1 - 2x1 display
  - D3X1 - 3x1 display
  - D1X3 - 1x3 display
  - D1X7 - 1x7 display 
  Example for two D1X3 displays: Flip.Init(D1X3, D1X3); */
  Flip.Init(D1X3);
  delay(3000);
}

void loop() 
{
  /* The function is used to turn off (clear) all displays */
  Flip.Clear();
  delay(1000);
  
  /* The function is used to turn on (set) all discs of all displays */
  Flip.All();
  delay(1000);

  Flip.Clear();
  delay(3000);

  /* The function allows you to control up to three discs of the selected display. 
  Flip.Display_1x3(module_number, disc1,disc2,disc3);
  The first argument is the relative number "module_number" of the display in the series 
  of all displays. For example, if we have a combination of D1X3, D7SEG, D1X3, 
  then the second D1X3 display will have a relative number of 2 even though 
  there is a D7SEG display between the D1X3 displays.
  - module_number - relative number of the D1X3 display
  - disc1, disc2, disc3 - counting from left to right 1-3 */
  /* Set all discs */
  Flip.Display_1x3(1,1,1,1);
  delay(1000);
  /* Reset first disc */
  Flip.Display_1x3(1,0);
  delay(1000);
  /* Set first disc and reset second */
  Flip.Display_1x3(1,1,0);
  delay(1000);
  /* Reset all discs */
  Flip.Display_1x3(1,0,0,0);
  delay(3000);

  Flip.All();
  delay(1000);

  /* Function allows you to control a selected disc in a selected D1X3 display.
  You can control only one disc of the selected display at a time.
  Flip.Disc_1x3(module_number, disc_number, disc_status);
  The first argument module_number is the relative number of the display 
  in the series of all displays. For example, if we have a combination of 
  D1X3, D7SEG, D1X3, then the second D1X3 display will have a relative number of 2 
  even though there is a D7SEG display between the D1X3 displays.
  - module_number - relative number of the D1X3 display
  - disc_number - display disc number counting from left to right 1-3
  - disc_status - reset disc "0" or set disc "1" */
 
  /* Reset selected discs of the first D1X3 display counting from the left */
  Flip.Disc_1x3(1, 1, 0);
  delay(1000);
  Flip.Disc_1x3(1, 2, 0);
  delay(1000);
  Flip.Disc_1x3(1, 3, 0);
  delay(1000);

  /* Set selected discs */
  Flip.Disc_1x3(1, 1, 1);
  delay(1000);
  Flip.Disc_1x3(1, 3, 1);
  delay(3000);
  
  Flip.Clear();
  delay(1000);
}

A simple example of controlling two 1x3 flip-disc displays

Arduino
/*----------------------------------------------------------------------------------*
 * A simple example of controlling one 1x3 flip-disc display                        *
 * Example connection diagram: https://bit.ly/2x1x3-ARD                             *
 *                                                                                  *
 * Project website: https://bit.ly/1x3-FD                                           *
 * Marcin Saj 30 Jan 2023                                                           *
 * https://www.Flipo.io                                                             *
 *                                                                                  *
 * Arduino board with a power module or dedicated controller is required to operate *
 * the display:                                                                     *
 * 1. Arduino board + Pulse Shaper Power Supply - https://bit.ly/PSPS-FD            *
 * 2. Or dedicated controller - https://bit.ly/AC1-FD                               *
 *----------------------------------------------------------------------------------*/

/* The library <FlipDisc.h> uses SPI to control flip-disc displays. 
The user must remember to connect the display inputs marked: 
- DIN - data in - to the MOSI (SPI) output of the microcontroller, 
- CLK - clock - input of the display to the SCK (SPI).
The displays are connected in series through the built-in connectors, 
only the first display from the left is connected to the Arduino or a dedicated controller.
 
It is very important to connect and declare EN, CH, PL pins. 
The declaration of DIN (MOSI) and CLK (SCK) is not necessary, 
because the SPI.h library handles the SPI hardware pins. */

#include <FlipDisc.h>   // https://github.com/marcinsaj/FlipDisc 

// Pin declaration for Arduino Uno and PSPS module
#define EN_PIN  10      // Start & End SPI transfer data
#define CH_PIN  8       // Charging PSPS module - turn ON/OFF
#define PL_PIN  9       // Release the current pulse - turn ON/OFF

/*
// Pin declaration for a dedicated controller
#define EN_PIN  A7
#define CH_PIN  A2 
#define PL_PIN  A3
*/

void setup() 
{
  /* Flip.Pin(); it is the most important function and first to call before everything else. 
  The function is used to declare pin functions. Before starting the device, double check 
  that the declarations and connection are correct. If the connection of the control outputs 
  is incorrect, the display may be physically damaged. */
  Flip.Pin(EN_PIN, CH_PIN, PL_PIN);
  
  /* Flip.Init(display1, display2, ... display8); it is the second most important function. 
  Initialization function for a series of displays. Up to 8 displays can be connected in series 
  in any configuration. The function also prepares SPI. Correct initialization requires 
  code names of the serially connected displays:
  - D7SEG - 7-segment display
  - D2X1 - 2x1 display
  - D3X1 - 3x1 display
  - D1X3 - 1x3 display
  - D1X7 - 1x7 display */
  Flip.Init(D1X3, D1X3);
  delay(3000);
}

void loop() 
{
  /* The function is used to turn off (clear) all displays */
  Flip.Clear();
  delay(1000);
  
  /* The function is used to turn on (set) all discs of all displays */
  Flip.All();
  delay(1000);

  Flip.Clear();
  delay(3000);

  /* The function allows you to control up to three discs of the selected display. 
  Flip.Display_1x3(module_number, disc1,disc2,disc3);
  The first argument is the relative number "module_number" of the display in the series 
  of all displays. For example, if we have a combination of D1X3, D7SEG, D1X3, 
  then the second D1X3 display will have a relative number of 2 even though 
  there is a D7SEG display between the D1X3 displays.
  - module_number - relative number of the D1X3 display
  - disc1, disc2, disc3 - counting from left to right 1-3 */
  /* Set all discs of first display */
  Flip.Display_1x3(1,1,1,1);
  /* Set all discs of second display */
  Flip.Display_1x3(2,1,1,1);
  delay(1000);
  /* Reset first disc */
  Flip.Display_1x3(1,0);
  Flip.Display_1x3(2,0);
  delay(1000);
  /* Set first disc and reset second */
  Flip.Display_1x3(1,1,0);
  Flip.Display_1x3(2,1,0);
  delay(1000);
  /* Reset all discs */
  Flip.Display_1x3(1,0,0,0);
  Flip.Display_1x3(2,0,0,0);
  delay(3000);

  Flip.All();
  delay(1000);

  /* Function allows you to control a selected disc in a selected D1X3 display.
  You can control only one disc of the selected display at a time.
  Flip.Disc_1x3(module_number, disc_number, disc_status);
  The first argument module_number is the relative number of the display 
  in the series of all displays. For example, if we have a combination of 
  D1X3, D7SEG, D1X3, then the second D1X3 display will have a relative number of 2 
  even though there is a D7SEG display between the D1X3 displays.
  - module_number - relative number of the D1X3 display
  - disc_number - display disc number counting from left to right 1-3
  - disc_status - reset disc "0" or set disc "1" */
  
  /* Reset selected discs of the first D1X3 display counting from the left */
  Flip.Disc_1x3(1, 1, 0);
  /* Reset selected discs of the second D1X3 display counting from the left */
  Flip.Disc_1x3(2, 3, 0);
  delay(1000);
  
  Flip.Disc_1x3(1, 2, 0);
  Flip.Disc_1x3(2, 2, 0);  
  delay(1000);
  Flip.Disc_1x3(1, 3, 0);
  Flip.Disc_1x3(2, 1, 0);  
  delay(1000);

  /* Set selected discs */
  Flip.Disc_1x3(1, 1, 1);
  Flip.Disc_1x3(2, 3, 1);  
  delay(1000);
  Flip.Disc_1x3(1, 3, 1);
  Flip.Disc_1x3(2, 1, 1); 
  delay(3000);
  
  Flip.Clear();
  delay(1000);
}

Arduino Example Codes for 1x3 Flip-disc Displays

Credits

Marcin Saj

Marcin Saj

27 projects • 29 followers
I am currently involved in the development of the Flipo.io and NixieTester.com project.

Comments