


Hardware components | ||||||
 |
| × | 1 | |||
Software apps and online services | ||||||
 |
| |||||
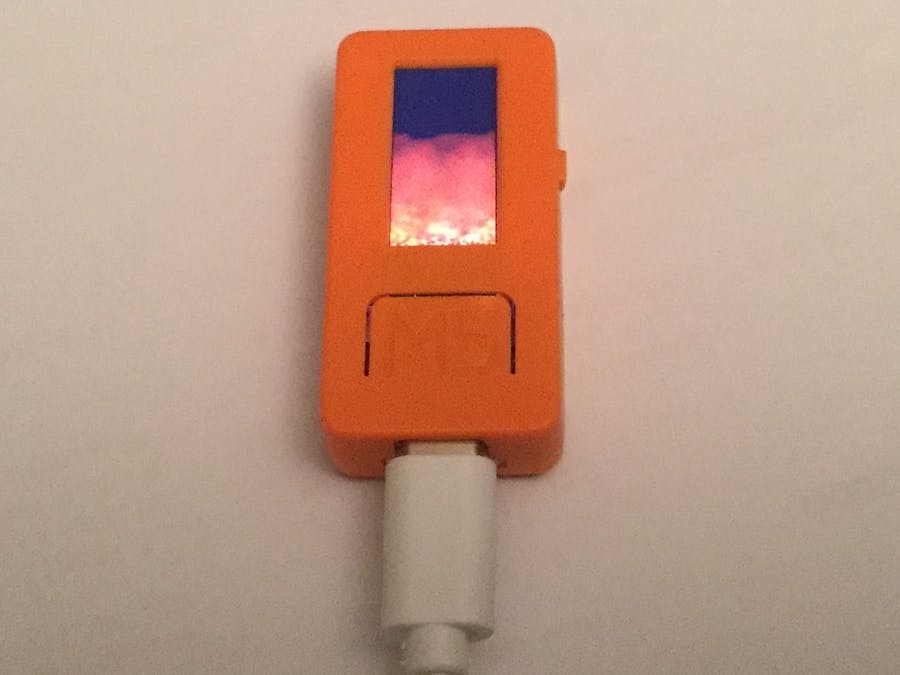
Re-living my Amiga programming days!
Found this website: https://lodev.org/cgtutor/fire.html and decided to adapt the code for the M5StickC.
May do a re-write to show in landscape.
Play with the numbers in the algorithm for different effects, but ensure that the second number is just over four times greater than the first (128 and 513 is nice)
// Simple M5StickC oldschool flame effect
// All credit to Lode Vandevenne https://lodev.org/ whose code I have adapted for the M5StickC


#include <M5StickC.h>

const int screenWidth = 80;
const int screenHeight = 160;
int colour[128]; // Array to hold the colour palette
int fire[screenHeight][screenWidth]; //Array to hold the screen buffer

void setup() {
  // put your setup code here, to run once:
  M5.begin();

  // This for loop creates a black -> red then red -> yellow colour palette
  for (int i = 0; i < 128; i++) {
    if (i < 64) {
      colour[i] = (int(i/2) * 0x800);
    }
    else {
      colour[i] = 0xf800 + ((i - 64) * 0x20);
    }
  }

  // Clear the screen buffer

  for (int y = 0; y < screenHeight; y++) {
    for (int x = 0; x < screenWidth; x++) {
        fire[y][x] = 0;
    }
  }
}

void loop() {
  // put your main code here, to run repeatedly:

  // Randomise the bottom line of the screen buffer

  for (int x = 0; x < screenWidth; x++) {
    fire[screenHeight - 1][x] = (64 + random(64));
  }

  // Calculate the flame algorithm from the top down

  for (int y =0; y < (screenHeight - 1); y++) {
    for (int x = 0; x < screenWidth; x++) {
      fire[y][x] =
      ((fire[(y + 1) % screenHeight][(x - 1) % screenWidth]
      + fire[(y + 1) % screenHeight][(x) % screenWidth]
      + fire[(y + 1) % screenHeight][(x + 1) % screenWidth]
      + fire[(y + 2) % screenHeight][(x) % screenWidth])
      * 64) / 257; // play with these values for different effects, second number must be just over 4 x the first
    }
  }

  // Update the screen

  for (int y =0; y < screenHeight; y++) {
    for (int x = 0; x < screenWidth; x++) {
      M5.Lcd.drawPixel(x, y, colour[(fire[y][x])]);
    }
  }
}
// Simple M5Stack oldschool flame effect
// All credit to Lode Vandevenne https://lodev.org/ whose code I have adapted for the M5Stack


#include <M5Stack.h>
// Only using every other pixel due to speed and memory use
const int screenWidth = 160;
const int screenHeight = 120;
int colour[96]; // Array to hold the colour palette
int fire[screenHeight][screenWidth]; //Array to hold the screen buffer

void setup() {
  // put your setup code here, to run once:
  M5.begin();

  // This for loop creates a black -> red then red -> yellow colour palette
  for (int i = 0; i < 96; i++) {
    if (i < 32) {
      colour[i] = (i * 0x800);
    }
    else {
      colour[i] = 0xf800 + ((i - 32) * 0x20);
    }
  }

  // Clear the screen buffer

  for (int y = 0; y < screenHeight; y++) {
    for (int x = 0; x < screenWidth; x++) {
        fire[y][x] = 0;
    }
  }
}

void loop() {
  // put your main code here, to run repeatedly:

  // Randomise the bottom line of the screen buffer

  for (int x = 0; x < screenWidth; x++) {
    fire[screenHeight - 1][x] = (32 + random(64));
  }

  // Calculate the flame algorithm from the top down

  for (int y =0; y < (screenHeight - 1); y++) {
    for (int x = 0; x < screenWidth; x++) {
      fire[y][x] =
      ((fire[(y + 1) % screenHeight][(x - 1) % screenWidth]
      + fire[(y + 1) % screenHeight][(x) % screenWidth]
      + fire[(y + 1) % screenHeight][(x + 1) % screenWidth]
      + fire[(y + 2) % screenHeight][(x) % screenWidth])
      * 64) / 257 ; // play with these values for different effects, second number must be just over 4 x the first
    }
  }

  // Update the screen

  for (int y =0; y < screenHeight; y++) {
    for (int x = 0; x < screenWidth; x++) {
      M5.Lcd.drawPixel(2*x, 2*y, colour[(fire[y][x])]);
    }
  }
}


Comments