


Hardware components | ||||||
 |
| × | 1 | |||
 |
| × | 1 | |||
 |
| × | 2 | |||
 |
| × | 1 | |||
 |
| × | 1 | |||
 |
| × | 1 | |||
| × | 1 | ||||
 |
| × | 1 | |||
 |
| × | 1 | |||
Software apps and online services | ||||||
| ||||||
 |
| |||||
| ||||||
 |
| |||||
This system controls the turning ON, OFF and brightness of led by our own device and also works as a fire alarm. The turning ON/OFF can be also handled by a push button switch. The system can be used in our houses and offices. It will also give a message when it detects fire and when someone switches on the light by the switch through the Twilio messaging service.
This project “Home Automation with Fire Alarm” has primarily three functionalities.
· To turn ON and OFF the LED by our own device.
· To alter the brightness of the led by our own device.
· Acts as a fire alarm.
The above first two functions are controlled using the user interface designed in the Bolt Android App. Initially, when the user interface is loaded there are two buttons ON and OFF. When we click on the ON button, the LED glows and a slider appears by which we can adjust the brightness of the LED. When we click on the OFF button, the LED stops glowing and the slider of adjusting the brightness disappears. The LED can also be turned ON and OFF by a push button switch. It can be used for privacy or security purpose that when we turn ON the LED by a push button switch it sends a message to the user “Someone switched ON the light”. This can help us to know who has switched ON the light of our rooms or cabins when we are not present.
This also includes a temperature monitoring sensor which acts as a fire alarm. In this when the temperatures rises in case of fire, the buzzer starts ringing and the Led glows and it sends a message to my mobile phone about the fire and the current temperature i.e. “FIRE !!! FIRE !!! The current temperature in degree Celsius is ---”
This project can help us in our homes and offices so that we can control the light of our rooms and cabins and if someone turns ON the light of our room or cabin in our absence, we can be informed. And in case of fire detection, the buzzer rings and if someone is listening to loud music and unable to listen to the buzzer, the glowing LED can help them as a signal or an indicator and it also informs the owner about the fire detection.
2. DemonstrationAlert Notifications :
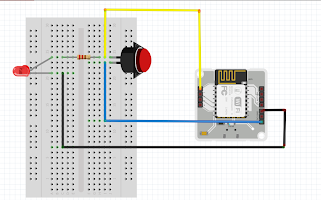
Step 1: Take one leg of the resistor and wrap it around the longer leg of the led i.e. positive leg or attach the longer leg and one leg of resistor to the same column of breadboard.
Step 2: Attach the shorter leg of the led i.e. the negative led in the breadboard to the ground (GND) pin of bolt with the help of jumper wires (male to male).
Step 3: Now connect another leg of the resistor to the digital pin 1 of the Bolt with the help of jumper wire.
Step 4: Take one pin of push button switch to the digital pin 1 and 4 of the Bolt (digital pin 1 for controlling the led from the bolt cloud and digital pin 4 for alert through the message from Twilio so that message will only generate on pressing the push button switch)
Step 5: Connect another pin of the push button switch to +5V pin of Bolt module through jumper wire.
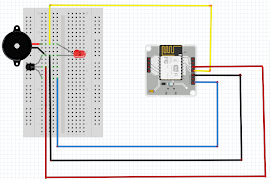
A LM35 temperature sensor is connected to the bolt module. It has three pins: VCC, Output and GND.
Step 1: The VCC pin connects to 5V of Bolt Wifi Module.
Step 2:The output pin is connected to the analog pin (A0) of the module.
Step 3: The GND pin is connected to the ground pin of Bolt Wifi Module.
Step 4: Also a LED and a buzzer connected to the Bolt Wifi Module. The LED’s anode is connected along with the buzzer’s anode to pin 0 of the module.
When the device detects the fire or high temperature, the pin 0 will be set to HIGH so that both the LED and the buzzer is switched on, raising an alarm.
Twilio is a third-party SMS functionality provider. It is a cloud communications platform as a service (PaaS) company. Twilio allows software developers to programmatically make and receive phone calls and also send and receive text messages using its web service APIs.
Step 1: Visit twilio.com and create a free trial account.
Step 2: Verify your email id and your phone number.
Step 3: Go to the dashboard and click Get a Trial Number.
Step 4: Now you can find that Twilio would have assigned you a number.
Bolt cloud is a server which lets you communicate with your Bolt WiFi module over the internet. It offers features like receiving and storing the data collected by Bolt Modules, Storing the data, Analysing it via Data visualisation and Machine Learning as well as it lets your program your Bolt modules.
Step 1: Visit cloud.boltiot.com and create an account in the Bolt Cloud.
Step 2: Set up and link the microcontroller module to the Bolt Cloud.
Step 3: Create the product and link the product with the device on the cloud.
The User Interface is designed using html and implemented using the Bolt Android app. The linking of the UI with the Bolt module is done using the JavaScript function digitalWrite() and analogWrite().The html code is as follows:
<!DOCTYPE html>
<html>
<head>
<title>HOME AUTOMATION</title>
<meta charset="utf-8">
<meta name="viewport" content="width=device-width, initial-scale=1.0">
<script type="text/javascript" src="https://cloud.boltiot.com/static/js/boltCommands.js"></script>
<script>
setKey('{{ApiKey}}','{{Name}}');

/* For appearing and disappearing of the slider for adjusting the brightness of LED */
function Show() {
let x = document.getElementById("Power");
x.style.display = "block";
}
function Hide() {
let x = document.getElementById("Power");
x.style.display = "none";
}
</script>

/* CSS PART OF THE ELEMENTS */

<style>
body, html {
height: 100%;
margin: 0;
}
.bg {
/* Full height */
height: 100%;
/* Center and scale the image nicely */
background-position: center;
background-repeat: no-repeat;
background-size: cover;
}
.button0 {
border: none;
color: white;
text-align: center;
text-decoration: none;
display: inline-block;
font-size: 32px;
margin: 4px 2px;
cursor: pointer;
}
.button1 {background-color: #4CAF50;
padding: 50px 50px;
width: 50%;
}
.button2 {background-color: #f44336;
padding: 50px 50px;
width: 50%;
}
.div{
height: 100px;
}
.div1{height: 40px;}
.slidecontainer {
width: 100%;
}
.slider {
-webkit-appearance: none;
width: 50%;
height: 15px;
border-radius: 5px;
background: #FDEBD0;
outline: none;
opacity: 0.7;
-webkit-transition: .2s;
transition: opacity .2s;
}
.slider:hover {
opacity: 1;
}
.slider::-webkit-slider-thumb {
-webkit-appearance: none;
appearance: none;
width: 25px;
height: 25px;
border-radius: 50%;
background: #FF8C00;
cursor: pointer;
}
.slider::-moz-range-thumb {
width: 25px;
height: 25px;
border-radius: 50%;
background: #FF8C00;
cursor: pointer;
}
</style>
</head>


<body bgcolor="#000000" text="#ffffff"  onload="Hide()">
<center>
<div class="div1"></div>
<div class="div">
<button class="button0 button1" onclick="Show(); digitalWrite(1, 'HIGH');"><b>ON</b></button>
</div>
<div class="div1"></div>
<center>
<div id="Power"  class="div slidecontainer">
<h1> <font color="">BRIGHTNESS </font></h1>
<input type="range" min="1" max="255" value="200" onchange="analogWrite(1,this.value);" class="slider" id="myRange">
<p>Value: <span id="demo"></span></p>
<script>
var slider = document.getElementById("myRange");
var output = document.getElementById("demo");
output.innerHTML = slider.value;
slider.oninput = function() {
output.innerHTML = this.value;
}
</script>
</div>
</center>
<div class="div1"></div>
<div class="div1"></div>
<div class="div">
<button class="button0 button2" onclick="Hide(); digitalWrite(1, 'LOW');"><b>OFF</b></button>
</div>
</center>
</body>
</html>
The User Interface designed is as below:
- When the Led is OFF. It shows only two buttons.
- When the Led is ON, it shows the slider to adjust the brightness otherwise not.
The python coding for this project has been done in Ubuntu (Linux). Before we start coding, we need to make a configuration file which will have the specific keys for each user/device. We will import this file in our main code and use the various attributes. The advantage of this is that each user will only have to change the contents the configuration file to use the product.
The following is the configuration file (named as conf.py):
SID = 'XXXXXX'                  # SID in Twilio Dashboard
AUTH_TOKEN = 'XXXXXX'           # on Twilio Dashboard
FROM_NUMBER = 'XXXXXXXXXXXX'  #This is the no. generated by Twilio on Twilio Dashboard
TO_NUMBER = 'XXXXXXXXXXXXXX'  # your number with +91 in beginning
API_KEY = 'XXXXXXXX'         #Bolt Cloud accout API key
DEVICE_ID = 'BOLTXXXXXXX' # Bolt device ID- Section 3.3 explains how to get the above credentials from the twilio dashboard.
- Section 3.4 explains how to get the DEVICE_ID from the Bolt Cloud.
- Go to the API section to know the API KEY on Bolt Cloud.
import conf
from boltiot import Sms, Bolt
import json, time
import threading
maximum_limit = 50
on = 1
mybolt = Bolt(conf.API_KEY, conf.DEVICE_ID)
sms = Sms(conf.SID, conf.AUTH_TOKEN, conf.TO_NUMBER, conf.FROM_NUMBER)
def fire_alarm():
while True:
print("Reading Sensor Value")
response = mybolt.analogRead('A0')
data = json.loads(response)
print("Sensor Value is : " + str(data['value']))
try:
sensor_value = int(data['value'])
temp = (100 * sensor_value)/1024
print(temp)
if temp > maximum_limit:
mybolt.digitalWrite('0','HIGH')
print("Making request to Twilio to send a SMS")
response = sms.send_sms("FIRE !!! FIRE !!! The Current Temperature Sensor value in degree celcius is " + str(temp))
print("Response received from Twilio is " + str(response))
print("Status of SMS at Twilio is " + str(response.status))
else:
mybolt.digitalWrite('0', 'LOW')
except Exception as e:
print("Error occured : Below are the details ")
print(e)
time.sleep(10)
def home_light():
while True:
response1 = mybolt.digitalRead('4')
data1 = json.loads(response1)
print("Status is " + str(data1['value']))
try:
status = int(data1['value'])
if status == on:
response1 = sms.send_sms("Someone switched ON the light")
except Exception as e:
print("Error occured : Below are the details")
print(e)
time.sleep(10)
t1 = threading.Thread(target=fire_alarm)
t1.start()
t2 = threading.Thread(target=home_light)
t2.start()import conf
- In the code, we first have to import our conf file which has all the credentials. The python json, time and threading libraries are also imported in the same line. Since we have saved our conf file with the.py extension, we can directly import it.
import json, time
import threading
- json is a python library used for handling all operations on JSON objects. JSON is nothing but a data communication format widely used on the Internet for sending/receiving data between a client and server. 'json' is the python library used for handling JSON objects and JSON is a data communication format.
- The threading module provides a very simple way to execute multiple threads in a program.
from boltiot import Sms, Bolt
- In the above line, we are importing two objects. First one is Sms which will be used to send SMS alerts and the other one is Bolt which is used for accessing data from your Bolt device like the temperature reading.
maximum_limit = 50
on = 1
- Now initialize the two variables which will store the maximum threshold value and the status of the led which is turned on by the push button switch.
- This would send an alert if the temperature reading goes above the maximum limit or if the push button switch is pressed.
mybolt = Bolt(conf.API_KEY, conf.DEVICE_ID)
- Now to fetch the data from Bolt Cloud, we will create an object called 'mybolt' using which you can access the data on your Bolt. For the Bolt Cloud to identify your device, you will need to provide the API key and the Device ID when creating the mybolt object. Since the conf file holds the API key and Device ID variables, we can use it as mentioned above.
sms = Sms(conf.SID, conf.AUTH_TOKEN, conf.TO_NUMBER, conf.FROM_NUMBER)
- Now to send an SMS, we will create an object of the same and use the contents of configuration file like above.
def fire_alarm():
- This declares the definition of the function of fire alarm.
while True:
- For the execution of the function fire_alarm() in a loop.
print("Reading Sensor Value")
response = mybolt.analogRead('A0')
data = json.loads(response)
print("Sensor Value is : " + str(data['value']))
- The code continuously fetches the temperature value using analogRead function. Since the sensor is connected to A0 pin of Bolt, we will execute the analogRead() on the A0 pin of Bolt.
- The response from the Bolt Cloud using the analogRead() function is in a JSON format, so we will need to load the JSON data sent by the cloud using Python's json library.
try:
- There is try-except block to handle any error that may occur in the code.
sensor_value = int(data['value'])
- The temperature value is inside a field labelled as "value" in the response. We can access the JSON values using the statement `sensor_value = int(data['value'])`. This line also converts the sensor reading to integer data type for comparing the temperature range.
temp = (100 * sensor_value)/1024
print(temp)
- Convert the sensor value to the temperature in degree Celcius and store it in the temp variable and print it.
if temp > maximum_limit:
- If the above reading is more than the maximum limit then the sms will be sent and the buzzer will ring and the LED will glow.
mybolt.digitalWrite('0','HIGH')
- This line make the buzzer rings and LED glows.Since the sensor is connected to 0 pin of Bolt, we will execute the digitalWrite() on the 0 pin of Bolt.
print("Making request to Twilio to send a SMS")
response = sms.send_sms("FIRE !!! FIRE !!! The Current Temperature Sensor value in degree celcius is " + str(temp))
- The response from Twilio will be stored in the response variable.
print("Response received from Twilio is " + str(response))
print("Status of SMS at Twilio is " + str(response.status))
- It will print the response and and the response status.
else:
mybolt.digitalWrite('0', 'LOW')
- If the condition is not true then the buzzer will not ring and LED will not glow. Since the sensor is connected to 0 pin of Bolt, we will execute the digitalWrite() on the 0 pin of Bolt.
except Exception as e:
print("Error occured : Below are the details ")
print(e)
- This will print the error that may occur in the code.
time.sleep(10)
- Once the temperature reading has been sent, we will need to wait for 10 seconds to get the next reading. For this, we will put the program to sleep once every loop iteration.
- The statement `time.sleep(10)` puts the program execution on hold for 10 seconds. This means that the program would not execute for a period of 10 seconds.
def home_light():
while True:
response1 = mybolt.digitalRead('4')
data1 = json.loads(response1)
print("Status is " + str(data1['value']))
try:
status = int(data1['value'])
if status == on:
response1 = sms.send_sms("Someone switched ON the light")
except Exception as e:
print("Error occured : Below are the details")
print(e)
time.sleep(10)
- The Code for the home_light() function is as same as the fire_alarm function as it is connected to the digital pin 4 of the Bolt and the response is stored to the response1 variable.
- If the status is 1 i.e. the response is high, it sends the message otherwise not.
- Once the reading has been sent we have to wait for another 10 seconds for the next reading.
t1 = threading.Thread(target=fire_alarm)
- t1 is a thread which targets at the fire_alarm function.
t1.start()
- start() function is used to run the thread.
t2 = threading.Thread(target=home_light)
t2.start()
- It is same as thread t1.
- When the push button switch is pressed and the status became 1.
- Execution of the function fire_alarm()
- When the Led is controlled by the User Interface on the Bolt Android App.


Comments